SSM整合最新版,spring4.2,springmvc4.2,mybatis3.2整合
**目前网站开发常使用的三层框架体系结构:
ssh和ssm即(spring,struts2,hibernate)和(spring,springmvc,mybatis),但是目前使用较多的是ssm,可能是由于struts2的严重漏洞导致大家对于ssh框架失去了信心,
Struts2 官方对于安全问题的处理让人担忧,竟然会直接演示攻击方法,多少个站长彻夜将自己的网站升级,然而 Hibernate 我估计是很多掌握不了其内部的逻辑,瞬时态,持久态,托管态,延时加载,事务边界,在加上对于SQL调优的不利因素,所以也渐渐的不流行
而spring自家的springmvc无需第三方类库支持,可以实现无缝连接,配合mybatis完全可以满足大部分企业对于网站开发的要求,而且性能也很不错,学习成本也较低
,但是两者都有其是使用场景,并不能说谁取代谁,就目前来看,ssm略占上风,但是ssh在校园开发,小型企业开发中使用较多,建议稍微了解一下,会使用就好,ssh和ssm的学习可以参照我的csdn文章学习**
整合第一步导入jar包
jar包包含:c3p0数据库连接池
aop联盟
spring和springmvc
以及mybatis和spring-mybatis整合包
二级缓存包
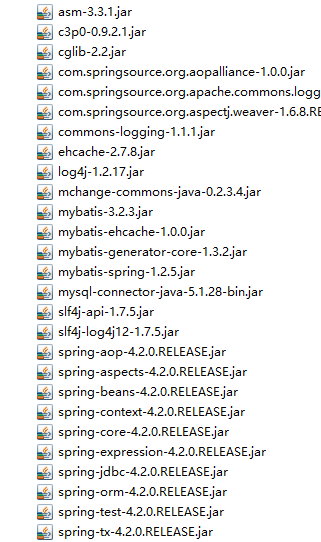
第二步dao开发:逆向工程自动生成mapper和实体类:
2.1数据库,关系,测试数据,用户自己添加:
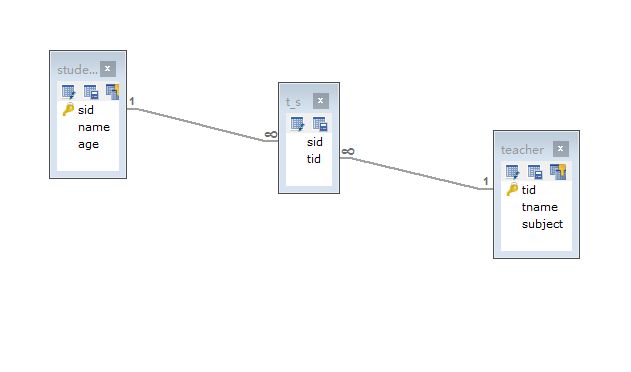
2.2,逆向工程的使用教程地址:
http://blog.csdn.net/do_bset_yourself/article/details/51276517
生成结构如下:
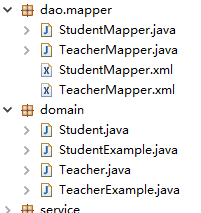
第三步service开发,这里只做测试,service没有实际意义:
package com.leige.service;

import com.leige.domain.Student;

public interface StudentService {
    //根据id查找学生
    public Student selectStudent(Integer id);
}
第四步:spring mvc的controler开发
package com.leige.controler;
import javax.servlet.http.HttpServletRequest;
import javax.servlet.http.HttpServletResponse;

import org.springframework.beans.factory.annotation.Autowired;
import org.springframework.stereotype.Controller;
import org.springframework.web.bind.annotation.RequestMapping;
import org.springframework.web.servlet.ModelAndView;

import com.leige.domain.Student;
import com.leige.service.StudentService;


/** * @author 都市桃源 * springmvc写controler,实现Controler接口 * */
@Controller
@RequestMapping("/student")
public class StudentControler implements org.springframework.web.servlet.mvc.Controller{
    @Autowired
    private StudentService studentService;
    @RequestMapping("/search.action")
    public ModelAndView handleRequest(HttpServletRequest request,
            HttpServletResponse response) throws Exception {
        //获取参数值
        Integer sid=Integer.valueOf(request.getParameter("sid"));
        //调用业务层,查找
         Student stu=studentService.selectStudent(sid);
         ModelAndView modelAndView=new ModelAndView();
         //设置错误信息
         if(stu!=null){
         modelAndView.addObject("student",stu);
         }else{
             modelAndView.addObject("msg","查询不到,sorry");
         }
         //返回消息页面
         modelAndView.setViewName("index");
         return modelAndView;
    }


}
第五步:view开发,制作简单显示
  <body>
<h1>
<!-- 显示错误信息 -->
${msg}
</h1>

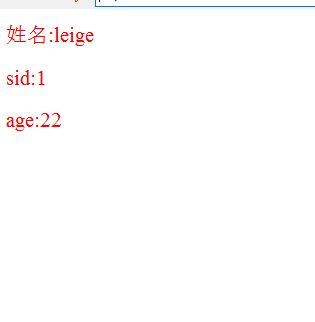
<p style="color: red;">姓名:${student.name}</p>
<p style="color: red;">sid:${student.sid}</p>
<p style="color: red;">age:${student.age}</p>

  </body>
第六步,各个层次整合开发,配置文件处理
**配置文件在项目路径下新建一个sourcefolder,也是在classpath下,里面放置各种配置文件:
如下:**
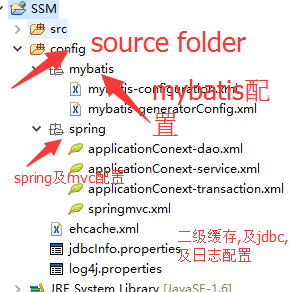
6.1.web.xml中配置spring的监听器,加载spring配置文件,配置springmvc的前端控制器,处理用户请求
<?xml version="1.0" encoding="UTF-8"?>
<web-app version="3.0" xmlns="http://java.sun.com/xml/ns/javaee" xmlns:xsi="http://www.w3.org/2001/XMLSchema-instance" xsi:schemaLocation="http://java.sun.com/xml/ns/javaee http://java.sun.com/xml/ns/javaee/web-app_3_0.xsd">


<!-- 与springmvc整合配配置springmvc的前端控制器 -->
    <servlet>
    <servlet-name>springmvc</servlet-name>
    <servlet-class>org.springframework.web.servlet.DispatcherServlet</servlet-class>
<!-- 初始参数 -->
    <init-param>
    <param-name>contextConfigLocation</param-name>
    <param-value>classpath:spring/springmvc.xml</param-value>
    </init-param>


    </servlet>
    <servlet-mapping>
    <servlet-name>springmvc</servlet-name>
    <url-pattern>*.action</url-pattern>
    </servlet-mapping>


    <!-- 与spring整合配置spring的监听器 -->
    <context-param>
    <!-- 初始化参数,加载spring容器配置 , 这里建议将service,dao,transaction的配置分开,这样可以增加程序的可读性, 建议不要使用include,避免后期维护配置文件麻烦 -->
        <param-name>contextConfigLocation</param-name>
    <!-- spring/applicationConext-dao.xml -->
        <param-value>classpath:spring/applicationConext-*.xml</param-value>
    </context-param>
  <listener>
<!-- 配置spring的监听器,这样可以是服务器已启动就加载spring的配置文件 -->
  <description>spring 中加载配置文件的监听器</description>
  <listener-class>org.springframework.web.context.ContextLoaderListener</listener-class>

  </listener>


  <display-name>SSM</display-name>
  <welcome-file-list>
    <welcome-file>index.jsp</welcome-file>
  </welcome-file-list>
</web-app>
6.2.springmvc配置,详细解释都在配置文件中:springmvc.xml
<beans xmlns="http://www.springframework.org/schema/beans" xmlns:xsi="http://www.w3.org/2001/XMLSchema-instance" xmlns:mvc="http://www.springframework.org/schema/mvc" xmlns:context="http://www.springframework.org/schema/context" xmlns:aop="http://www.springframework.org/schema/aop" xmlns:tx="http://www.springframework.org/schema/tx" xsi:schemaLocation="http://www.springframework.org/schema/beans http://www.springframework.org/schema/beans/spring-beans-4.2.xsd http://www.springframework.org/schema/mvc http://www.springframework.org/schema/mvc/spring-mvc-4.2.xsd http://www.springframework.org/schema/context http://www.springframework.org/schema/context/spring-context-4.2.xsd http://www.springframework.org/schema/aop http://www.springframework.org/schema/aop/spring-aop-4.2.xsd http://www.springframework.org/schema/tx http://www.springframework.org/schema/tx/spring-tx-4.2.xsd ">

<!-- 1.配置注解处理器映射器和处理器适配器 ,也就是说controler开发使用使用注解,千万别忘记配置spring的注解扫描-->
<mvc:annotation-driven/>
<context:component-scan base-package="com.leige.controler"/>

<!-- 2.配置视图解析器 支持jsp-->
<bean class="org.springframework.web.servlet.view.InternalResourceViewResolver">
<!-- 视图前缀 和modelandview拼接成一个完整的urlmodelAndView.setViewName("index"); /index.jsp -->
<property name="prefix" value="/"/>
<!-- 视图后缀 -->
<property name="suffix" value=".jsp" ></property>
</bean>

</beans>
**6.3spring配置:这里建议将service,dao,transaction的配置分开,这样可以增加程序的可读性,
建议不要使用include,避免后期维护配置文件麻烦**
6.3.1:spring配置文件dao配置:applicationContext-dao.xml:
<?xml version="1.0" encoding="UTF-8"?>
<beans xmlns="http://www.springframework.org/schema/beans" xmlns:aop="http://www.springframework.org/schema/aop" xmlns:context="http://www.springframework.org/schema/context" xmlns:xsi="http://www.w3.org/2001/XMLSchema-instance" xmlns:tx="http://www.springframework.org/schema/tx" xsi:schemaLocation="http://www.springframework.org/schema/beans http://www.springframework.org/schema/beans/spring-beans.xsd http://www.springframework.org/schema/aop http://www.springframework.org/schema/aop/spring-aop.xsd http://www.springframework.org/schema/context http://www.springframework.org/schema/context/spring-context.xsd http://www.springframework.org/schema/tx http://www.springframework.org/schema/tx/spring-tx.xsd ">

      <!-- 配置数据库连接池 -->

<context:property-placeholder location="classpath:jdbcInfo.properties"/>
<bean id="dataSourse" class="com.mchange.v2.c3p0.ComboPooledDataSource">
<property name="user" value="${username}"/>
<property name="password" value="${password}"/>
<property name="jdbcUrl" value="${url}"/>
<property name="driverClass" value="${driver}"/>
<property name="acquireIncrement" value="5"/>
<property name="maxPoolSize" value="50"/>
<property name="initialPoolSize" value="5"/>
</bean>
<bean id="sqlSessionFactory" class="org.mybatis.spring.SqlSessionFactoryBean" scope="singleton">
     <property name="dataSource" ref="dataSourse" />
    <property name="configLocation" value="classpath:mybatis/mybatis-configuration.xml"></property>
  </bean>

<!-- 配置mapper代理开发 ,需要指定mapperInterface接口类型和sqlsessionFactory class要指定org.mybatis.spring.mapper.MapperFactoryBean,这个类会自动根据我们的接mapper和mapper.xml生成代理 可以手动配置也可以使用动态扫描-->
<!-- <bean id="studentMapper" class="org.mybatis.spring.mapper.MapperFactoryBean"> <property name="mapperInterface" value="com.leige.dao.mapper.StudentMapper"/> <property name="sqlSessionFactory" ref="sqlSessionFactory"/> </bean> -->

    <!-- 或者指定包扫描 使用MapperScannerConfigurer扫描mapper 扫描器将mapper扫描出来自动 注册到spring容器,bean的id是类名(首字母小写) -->
    <bean class="org.mybatis.spring.mapper.MapperScannerConfigurer">
        <!-- 指定扫描的包 如果扫描多个包中间使用半角逗号分隔 如果使用扫描器,不用在sqlmapconfig.xml中去配置mapper的扫描了,如果使用mapper代理的开发,在SqlMapConfig.xml中不用配置mapper项了 -->
        <property name="basePackage" value="com.leige.dao.mapper"/>
        <!-- 使用sqlSessionFactoryBeanName注入sqlSessionFactory -->
        <property name="sqlSessionFactoryBeanName" value="sqlSessionFactory"/>
        <!-- 注意: 这里使用sqlSessionFactoryBeanName而不使用sqlSessionFactory原因如下: MapperScannerConigurer在扫描mapper时需要注入 sqlSessionFactory,如果使用 <property name="sqlSessionFactory" ref="sqlSessionFactory"/> 会存在PropertyPlaceholderConfigurer还没来得及替换dataSource定义中的${jdbc.driver} 等数据源变量就注入到了MapperScannerConigurer中,将导致数据库连接不上,如果改为如下方式可以解决问题: 名称就是就是mapper名称首字母小写 -->

    </bean>

</beans>
6.3.2:spring配置文件,service配置,applicationContext-service.xml:
<?xml version="1.0" encoding="UTF-8"?>
<beans xmlns="http://www.springframework.org/schema/beans" xmlns:aop="http://www.springframework.org/schema/aop" xmlns:context="http://www.springframework.org/schema/context" xmlns:xsi="http://www.w3.org/2001/XMLSchema-instance" xmlns:tx="http://www.springframework.org/schema/tx" xsi:schemaLocation="http://www.springframework.org/schema/beans http://www.springframework.org/schema/beans/spring-beans.xsd http://www.springframework.org/schema/aop http://www.springframework.org/schema/aop/spring-aop.xsd http://www.springframework.org/schema/context http://www.springframework.org/schema/context/spring-context.xsd http://www.springframework.org/schema/tx http://www.springframework.org/schema/tx/spring-tx.xsd ">
      <!-- 配置service层,注入dao,mapper代理 -->
      <bean id="studentService" class="com.leige.service.impl.StudentServiceImpl">
      <property name="studentMapper" ref="studentMapper"></property>
      </bean>

</beans>
6.3.3,spring配置,事务配置,application-transaction.xml
<?xml version="1.0" encoding="UTF-8"?>
<beans xmlns="http://www.springframework.org/schema/beans" xmlns:aop="http://www.springframework.org/schema/aop" xmlns:context="http://www.springframework.org/schema/context" xmlns:xsi="http://www.w3.org/2001/XMLSchema-instance" xmlns:tx="http://www.springframework.org/schema/tx" xsi:schemaLocation="http://www.springframework.org/schema/beans http://www.springframework.org/schema/beans/spring-beans.xsd http://www.springframework.org/schema/aop http://www.springframework.org/schema/aop/spring-aop.xsd http://www.springframework.org/schema/context http://www.springframework.org/schema/context/spring-context.xsd http://www.springframework.org/schema/tx http://www.springframework.org/schema/tx/spring-tx.xsd ">
                  <!-- 1. 配置事务管理器 ,将事务交给spring管理-->
 <!-- <tx:annotation-driven /> -->
 <bean id="transactionManager" class="org.springframework.jdbc.datasource.DataSourceTransactionManager">
 <property name="dataSource" ref="dataSourse"/>
 </bean>
<!-- 2. 配置通知 ,事务详情,添加要被管理的方法 -->
<tx:advice id="txAdvice" transaction-manager="transactionManager">
<tx:attributes >
<tx:method name="update*" propagation="REQUIRED"/>
<tx:method name="delete*" propagation="REQUIRED"/>
<tx:method name="insert*" propagation="REQUIRED"/>
<tx:method name="save*" propagation="REQUIRED"/>
<tx:method name="select*" read-only="true"/>

</tx:attributes>
</tx:advice>


<!-- 3.配置切面 -->
<aop:config>
<aop:pointcut expression="execution(* com.leige.service.impl.*.*(..))" id="studentPoint"/>
<aop:advisor advice-ref="txAdvice" pointcut-ref="studentPoint"/>
</aop:config>


</beans>
第七步:二级缓存配置,注意mybatis的二级缓存使用,需要在mapper.xml文件中指定,如果想要使对象支持磁盘缓存,建议实现序列化接口:
<?xml version="1.0" encoding="UTF-8"?>
<ehcache xmlns:xsi="http://www.w3.org/2001/XMLSchema-instance" xsi:noNamespaceSchemaLocation="http://ehcache.org/ehcache.xsd">
<!-- 磁盘缓存地址,则需要支持缓存对象实现序列化接口 -->
    <diskStore path="F:\cache"/>
    <defaultCache maxElementsInMemory="3000" eternal="false" timeToIdleSeconds="3600" timeToLiveSeconds="3600" overflowToDisk="true" diskPersistent="false" diskExpiryThreadIntervalSeconds="100" memoryStoreEvictionPolicy="LRU" />
    <cache name="userCache" maxElementsInMemory="3000" eternal="false" overflowToDisk="true" timeToIdleSeconds="3600" timeToLiveSeconds="3600" memoryStoreEvictionPolicy="LFU" />
<!-- 注意mybatis的二级缓存使用,需要在mapper.xml文件中指定,如果想要使对象支持磁盘缓存,建议实现序列化接口 -->
</ehcache>
第八步:测试,根据controler中的注解,得知访问url是http://localhost/SSM/student/search.action?sid=1:
测试结果:
最后再强调一句,这里只是初级的整合,并没用真正的设计业务管理,事务管理仅供初级新手学习,也作为一个整合的初级模板,大家也可以在这个基础上,添加自己想要的业务管理\