超详细CentOS 7 x / Ubuntu 15.04 安装icinga Web 2
We can customize and configure the Icinga Web 2 using many modules for its views, filters and dashboards. Timestamps and status updates can be refreshed automatically every second, rolling along smoothly saving your eyes the strain of flickering displays.
In this article we will be using the CentOS 7 for the complete installation and configuration of Icinga Web 2. If you want to use Ubuntu as your base Operating system then you can also refer to our previous article ofIcinga2 on Ubuntu 15.04.
Installing Prerequisites
Icinga Web 2 installation depends upon a number of following packages that must be installed on your system before the installation of Icinga Web 2 on CentOS 7 or Ubuntu 15.
Let's follow the below steps to complete the prerequisites by installing required packages and other settings.
1) System Update
Login to your system with root or sudo user privileges and run the following command to update your system.
For CentOS:
# yum update
For Ubuntu:
# apt-get update
2) Installing Icinga 2
To install Icinga 2 we will use the official package repositories that can be downloaded from thisIcinga Web Page.
To setup EPRL repositories for Icinga Installation run the following commands.
For CentOS:
To import the archive key and to setup the surrent stable builds of Icinga, run below command.
# rpm --import http://packages.icinga.org/icinga.key
# wget http://packages.icinga.org/epel/ICINGA-release.repo -O /etc/yum.repos.d/ICINGA-release.repo
# yum makecache
Now run the Icinga 2 Installation command as shown below.
# yum install icinga2
The following number of packages including the dependencies will be installed as shown. To proceed run type the "Y" key to continue.
===========================================================================================
Package Arch Version Repository Size
===========================================================================================
Installing:
icinga2 x86_64 2.3.10-1.el7.centos icinga-stable-release 9.1 k
Installing for dependencies:
boost-program-options x86_64 1.53.0-23.el7 base 155 k
boost-regex x86_64 1.53.0-23.el7 base 294 k
boost-system x86_64 1.53.0-23.el7 base 39 k
boost-thread x86_64 1.53.0-23.el7 base 56 k
icinga2-bin x86_64 2.3.10-1.el7.centos icinga-stable-release 2.2 M
icinga2-common x86_64 2.3.10-1.el7.centos icinga-stable-release 73 kTransaction Summary
===========================================================================================
Install 1 Package (+6 Dependent packages)Total download size: 2.8 M
Installed size: 15 M
Is this ok [y/d/N]: y
For Ubuntu
Run the below commands to add the Icinga repository to your package management configuration using PPA.
# add-apt-repository ppa:formorer/icinga
# apt-get update
# apt-get install icinga2
The installation process will be installing the Icinga 2 including some of its required dependencies.
The following extra packages will be installed:
icinga2-bin icinga2-common icinga2-doc libboost-program-options1.55.0 libboost-regex1.55.0 libboost-system1.55.0
libboost-thread1.55.0 libyajl2 nagios-plugins-basic nagios-plugins-common
Suggested packages:
nagios3 icinga
The following NEW packages will be installed
icinga2 icinga2-bin icinga2-common icinga2-doc libboost-program-options1.55.0 libboost-regex1.55.0 libboost-system1.55.0
libboost-thread1.55.0 libyajl2 nagios-plugins-basic nagios-plugins-common
0 to upgrade, 11 to newly install, 0 to remove and 92 not to upgrade.
Need to get 3,201 kB of archives.
After this operation, 18.4 MB of additional disk space will be used.
Do you want to continue? [Y/n] Y
3) Starting Icinga 2
Upon successful installation of Icinga 2 , now start its services and enable them to start at each reboot.
For CentOS 7 / Ubuntu 15
Run the following commands to Enable, Start and check the the status of Icinga 2 service on Centos 7 and Ubuntu 15.
# systemctl enable icinga2
# systemctl start icinga2
# systemctl status icinga2
4) MySQL Database Setup
We will be using the MySQL data base that will be used for Icinga web 2 interface. So, let's run the below commands to install MySQL MariaDB.
For CentOS 7
# yum install mariadb-server mariadb
After installation completes, start the mariadb services and configure its root password using the below command.
#systemctl enable mariadb
#systemctl start mariadb
#mysql_secure_installation
For Ubuntu 15
To install the MySQL database run the below command and configure the root password during the installation process.
#apt-get install mysql-server mysql-client
#service mysql start
Create New Database
Now login to the mysql/mariadb and create the new database with a new user with its specific privileges on the database using the below commands.
MariaDB [(none)]> CREATE DATABASE icinga2;
Query OK, 1 row affected (0.00 sec)MariaDB [(none)]> GRANT SELECT, INSERT, UPDATE, DELETE, DROP, CREATE VIEW, INDEX, EXECUTE ON icinga2.* TO 'icinga2'@'localhost' IDENTIFIED BY 'icinga123';
Query OK, 0 rows affected (0.00 sec)MariaDB [(none)]>exit
5) Installing MySQL IDO Module
For CentOS:
Run the below command to install IDO MySQL module for Icinga2.
#yum install icinga2-ido-mysql
Now import the Icinga 2 IDO schema using the following command.
# mysql -u root -p icinga2 < /usr/share/icinga2-ido-mysql/schema/mysql.sql
A new configuration file will be created after installation of Icinga IDO Module which is located in /etc/icinga2/features-available/ido-mysql.conf. So, open this file using any editor and update the database credentials in this file.
library "db_ido_mysql"
object IdoMysqlConnection "ido-mysql" {
//user = "icinga"
//password = "icinga"
//host = "localhost"
//database = "icinga"
}
Then enable module and check the list it should now listed under the enabled module by using the following command in centos 7.
[root@centos-7 ~]# icinga2 feature enable ido-mysql
warning/cli: Feature 'ido-mysql' already enabled.
[root@centos-7 ~]# icinga2 feature list
Disabled features: api command compatlog debuglog gelf graphite icingastatus livestatus opentsdb perfdata statusdata syslog
Enabled features: checker ido-mysql mainlog notification
For Ubuntu:
In ubuntu during the installation process of IDO MySQL Module, you will be asked Configure the icinga2-ido-mysql whether you want to enable it or not.
# apt-get install icinga2-ido-mysql
So, you will choose the "Yes" option and press OK to proceed then in the next steps you have to configure its configuration file by providing the MySQL root credentials that will configure the following new configuration files.
Creating config file /etc/dbconfig-common/config with new version
Setting up icinga2-ido-mysql (2.3.10-1~ppa1~vivid1) ...
dbconfig-common: writing config to /etc/dbconfig-common/icinga2-ido-mysql.confCreating config file /etc/dbconfig-common/icinga2-ido-mysql.conf with new version
Creating config file /etc/icinga2/features-available/ido-mysql.conf with new version
granting access to database icinga2idomysql for icinga2-ido-mysq@localhost: success.
verifying access for icinga2-ido-mysq@localhost: success.
creating database icinga2idomysql: success.
verifying database icinga2idomysql exists: success.
populating database via sql... done.
dbconfig-common: flushing administrative password
Like the same way run the below command to enale IDO MySQL Icinga Module.
root@ubuntu-15:~# icinga2 feature enable ido-mysql
Enabling feature ido-mysql. Make sure to restart Icinga 2 for these changes to take effect.
root@ubuntu-15:~# service icinga2 restart
root@ubuntu-15:~# icinga2 feature list
Disabled features: api command compatlog debuglog gelf graphite icingastatus livestatus opentsdb perfdata statusdata syslog
Enabled features: checker ido-mysql mainlog notification
You check and change the dtaabase configuration setting if required by using the below file.
# vim /etc/icinga2/features-available/ido-mysql.conf
6) Web server Setup
After completing the database installation and configuration setup, now we move towards Apache web server installation before starting the Icinga Web 2.
Let's run the below commands to to setup your web server installation.
For CentOS
In centOS, you can use the following commands to install apache server and start its services as shown.
# yum install httpd
# systemctl enable httpd
# systemctl start httpd
For Ubuntu
For ubuntu you will use the following commands for the apache web server installation.
# apt-get install apache2
# service apache2 start
Firewall Setting
Use the following commands to allow apache services in your firewall.
# firewall-cmd --add-service=http
# firewall-cmd --permanent --add-service=http
# firewall-cmd --reload
# iptables -A INPUT -p tcp -m tcp --dport 80 -j ACCEPT
# service iptables save
7) External Command Pipe Setup:
To enable the External Command Pipe we will be using the below, so that the Web interfaces and other Icinga addons are able to send commands to Icinga 2 through the external command pipe.
# icinga2 feature enable command
Enabling feature command. Make sure to restart Icinga 2 for these changes to take effect.
# service icinga2 restart
# icinga2 feature list
Disabled features: api compatlog debuglog gelf graphite icingastatus livestatus opentsdb perfdata statusdata syslog
Enabled features: checker command ido-mysql mainlog notification
Icinga Web 2 Installation
Now start the installation of Icinga Web 2
For CentOS 7:
# rpm --import http://packages.icinga.org/icinga.key
# curl -o /etc/yum.repos.d/ICINGA-release.repo http://packages.icinga.org/epel/ICINGA-release.repo
# yum makecache
# yum install icingaweb2 icingacli
For Ubuntu
# wget -O - http://packages.icinga.org/icinga.key | apt-key add -
# add-apt-repository 'deb http://packages.icinga.org/ubuntu icinga-trusty main'
# apt-get update
# apt-get install icingaweb2
Icinga Web 2 Setup:
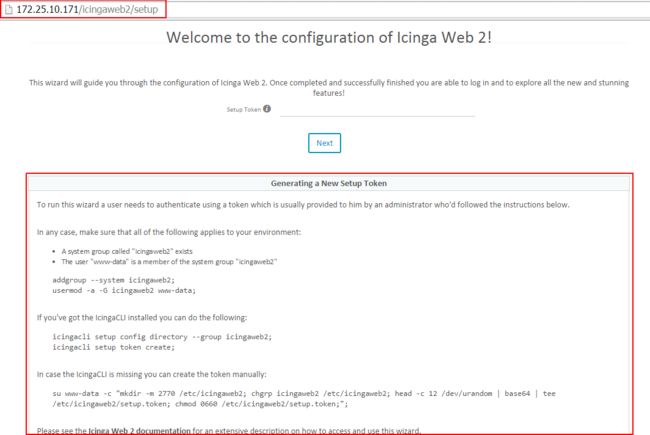
When the installion is complete, Open your web browser and give the URL using your hostname or the IP address with the addition to ‘/icingaweb2/setup’. You will find the below Icinga Web 2 setup wizard as shown.
As shown above this asks for a setup token, so make sure you run the server this installation of Icinga Web 2 runs on. Go back to your terminal and run the below commands.
# icingacli setup token create
The newly generated setup token is: 8cfe15c9b0d7ef2a
I you forget the newly created token, you can check by using the below command.
# icingacli setup token show
The current setup token is: 8cfe15c9b0d7ef2a
Copy the newly created token and place it on the web setup to move to next setup.
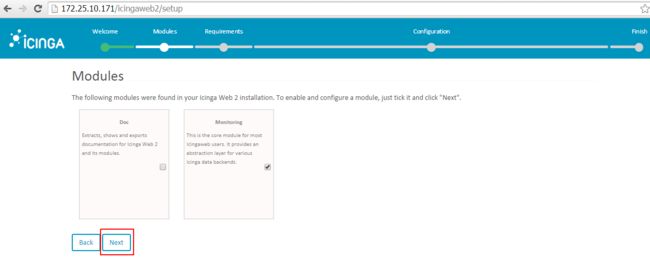
Then you will be directed to the pre installed modules setup so, simply press the next key.
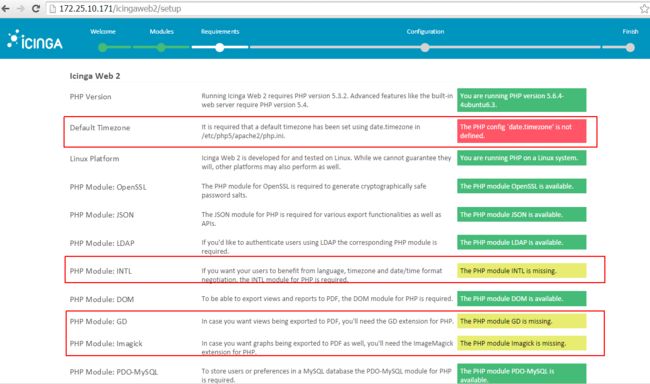
Now this the below is the main section to configure all the requirements before moving to the next step.
We have to fulfill all these requirements, so first of all we will configure the time zone and then install the required php modules using the below commands.
# vim /etc/php5/apache2/php.ini
[Date]
date.timezone = Europe/London
:wq!
# apt-get install php5-json php5-gd php5-imagick php5-pgsql php5-intl
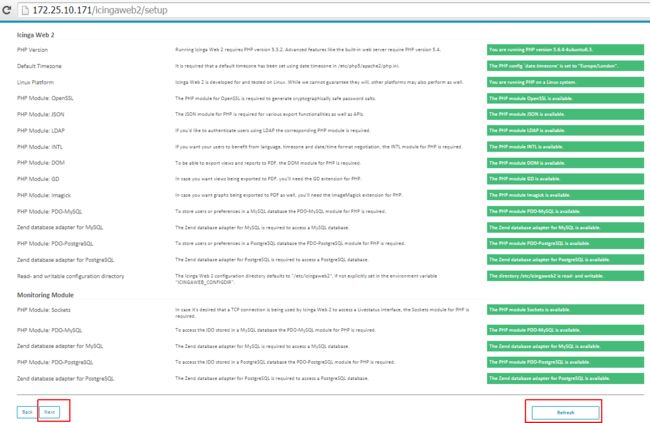
After installation restart the apache web services and press the refresh key to re check the requirements and you will found no missing module as shown below.
Next option is to choose the authentication type, where as we will be using here the database as a authentication method.
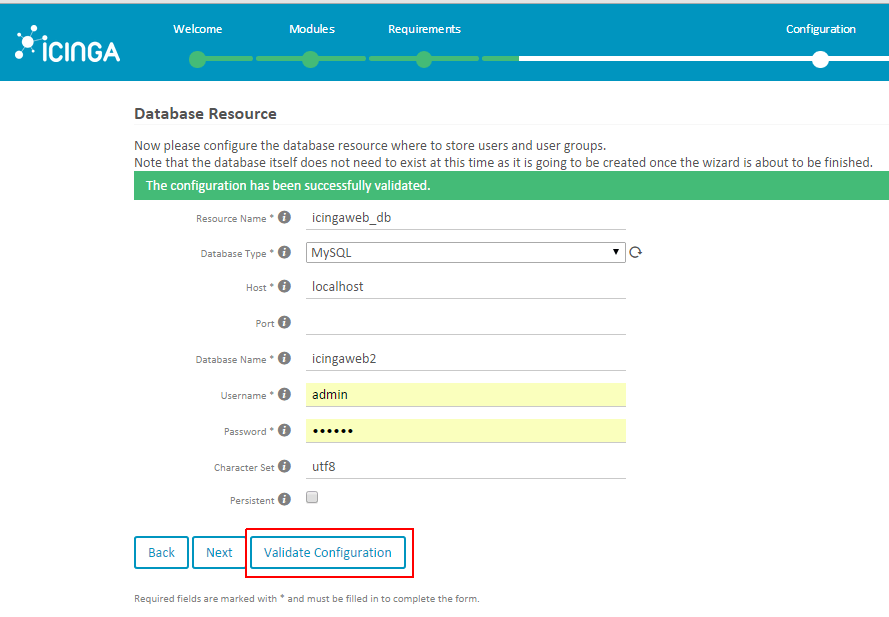
Now we need to configure the database resource where to store users and user groups. Before moving to next option press the Database validation key.
Upon providing the credentials you might get the below message, but there is nothing to worry if your are unable to validate your database just choose the skip validation option and click on the next button.
If you chooses to skip validation, then you will be asked to recreate your administrator account, choose the user name and give it a password.
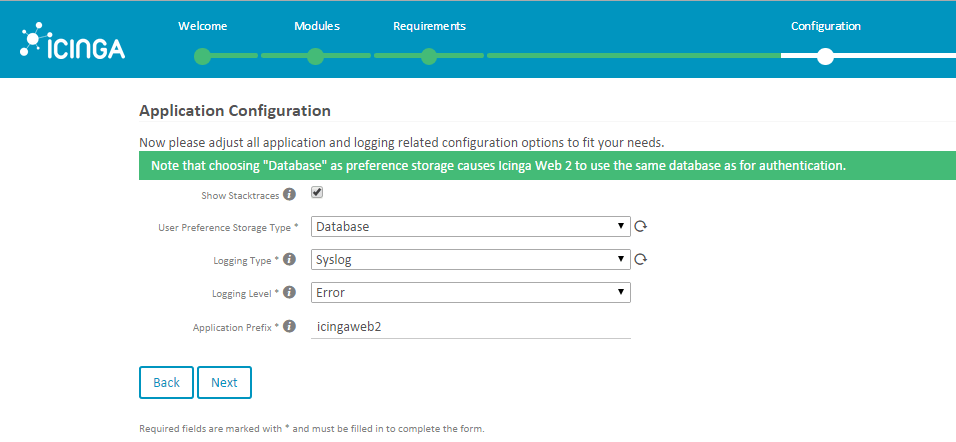
Then choose the appropriate options to adjust all application and logging related configuration options to fit your needs as shown.
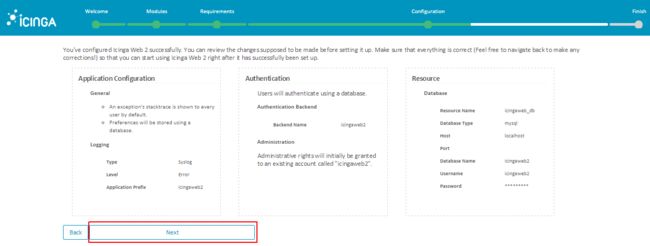
At this point you've configured Icinga Web 2 successfully. You can review the changes supposed to be made before setting it up. Make sure that everything is correct (Feel free to navigate back to make any corrections!) so that you can start using Icinga Web 2 right after it has successfully been set up.
Welcome to the configuration of the monitoring module for Icinga Web 2!
This is the core module for Icinga Web 2. It offers various status and reporting views with powerful filter capabilities that allow you to keep track of the most important events in your monitoring environment.
Then choose the monitoring backend configuration that how it retrieve the information.
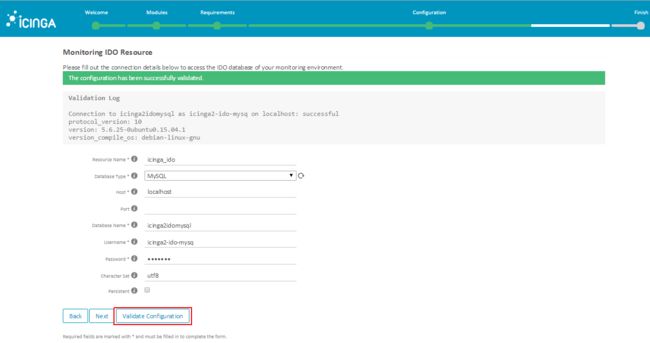
Choose the database name, user and its password that you created after installing the Icinga IDO MySQL Module and then validate the database.
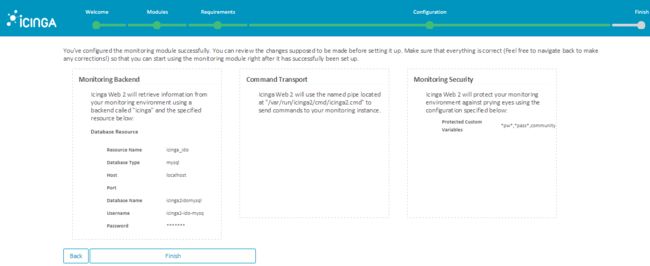
Choose the default options for Command transport and Monitoring Security and that it you've configured the monitoring module successfully. Now take review of the changes and click on the finish button to ‘Finish’ to make sure everything has been setup well.
Icinga Web 2 Dashboard
Conclusion
We have successfully installed and configured Icinga Web 2 and ready to Monitoring our hosts and services through its interactive web interface. Hopefully you understand all the steps, so feel free to to share your your experience if you face any kind of difficulty while preparing your own Icinga Web 2 setup on CentOS or Ubutu.
