s5pv210开发板 led驱动学习笔记
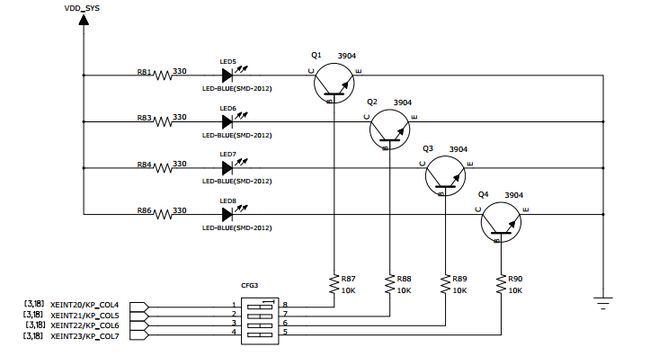
s5pv210开发板LED 的硬件原理图如下:
从硬件原理图可以看到, LED5、 LED6、 LED7、 LED8 是通过开关三极管来控制的, 当三极管导通的时候对应的 LED 灯就会点亮。
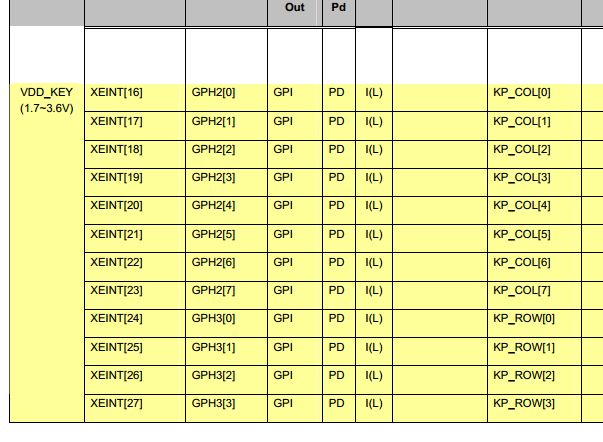
而三极管分别被 XEINT20/KP_COL4、 XEINT21/KP_COL5、XEINT22/KP_ COL6、XEINT23/KP_COL7四个引脚控制,对应的GPIO 分别为: GPH2[4]、GPH2[5]、
GPH2[6]、 GPH2[7]。当 GPIO 为高电平的时候灯亮,当 GPIO 为低电平的时候灯灭。
寄存器地址为:0xE020_0C40。
相应驱动程序如下:
#include <linux/module.h>
#include <linux/init.h>
#include <linux/fs.h>
#include <linux/types.h>
#include <linux/gpio.h>
#include <linux/ioctl.h>
#include <linux/cdev.h>
#include <linux/mm.h>
#include <linux/device.h>
#include <mach/regs-gpio.h>
#include <mach/hardware.h>
#include <asm/uaccess.h>
#include <asm/atomic.h>
#include <asm/unistd.h>
#include <mach/gpio.h>
#include <plat/gpio-cfg.h>
#include <asm/uaccess.h>
#include <asm/io.h>

//**************
static struct device *dev;
//*************


 volatile unsigned long *gpio_con;
 volatile unsigned long *gpio_dat;

#define DEVICE_NAME "leds"
//定义一个cdev结构体,并初始化
static struct cdev *cdevp=NULL;
//定义一个设备号
static dev_t devno;

#define LED_OFF 0
#define LED_ON 1


static int leds_open(struct inode *inode, struct file *file)
{

    printk("use open\n");

    *gpio_con = 0x11111111;   //设置寄存器为输出
    printk("gpio_con == %0x\n",*gpio_con);
    return 0;
}


static long leds_ioctl(struct file *filp,unsigned int cmd,unsigned long arg)
{
	printk("use ioctl\n");


	if(cmd == 1){
		*gpio_dat =0x1f;     //设置相应引脚位高电平
		printk("gpio_dat == %0x\n",*gpio_dat);
	}
	else
   		*gpio_dat &= 0x00;
}

//应用程序与驱动映射
static struct file_operations led_fops = {
    .owner   = THIS_MODULE,
    .open    = leds_open,
   .unlocked_ioctl = leds_ioctl,
};

static char __initdata banner[] =
	"CES-V210 LEDS , (c) 2012 Shenzhen Haitianxiong Electronic\n";

//**************
static struct class *led_class;
//**************
static int __init led_init_module(void)
{
    int ret;
    int err;

    printk(banner);

    gpio_con = (volatile unsigned long *)ioremap(0xE0200C40, 16);

    gpio_dat = gpio_con + 1;

    ret = alloc_chrdev_region(&devno,0,1,DEVICE_NAME);//注册设备,函数向系统申请设备号放在devno
    if(ret < 0)
    {
        printk(DEVICE_NAME "can't get the major number\n");
        return ret;
    }

//****************************
   led_class= class_create(THIS_MODULE,DEVICE_NAME);
   if(IS_ERR(led_class)) {
	printk("Err: failed in leds-class.\n");
	return -1;
   }
   dev=device_create(led_class,NULL,devno,NULL,DEVICE_NAME);
//**************************

    cdevp = cdev_alloc();//动态申请一个cdev内存
    cdev_init(cdevp,&led_fops);//初始化cdev
    cdevp->owner = THIS_MODULE;
    err=cdev_add(cdevp,devno,1);
    if(err){
         printk(KERN_NOTICE "Error %d adding cdev",err);
         unregister_chrdev_region(devno,1);
         return -EFAULT;
    }

    return 0;
}

static void __exit led_exit_module(void)
{
    cdev_del(cdevp);
    unregister_chrdev_region(devno,1);

//****************
    device_destroy(led_class,devno);
    class_destroy(led_class);
    iounmap(gpio_con);
//*****************

}

module_init(led_init_module);
module_exit(led_exit_module);
MODULE_LICENSE("GPL");
MODULE_AUTHOR("w_fly");
MODULE_DESCRIPTION("CES-V210 led driver");
Makefile文件如下:
KERN_DIR = /home/wfly/linux-3.2

all:
	make -C $(KERN_DIR) M=`pwd` modules

clean:
	make -C $(KERN_DIR) M=`pwd` modules clean
	rm -rf modules.order

obj-m	+= ces_210_led_test.o
#obj-m	+= s5p_led_test.o
#obj-m	+= s5p_led_dev.o
在驱动程序所在目录执行make即可生成驱动模块。
wfly@ubuntu:~/tq210/led$ make
make -C /home/wfly/linux-3.2 M=`pwd` modules
make[1]: Entering directory `/home/wfly/linux-3.2'

  WARNING: Symbol version dump /home/wfly/linux-3.2/Module.symvers
           is missing; modules will have no dependencies and modversions.

  Building modules, stage 2.
  MODPOST 1 modules
make[1]: Leaving directory `/home/wfly/linux-3.2'
wfly@ubuntu:~/tq210/led$
将驱动程序直接编译进内核,按如下步骤:
1.将驱动源程序复制到 /home/wfly/linux-3.2/drivers/leds/目录下。
2.修改/home/wfly/linux-3.2/drivers/leds/下Kconfig文件,添加程序如下:
#*****************************
config LEDS_CESV210_test
	tristate "LED Support for CES-V210_test GPIO LEDs"
	depends on ARCH_S5PV210
	help
	  This option enables support for LEDs connected to GPIO lines on CES-V210_test.
3. 修改 /home/wfly/linux-3.2/drivers/leds/下Makefile文件,添加程序如下:
#new
obj-$(CONFIG_LEDS_CESV210_test)		+= ces_210_led_test.o
4.修改 /home/wfly/linux-3.2/下.config文件,添加程序如下:
CONFIG_LEDS_CESV210_test=m //m表示编译成模块,y表示直接编译进内核。
进入内核顶层目录, /home/wfly/linux-3.2/,执行make menuconfig
 Device Drivers  --->
      [*] LED Support  --->
            <M>   LED Support for CES-V210_test GPIO LEDs
可以看到添加的驱动已编译进内核,执行make编译。

