2、Gerrit配置--用户配置
前面一章已经搭建好了Gerrit服务器,下面介绍如何创建Gerrit用户,并使用用户登录已经改配用户设定
环境:
Gerrit Server:172.16.206.133
Client:172.16.206.129
1、在Gerrit服务器上创建用户
Gerrit服务器使用的是HTTP认证类型,并用httpd做反向代理,创建用户使用以下命令
#cd /home/gerrit2/gerrit/etc
[root@localhost etc]# htpasswd -m passwords user2
New password:
Re-type new password:
Adding password for user user2
根据提示输入密码即可(密码设置为123456),这样账号就创建好了。创建完成,httpd和gerrit服务不需要重启。
2、登录gerrit用户
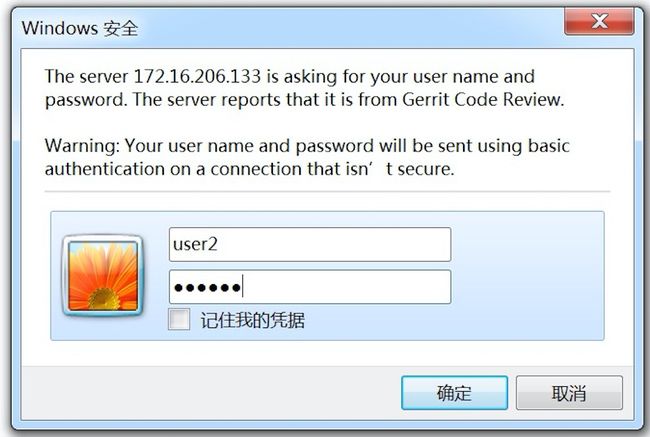
用创建的user2账号访问gerrit,在浏览器地址栏输入:
http://172.16.206.133:8080
输入登录的账号密码,账号为user2,密码为123456
3、修改gerrit用户配置
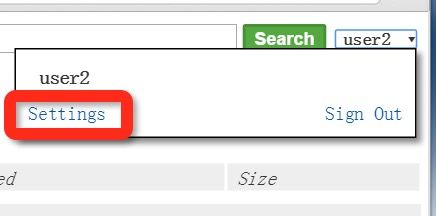
登录后,在网页右上角点击自己的用户名,在点击“settings”。
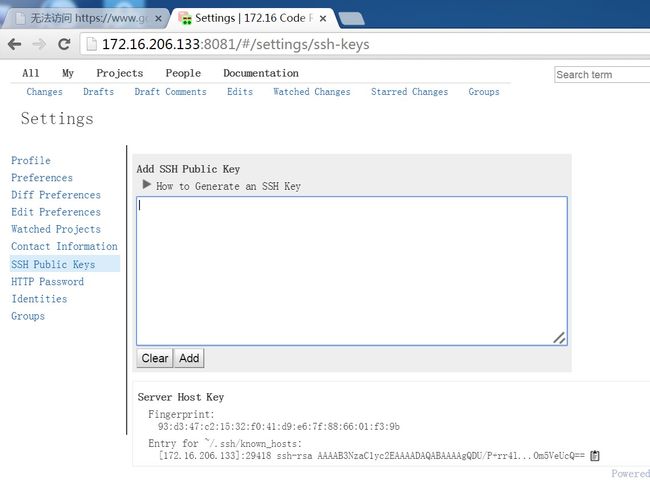 settings中就是用户的配置相关信息,需要注册邮箱和提交服务器上的公钥
1、提交公钥
注意:为什么要提交公钥文件到gerrit服务器?如果不提交公钥,则不能使用git push命令将本地代码提交到gerrit服务器。公钥是一个认证方式。
在客户端172.16.206.129这台服务器上创建公、私钥对,具体命令如下:
[user2@host2 root]$ ssh-keygen -t rsa
Generating public/private rsa key pair.
Enter file in which to save the key (/home/user2/.ssh/id_rsa):
Created directory '/home/user2/.ssh'.
Enter passphrase (empty for no passphrase):
Enter same passphrase again:
Your identification has been saved in /home/user2/.ssh/id_rsa.
Your public key has been saved in /home/user2/.ssh/id_rsa.pub.
The key fingerprint is:
fd:da:fa:c5:ec:6c:82:60:1f:39:15:bc:62:ec:51:15 user2@host2
The key's randomart image is:
+--[ RSA 2048]----+
|           . .E. |
|            +    |
|         . . o   |
|         .= o    |
|        So.=     |
|        o =. o   |
|       . o +. +  |
|          oo.+.  |
|          ooooo  |
+-----------------+
生成的密钥文件如下:
[user2@host2 ~]$ ls .ssh/
id_rsa id_rsa.pub
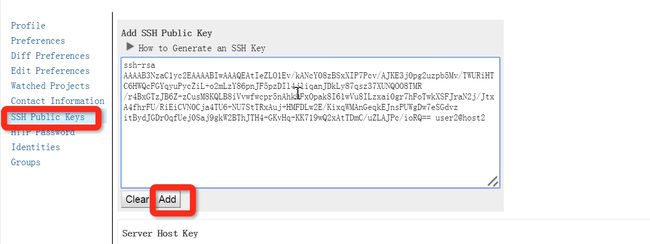
id_rsa.pub为公钥文件,将该文件中的内容,复制并粘贴到settings==>SSH Public Keys中,并点击Add
测试SSH key是否提交成功,在client 172.16.206.129服务器上执行以下命令:
#ssh -p 29418 [email protected]
29418为gerrit上SSH服务器监听的端口,user2为登录的gerrit账号,注意这里我们使用哪个账号登录gerrit就使用哪个账号测试,并且该账号已经登录了gerrit服务器,而且公钥已经上传。172.16.206.133为gerrit服务器的IP
[user2@host2 .ssh]$ ssh -p 29418 [email protected]
The authenticity of host '[172.16.206.133]:29418 ([172.16.206.133]:29418)' can't be established.
RSA key fingerprint is 93:d3:47:c2:15:32:f0:41:d9:e6:7f:88:66:01:f3:9b.
Are you sure you want to continue connecting (yes/no)? yes
Warning: Permanently added '[172.16.206.133]:29418' (RSA) to the list of known hosts.
  ****    Welcome to Gerrit Code Review    ****
  Hi user2, you have successfully connected over SSH.
  Unfortunately, interactive shells are disabled.
  To clone a hosted Git repository, use:
  git clone ssh://[email protected]:29418/REPOSITORY_NAME.git
Connection to 172.16.206.133 closed.
可以看到连接成功,说明SSH Public Key上传成功。
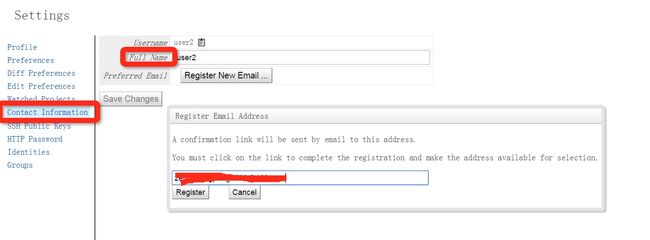
为user2注册邮箱
点击Register后,登录你刚才注册的邮箱,激活即可。
4、创建用户组并创建一个项目
注意,只有管理员组的用户才能创建group和Project
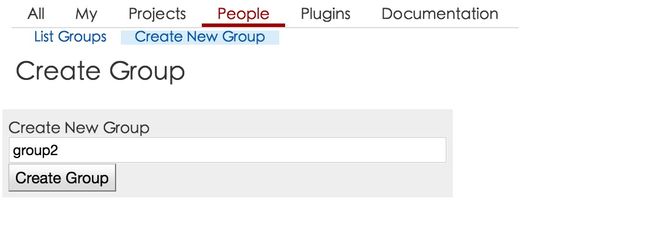
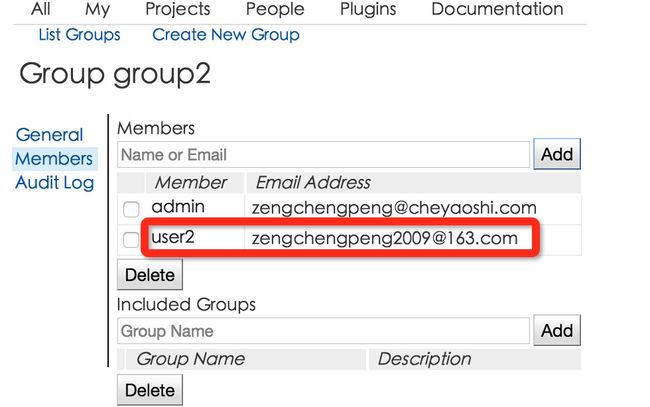
登录Gerrit管理员账号admin,创建一个新的组为group2。并将user2账号加入该组
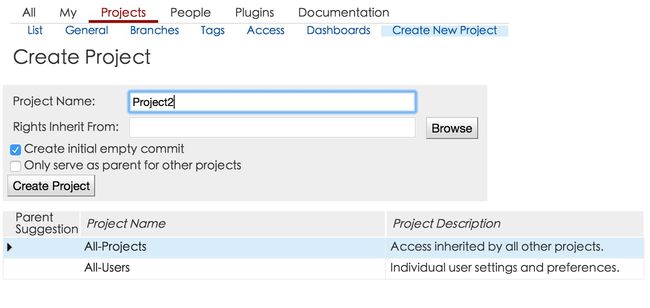
新建一个Project,名为Project2
5、gerrit代码审核流程
前面都是准备工作,接下来演示gerrit如何做代码审核的
a、client server( 172.16.206.129)的git初始配置
配置用户名和邮箱
#git config --global user.name "user2"
#git config --global user.email "YOUR EMAIL-ADDRESS"
b、用账户user2登录gerrit
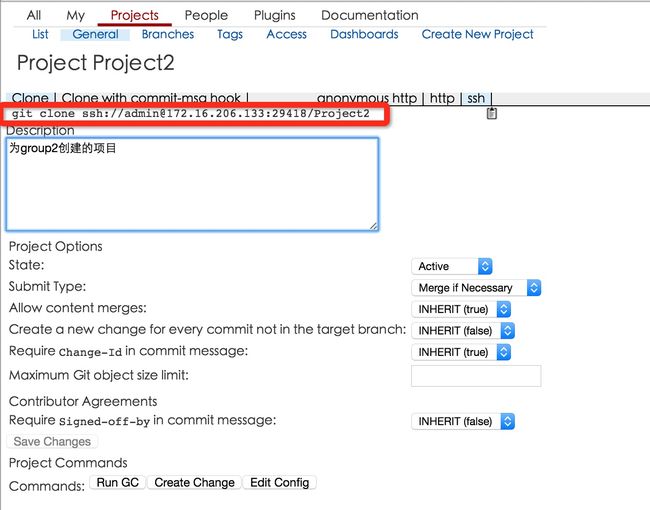
在Projects==> List中找到Projects2,然后点击Clone with commit-msg hook, 在点击ssh按钮,
复制ssh下面项目地址:
git clone ssh://[email protected]:29418/Project2 && scp -p -P 29418 [email protected]:hooks/commit-msg Project2/.git/hooks/
直接将刚才复制的命令,在client server的命令行运行
git clone ssh://[email protected]:29418/Project2 && scp -p -P 29418 [email protected]:hooks/commit-msg Project2/.git/hooks/
注意:步骤b一定选Clone with commit-msg hook下面的地址来clone,否则在客户端使用git push
命令提交代码时会报错。如果不需要向gerrit服务器提交代码,那么你只需使用
git clone ssh://[email protected]:29418/Project2
或者git clone http://[email protected]:8081/a/Project2
c、创建一个文件,并提交到gerrit服务器端
[user2@host2 Project2]$ vim test.sh
aaaaaaaaaaaaa
bbbbbbbbbbbbb
ccccccccccccc
用git add 和git commit命令将文件保存到git仓库中
[user2@host2 Project2]$ git add test.sh
[user2@host2 Project2]$ git commit -m "创建了test.sh文件"
[master 16462e9] 创建了test.sh文件
 1 files changed, 3 insertions(+), 0 deletions(-)
 create mode 100644 test.sh
d、用git push命令将代码从本地传到gerrit服务器对象项目下的master分支
[user2@host2 Project2]$ git push origin master:refs/for/master
Counting objects: 4, done.
Compressing objects: 100% (2/2), done.
Writing objects: 100% (3/3), 341 bytes, done.
Total 3 (delta 0), reused 0 (delta 0)
remote: Processing changes: new: 1, refs: 1, done
remote:
remote: New Changes:
remote:   http://172.16.206.133:8081/5 创建了test.sh文件
remote:
To ssh://[email protected]:29418/Project2
 * [new branch]      master -> refs/for/master
origin:远程仓库的名称,用git remote 可以查看所有的远程仓库名称
[user2@host2 Project2]$ git remote
origin
master:refs/for/master 表示将代码从本地的master分支传到远端的master分支,固定格式就是这样
e、看看Gerrit服务器上是否有code review的信息
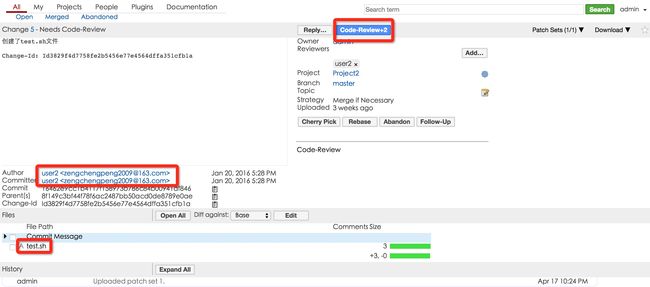
登录gerrit管理员账号admin,在ALL下面点击“Open”,看到“创建了test.sh”这条记录。
这里“创建了test.sh文件”就是git commit -m "创建了test.sh文件" 这条命令产生的
点开这条记录,看到以下信息
我们可以点开test.sh文件看到里面的内容
还可以看到提交者的信息:
这里显示的用户名和邮箱地址其实是在client server上初始化git时,用以下命令配置的
#git config --global user.name "user2"
#git config --global user.email "YOUR EMAIL-ADDRESS"
点击上上图中的code review和replay进行代码审核
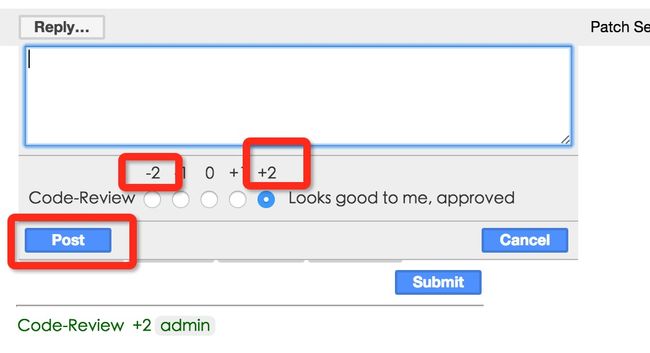 -2 表示不通过,+2表示代码ok可以通过审核,目前还没有深究这个,我理解的就是这样子的。
审核后可以看到审核的日志
以上就是gerrit代码审核的流程,gerrit仓库是纯粹的代码仓库,不存在work tree这个说法。所以在gerrit仓库里面执行git命令都会报错:
[root@localhost Project2.git]# git status
fatal: This operation must be run in a work tree
但是,如果用git clone将gerrit仓库里面的项目clone下来后,就自动变成了一个git仓库。
PS:本人是运维新手,很多东西还没有来得及深入学习了解,如果文章有错误的地方请见谅。
git相关知识请参考:https://git-scm.com/book/zh/v2/
gerrit相关知识请参考官方文档:
http://gerrit-documentation.googlecode.com/svn/Documentation/2.5/intro-quick.html
本文出自 “zengestudy” 博客,谢绝转载!
