Android Activity 图形化生成简读 <3>
不知道标题是否准确,即使Activity开始自己的周期,从attach开始,接着第一篇的attach点.多说一句,前面跟随思路,一步一步的打log,生成services.jar放到系统里面运行,就知道自己的判定是否正确了.
下面回到Activity的类,attach :
final void attach(Context context, ActivityThread aThread, Instrumentation instr, IBinder token,
            Application application, Intent intent, ActivityInfo info, CharSequence title,
            Activity parent, String id, NonConfigurationInstances lastNonConfigurationInstances,
            Configuration config) {
        attach(context, aThread, instr, token, 0, application, intent, info, title, parent, id,
            lastNonConfigurationInstances, config);
    }
新建和初始化窗口:
mWindow = PolicyManager.makeNewWindow(this);
        mWindow.setCallback(this);
        mWindow.getLayoutInflater().setPrivateFactory(this);
mWindow.setWindowManager(
                (WindowManager)context.getSystemService(Context.WINDOW_SERVICE),
                mToken, mComponent.flattenToString(),
                (info.flags & ActivityInfo.FLAG_HARDWARE_ACCELERATED) != 0);
        if (mParent != null) {
            mWindow.setContainer(mParent.getWindow());
        }
        mWindowManager = mWindow.getWindowManager();
mWindow是Window的一个对象,但是Window本身是一个抽象类,新建一个窗体:
mWindow = PolicyManager.makeNewWindow(this);这个开始.由PolicyManager开始:
// The static methods to spawn new policy-specific objects
    public static Window makeNewWindow(Context context) {
        return sPolicy.makeNewWindow(context);
    }
而sPolicy是IPolicy.它是一个接口类:
/* The implementation of this interface must be called Policy and contained
 * within the com.android.internal.policy.impl package */
public interface IPolicy {
    public Window makeNewWindow(Context context);

    public LayoutInflater makeNewLayoutInflater(Context context);

    public WindowManagerPolicy makeNewWindowManager();

    public FallbackEventHandler makeNewFallbackEventHandler(Context context);
}
实现类Policy :
public Window makeNewWindow(Context context) {
        return new PhoneWindow(context);
    }
返回了一个PhoneWindow对象.
public PhoneWindow(Context context) {
        super(context);
        mLayoutInflater = LayoutInflater.from(context);
    }
获取的这个返回对象.
... ...
在进入Activity的onCreate方法:
在这个地方首先看一下下面三张图:
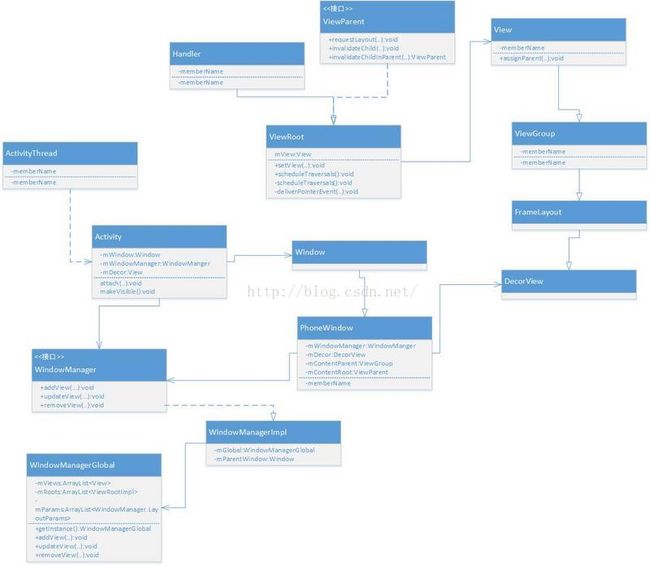
下面是视图的框架流程:
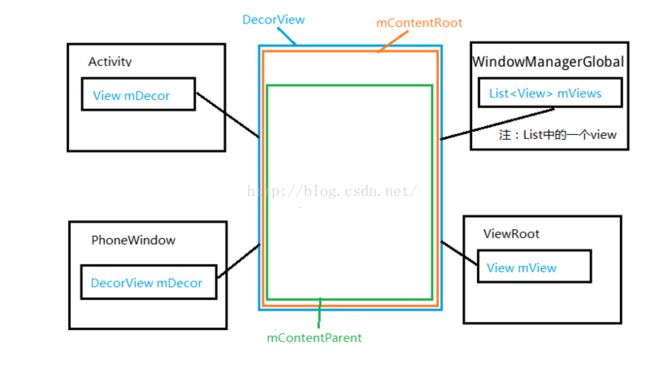
视窗体的组成分布:
下面的是setContentView的地位:

设置布局或者View时,最后进入PhoneWindow类:
@Override
    public void setContentView(View view, ViewGroup.LayoutParams params) {
        if (mContentParent == null) {
            installDecor();
        } else {
            mContentParent.removeAllViews();
        }
        mContentParent.addView(view, params);
        final Callback cb = getCallback();
        if (cb != null && !isDestroyed()) {
            cb.onContentChanged();
        }
    }
如果不是子View,即Activity父容器未创建,则先创建Activity父容器,那么程序就会运行installDecor()方法:
private void installDecor() {
        if (mDecor == null) {
            mDecor = generateDecor();
            mDecor.setDescendantFocusability(ViewGroup.FOCUS_AFTER_DESCENDANTS);
            mDecor.setIsRootNamespace(true);
            if (!mInvalidatePanelMenuPosted && mInvalidatePanelMenuFeatures != 0) {
                mDecor.postOnAnimation(mInvalidatePanelMenuRunnable);
            }
        }
        if (mContentParent == null) {
            mContentParent = generateLayout(mDecor);
通过generateDecor产生一个mDecor对象:
protected DecorView generateDecor() {
        return new DecorView(getContext(), -1);
    }
下面:
private final class DecorView extends FrameLayout implements RootViewSurfaceTaker {
        /* package */int mDefaultOpacity = PixelFormat.OPAQUE;

        /** The feature ID of the panel, or -1 if this is the application's DecorView */
        private final int mFeatureId;

        private final Rect mDrawingBounds = new Rect();

        private final Rect mBackgroundPadding = new Rect();

        private final Rect mFramePadding = new Rect();

        private final Rect mFrameOffsets = new Rect();

        private boolean mChanging;

        private Drawable mMenuBackground;
        private boolean mWatchingForMenu;
        private int mDownY;

        private ActionMode mActionMode;
        private ActionBarContextView mActionModeView;
        private PopupWindow mActionModePopup;
        private Runnable mShowActionModePopup;

        public DecorView(Context context, int featureId) {
            super(context);
            mFeatureId = featureId;
        }
这个DecorView是一个继承了FrameLayout的视图类.这里面记住featureId,创建以后:
 if (mContentParent == null) {
            mContentParent = generateLayout(mDecor);

            // Set up decor part of UI to ignore fitsSystemWindows if appropriate.
            mDecor.makeOptionalFitsSystemWindows();

            mTitleView = (TextView)findViewById(com.android.internal.R.id.title);
            if (mTitleView != null) {
                mTitleView.setLayoutDirection(mDecor.getLayoutDirection());
                if ((getLocalFeatures() & (1 << FEATURE_NO_TITLE)) != 0) {
开始创建跟View,其中所有自定义View的根View, id="@android:id/content",下面:
protected ViewGroup generateLayout(DecorView decor) {
        // Apply data from current theme.

        TypedArray a = getWindowStyle(); ... ...
int features = getLocalFeatures();
        // System.out.println("Features: 0x" + Integer.toHexString(features));
        if ((features & ((1 << FEATURE_LEFT_ICON) | (1 << FEATURE_RIGHT_ICON))) != 0) {
            if (mIsFloating) {
                TypedValue res = new TypedValue();
                getContext().getTheme().resolveAttribute(... ...
这个方法很有意思,一看就知道我们平时设置Activity主题theme,SDK之类的信息是如何处理的了,开始加载设置这个窗体的风格样式(根据指定的theme和feature).
添加视窗:
View in = mLayoutInflater.inflate(layoutResource, null);
        decor.addView(in, new ViewGroup.LayoutParams(MATCH_PARENT, MATCH_PARENT));
由窗口顶层视窗decor添加Activity布局各个View.
这个方法可以仔细阅读,不过注意它的返回值是,mContentParent.这样整个窗体框架基本出来了.由于程序app提供的是xml,那么就需要解析并且返回view,通过下面:
View in = mLayoutInflater.inflate(layoutResource, null);
通过它解析xml,获取信息:
public View inflate(XmlPullParser parser, ViewGroup root, boolean attachToRoot) {
        synchronized (mConstructorArgs) {
            final AttributeSet attrs = Xml.asAttributeSet(parser);
            Context lastContext = (Context)mConstructorArgs[0];
            mConstructorArgs[0] = mContext;
            View result = root;
基本的视窗就差不多了.
1> : 创建一个DecorView对象,该对象将作为整个应用窗口的根视图
2> : 创建不同的窗口修饰布局文件,并且获取Activity的布局文件该存放的地方,由该窗口修饰布局文件内id为content的FrameLayout指定 。
3> : 将Activity的布局文件添加至id为content的FrameLayout内
看过Activity周期的都会知道,Activity窗体显示出来并不是在oncreate时候,而是onResume的时候:回到ActivityManagerService类,回调onResume中:
//系统resume一个Activity时,调用此方法
final void handleResumeActivity(IBinder token, boolean clearHide, boolean isForward) {
    ActivityRecord r = performResumeActivity(token, clearHide);
    //...
     if (r.activity.mVisibleFromClient) {
         r.activity.makeVisible();
     }
}
然后进入Activity类:
void makeVisible() {
        if (!mWindowAdded) {
            ViewManager wm = getWindowManager();
            wm.addView(mDecor, getWindow().getAttributes());
            mWindowAdded = true;
        }
        mDecor.setVisibility(View.VISIBLE);
    }
这个时候整个Activity的窗体全部显示出来了.