.net WinForm用户控件开发--(3)可多选的下拉列表框
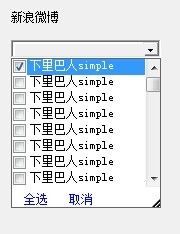
先来看下效果图吧,我会分几个步骤来具体讲解这个文本框的实现。
1.界面实现
我们先来看下界面效果怎样实现,然后再讲解具体的功能性实现。
先创建一个用户控件,当然是继承UserControl类,这个界面需要用到以下控件来实现
下拉按钮:是一个button控件
文本框:显示选中的内容,
多选列表框: checkboxlist
全选/取消:是两个LABEL控件
右下角的黑三角:是一个LABEL控件,可实现拉长下拉列表框.
窗体:点击下拉按钮,实际是弹出一个窗体,下拉列表框中的控件都在这个窗体中显示
首先看下下拉按钮的实现
/// <summary>
    /// 重写BUTTON
    /// </summary>
    public class ButtonS : Button
    {
        public ButtonS()
        {
            //防止重绘控件出现闪烁
            this.SetStyle(ControlStyles.UserPaint, true);
            this.SetStyle(ControlStyles.OptimizedDoubleBuffer, true);
            this.SetStyle(ControlStyles.AllPaintingInWmPaint, true);
        }
        ButtonState state;
        //当按钮被按下
        protected override void OnMouseDown(MouseEventArgs mevent)
        {
            state = ButtonState.Pushed;
            base.OnMouseDown(mevent);
        }

        //当按钮被释放
        protected override void OnMouseUp(MouseEventArgs mevent)
        {
            state = ButtonState.Normal;
            base.OnMouseUp(mevent);
        }

        protected override void OnPaint(PaintEventArgs pevent)
        {
            base.OnPaint(pevent);
            System.Windows.Forms.ControlPaint.DrawComboButton(pevent.Graphics, 0, 0, this.Width, this.Height, state);
        }
    }
接下来再看下具有拉动功能的LABEL
/// <summary>
    /// 重写LABEL
    /// </summary>
    public class LabelS : Label
    {
        public LabelS()
        {
            //控件绘制的时候减少闪烁
            this.SetStyle(ControlStyles.UserPaint, true);
            this.SetStyle(ControlStyles.OptimizedDoubleBuffer, true);
            this.SetStyle(ControlStyles.AllPaintingInWmPaint, true);
        }

        protected override void OnPaint(PaintEventArgs e)
        {
            base.OnPaint(e);
            System.Windows.Forms.ControlPaint.DrawSizeGrip(e.Graphics, Color.Black, 1, 0, this.Size.Width, this.Size.Height);
        }
    }
接下来,我们动态用代码生成这些控件,并设置控件的布局,
现在构造函数里生成这些控件,然后在用户控件的ComCheckBoxList_Layout事件里面布局这些控件,代码如下
 /// <summary>
    /// 带下拉框的用户控件
    /// </summary>
    public partial class ComCheckBoxList : UserControl
    {
        private TextBox tbSelectedValue;
        private ButtonS btnSelect;//下拉箭头
        private LabelS lbGrip;//此LABEL用于设置可以拖动下拉窗体变化

        private CheckedListBox checkListBox;
        private Label lbSelectAll;//全选
        private Label lbSelectNo;//取消

        private Form frmCheckList;

        private Panel pnlBack;
        private Panel pnlCheck;

        private System.Drawing.Point DragOffset; //用于记录窗体大小变化的位置
        public ComCheckBoxList()
        {
            InitializeComponent();
            this.Name = "comBoxCheckBoxList";
            this.Layout+=new LayoutEventHandler(ComCheckBoxList_Layout);

            //生成控件
            tbSelectedValue = new TextBox();
            tbSelectedValue.ReadOnly = true;
            tbSelectedValue.BorderStyle = BorderStyle.None;

            //下拉箭头
            this.btnSelect = new ButtonS();
            btnSelect.FlatStyle = FlatStyle.Flat;
            btnSelect.Click+=new EventHandler(btnSelect_Click);

            //全选
            this.lbSelectAll = new Label();
            lbSelectAll.BackColor = Color.Transparent;
            lbSelectAll.Text = "全选";
            lbSelectAll.Size = new Size(40, 20);
            lbSelectAll.ForeColor = Color.Blue;
            lbSelectAll.Cursor = Cursors.Hand ;
            lbSelectAll.TextAlign = ContentAlignment.MiddleCenter;
            lbSelectAll.Click+=new EventHandler(lbSelectAll_Click);

            //取消
            lbSelectNo = new Label();
            lbSelectNo.BackColor = Color.Transparent;
            lbSelectNo.Text = "取消";
            lbSelectNo.Size = new Size(40, 20);
            lbSelectNo.ForeColor = Color.Blue;
            lbSelectNo.Cursor = Cursors.Hand;
            lbSelectNo.TextAlign = ContentAlignment.MiddleCenter;
            lbSelectNo.Click+=new EventHandler(lbSelectNo_Click);

            //生成checkboxlist
            this.checkListBox = new CheckedListBox();
            checkListBox.BorderStyle = BorderStyle.None;
            checkListBox.Location = new Point(0,0);
            checkListBox.CheckOnClick = true;
            checkListBox.ScrollAlwaysVisible = true;
            checkListBox.LostFocus +=new EventHandler(checkListBox_LostFocus);
            checkListBox.ItemCheck+=new ItemCheckEventHandler(checkListBox_ItemCheck);

            //窗体
            frmCheckList = new Form();
            frmCheckList.FormBorderStyle = FormBorderStyle.None;
            frmCheckList.StartPosition = FormStartPosition.Manual;
            frmCheckList.BackColor = SystemColors.Control;
            frmCheckList.ShowInTaskbar = false;

            //可拖动窗体大小变化的LABEL
            lbGrip = new LabelS();
            lbGrip.Size = new Size(9,18);
            lbGrip.BackColor = Color.Transparent;
            lbGrip.Cursor = Cursors.SizeNWSE;
            lbGrip.MouseDown+=new MouseEventHandler(lbGrip_MouseDown);
            lbGrip.MouseMove+=new MouseEventHandler(lbGrip_MouseMove);

            //panel
            pnlBack = new Panel();
            pnlBack.BorderStyle = BorderStyle.Fixed3D;
            pnlBack.BackColor = Color.White;
            pnlBack.AutoScroll = false;

            //
            pnlCheck = new Panel();
            pnlCheck.BorderStyle = BorderStyle.FixedSingle;
            pnlCheck.BackColor = Color.White; ;

            SetStyle(ControlStyles.OptimizedDoubleBuffer, true);
            SetStyle(ControlStyles.ResizeRedraw, true);

            pnlBack.Controls.Add(tbSelectedValue);
            pnlBack.Controls.Add(btnSelect);

            this.Controls.Add(pnlBack);

            pnlCheck.Controls.Add(checkListBox);
            pnlCheck.Controls.Add(lbSelectAll);
            pnlCheck.Controls.Add(lbSelectNo);
            pnlCheck.Controls.Add(lbGrip);
            this.frmCheckList.Controls.Add(pnlCheck);


        }

        private void ReloationGrip()
        {

            lbGrip.Top = this.frmCheckList.Height - lbGrip.Height - 1;
            lbGrip.Left = this.frmCheckList.Width - lbGrip.Width - 1;

            lbSelectAll.Left =5;
            lbSelectAll.Top = frmCheckList.Height - lbSelectAll.Height;

            lbSelectNo.Left = 50;
            lbSelectNo.Top = frmCheckList.Height - lbSelectNo.Height;


        }

        #region 事件


        //布局
        private void ComCheckBoxList_Layout(object sender,LayoutEventArgs e)
        {
            this.Height = tbSelectedValue.Height + 6;
            this.pnlBack.Size = new Size(this.Width, this.Height - 2);

            //设置按钮的位置
            this.btnSelect.Size = new Size(16, this.Height - 6);
            btnSelect.Location = new Point(this.Width - this.btnSelect.Width - 4, 0);

            this.tbSelectedValue.Location = new Point(2, 2);
            this.tbSelectedValue.Width = this.Width - btnSelect.Width - 4;

            checkListBox.Height =150;

            //设置窗体
            this.frmCheckList.Size = new Size(this.Width,this.checkListBox.Height);
            this.pnlCheck.Size =frmCheckList.Size;


            this.checkListBox.Width = this.frmCheckList.Width;
            this.checkListBox.Height = this.frmCheckList.Height-lbSelectNo.Height;

            ReloationGrip();


        }
        /// <summary>
        /// 单价下拉框
        /// </summary>
        /// <param name="sender"></param>
        /// <param name="e"></param>
        public void btnSelect_Click(object sender,EventArgs e)
        {
            if (this.frmCheckList.Visible == false)
            {
                Rectangle rec = this.RectangleToScreen(this.ClientRectangle);
                this.frmCheckList.Location = new Point(rec.X, rec.Y + this.pnlBack.Height);
                this.frmCheckList.Show();
                this.frmCheckList.BringToFront();

                ReloationGrip();
            }
            else
                this.frmCheckList.Hide();
        }

        //全选事件
        private void lbSelectAll_Click(object sender, EventArgs e)
        {

        }
        //取消
        private void lbSelectNo_Click(object sender,EventArgs e)
        {

        }

        private void checkListBox_LostFocus(object sender, EventArgs e)
        {
            //如果鼠标位置在下拉框按钮的以为地方,则隐藏下拉框
            if (!this.btnSelect.RectangleToScreen(this.btnSelect.ClientRectangle).Contains(Cursor.Position))
            {
                frmCheckList.Hide();
            }
        }

        private void checkListBox_ItemCheck(object sender, ItemCheckEventArgs e)
        {

        }

        /// <summary>
        /// 鼠标按下
        /// </summary>
        /// <param name="sender"></param>
        /// <param name="e"></param>
        private void lbGrip_MouseDown(object sender, MouseEventArgs e)
        {
            if (e.Button==MouseButtons.Left)
            {
                int offsetX = System.Math.Abs(Cursor.Position.X - frmCheckList.RectangleToScreen(this.frmCheckList.ClientRectangle).Right);
                int offsetY = System.Math.Abs(Cursor.Position.Y - frmCheckList.RectangleToScreen(this.frmCheckList.ClientRectangle).Bottom);
                this.DragOffset = new Point(offsetX, offsetY);
            }
        }

        /// <summary>
        /// 鼠标移动
        /// </summary>
        /// <param name="sender"></param>
        /// <param name="e"></param>
        private void lbGrip_MouseMove(object sender,MouseEventArgs e)
        {
            if (e.Button==MouseButtons.Left)
            {
                //获取拉伸长度
                int curWidth = Cursor.Position.X - frmCheckList.Location.X;
                int curHeight = Cursor.Position.Y - frmCheckList.Location.Y;
                  if (curWidth<this.Width)
	              {
		                curWidth=this.Width;
	               }

                  if (curHeight<checkListBox.Height)
	              {
		                curHeight=checkListBox.Height;
	              }

                this.frmCheckList.Size=new Size(this.Width,curHeight);
                this.pnlCheck.Size=frmCheckList.Size;
                this.checkListBox.Height=(this.frmCheckList.Height-lbGrip.Height)<50?50:this.frmCheckList.Height-lbGrip.Height;

               ReloationGrip();
                SetStyle(ControlStyles.OptimizedDoubleBuffer, true);
                SetStyle(ControlStyles.ResizeRedraw, true);
                SetStyle(ControlStyles.UserPaint, true);
                SetStyle(ControlStyles.AllPaintingInWmPaint, true);


            }
        }

        #endregion
    }
这样用户控件的布局以及完成,我们编译项目,就可以拖动用户控件到窗体上,看到效果了
2. 绑定和添加数据
2.1 从数据库中读取数据绑定显示
既然可以从数据库中读取数据,数据源就可以是DATATABLE,我们在这里为用户控件设置数据源,以及绑定后,要显示的字段,以及对于的值字段。
为控件添加以下属性
    /// <summary>
        /// 设置数据源
        /// </summary>
        public object DataSource
        {
            set
            {
                this.checkListBox.DataSource = value;
            }
            get
            {
                return checkListBox.DataSource;
            }
        }
        /// <summary>
        /// 设置值
        /// </summary>
        public string ValueMember
        {
            set
            {
                checkListBox.ValueMember = value;
            }
        }
        /// <summary>
        /// 设置显示名称
        /// </summary>
        public string DisplayMember
        {
            set
            {
                checkListBox.DisplayMember = value;
            }
        }
2.2 添加项
我们也可以不绑定数据源,为控件添加项,所有这里我们要为控件添加一个方法,可以实现手动添加项。
  /// <summary>
        /// 添加项
        /// </summary>
        public int AddItems(object value)
        {
            checkListBox.Items.Add(value);
            return checkListBox.Items.Count;
        }
这样我们就为用户控件实现了两种显示数据的方法。下面我们看看在窗体中怎样使用这两种方法
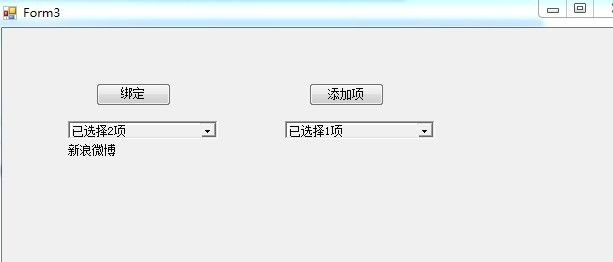
在窗体上放置两个按钮,然后绑定数据
 private void button1_Click(object sender, EventArgs e)
        {
            //绑定数据源
            DataTable dt = new DataTable();
            DataColumn dc1 = new DataColumn("weibo", typeof(System.String));
            dt.Columns.Add(dc1);

            DataColumn dc2 = new DataColumn("mail", typeof(System.String));
            dt.Columns.Add(dc2);

            DataColumn dc3 = new DataColumn("blog", typeof(System.String));
            dt.Columns.Add(dc3);


            for (int i = 0; i < 50; i++)
            {
                DataRow dr = dt.NewRow();
                dr[0] = "下里巴人simple";
                dr[1] = "[email protected]";
                dr[2] = "msdn" + i.ToString();
                dt.Rows.Add(dr);
            }
            comCheckBoxList1.DataSource = dt;
            comCheckBoxList1.DisplayMember = "weibo";
            comCheckBoxList1.ValueMember = "mail";
        }

        private void button2_Click(object sender, EventArgs e)
        {
            //添加项
            comCheckBoxList2.AddItems("邮箱:[email protected]");
            comCheckBoxList2.AddItems("微博:下里巴人simple");
        }
至此,第二步骤已经完成,可以实现大部分功能了.
3.事件处理
这里我们定义下全选事件,取消事件,和某项选中状态更改时发生的事件
  //全选事件
        private void lbSelectAll_Click(object sender, EventArgs e)
        {
            for (int i = 0; i < checkListBox.Items.Count; i++)
            {
                checkListBox.SetItemChecked(i, true);
            }
            tbSelectedValue.Text ="已选择"+checkListBox.Items.Count.ToString()+"项";
        }
        //取消
        private void lbSelectNo_Click(object sender,EventArgs e)
        {
            for (int i = 0; i < checkListBox.Items.Count; i++)
            {
                checkListBox.SetItemChecked(i, false);
            }
            tbSelectedValue.Text = "没有选择!";
        }
这里我们自定义一个选项状态更改时发生的事件,供别人使用的时候自行处理选择状态更改逻辑,需要我们自定义事件
  //单击列表项状态更改事件
        public delegate void CheckBoxListItemClick(object sender, ItemCheckEventArgs e);
        public event CheckBoxListItemClick ItemClick;
   private void checkListBox_ItemCheck(object sender, ItemCheckEventArgs e)
        {
            ItemClick(sender, e);

           //获取选中的数量
            int nCount = this.checkListBox.CheckedItems.Count;
            if (this.checkListBox.CheckedItems.Contains(this.checkListBox.Items[e.Index]))
            {

                if (e.NewValue != CheckState.Checked)
                {
                    nCount--;
                }
            }
            else
            {
                if (e.NewValue == CheckState.Checked)
                {
                    nCount++;
                }
            }
            tbSelectedValue.Text = "已选择" + nCount.ToString() + "项";

        }
  /// <summary>
        /// 选项集合
        /// </summary>
        public CheckedListBox.ObjectCollection Items
        {
            get
            {
                return checkListBox.Items;
            }
        }

        /// <summary>
        /// 获取选中项的文本
        /// </summary>
        /// <param name="item"></param>
        /// <returns></returns>
        public string GetItemText(object item)
        {
            return checkListBox.GetItemText(item);
        }
然后当用户把控件拖放到窗体上,我们就可以使用该事件了。
  /// <summary>
        /// 获取选中项的文本
        /// </summary>
        /// <param name="sender"></param>
        /// <param name="e"></param>
        private void comCheckBoxList1_ItemClick(object sender, ItemCheckEventArgs e)
        {
          string text=comCheckBoxList1.GetItemText(comCheckBoxList1.Items[e.Index]);
          MessageBox.Show(text);
        }
到此,这个控件的基本功能已经实现完成。再看下效果图
demo下载:http://download.csdn.net/detail/zx13525079024/4454696

