BootStrap入门教程 (二)
上讲回顾:Bootstrap的手脚架(Scaffolding)提供了固定(fixed)和流式(fluid)两种布局,它同时建立了一个宽达940px和12列的格网系统。
基于手脚架(Scaffolding)之上,Bootstrap的基础CSS(Base CSS)提供了一系列的基础Html页面要素,旨在为用户提供新鲜、一致的页面外观和感觉。本文将主要深入讲解排版(Typography),表格(Table),表单(Forms),按钮(Buttons)这四个方面的内容。
- 排版 (Typography),它囊括标题(Headings),段落 (paragraphs), 列表(lists)以及其他内联要素。我们可以通过修改variables.less的两个变量:
@baseFontSize和@baseLineHeight来控制整体排版的样式。Bootstrap同时还用了一些其他的算术方法来创建所有类型要素的margin,padding,line-height等。
1.1 标题和段落使用常见的html<h*></h*>和<p></P>即可表现,可以不必考虑margin,padding。两者显示效果如图2-1所示:
 图2-1 标题与段落(Headings¶graphs)
1.2 强调(Emphasis).使用<strong>和<em>两个标签,前者使用粗体,后者使用斜体来强调标签内容。请注意<strong>标签在html4中定义语气更重的强调文本;在 HTML 5 中,<strong> 定义重要的文本。这些短语标签也可以通过定义CSS的方式来丰富效果。更多短语标签请参见[1].缩写(abbreviations ).使用<abbr>,它重新封装了该标签,鼠标滑过会异步地显示缩写的含义。引入title属性来显示原文,使用.initialism类对缩写以大写方式显示。
1.3 引用文字(Blockquotes).使用<blockquote>标签和<small>两个标签,前者<blockquote>是引用的文字内容,后者<small>是可选的要素,能够添加书写式的引用,比如内容作者。如图2-2所示
图2-2 引用(Blockquotes)
代码片段如下所示:
<div class="row">
  <div class="span6 ">
  <blockquote class="pull-right">
  <p>凌冬将至. 我是黑暗中的利剑,长城上的守卫,抵御寒冷的烈焰,破晓时分的光线,唤醒眠者的号角,守护王国的坚盾。</p>
  守夜人军团总司令.<small>蒙奇.D.<cite title="">路飞</cite></small>
</blockquote>
  </div>
  <div class="span6 ">
  <blockquote >
  <p>凌冬将至.
我是黑暗中的利剑,长城上的守卫,抵御寒冷的烈焰,破晓时分的光线,唤醒眠者的号角,守护王国的坚盾。</p>
  守夜人军团总司令.<small>蒙奇.D.<cite title="">路飞</cite></small>
</blockquote>
  </div>
  </div>
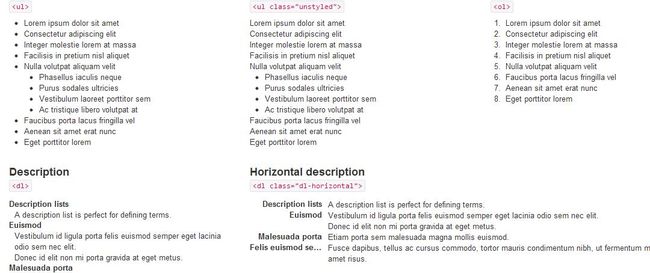
1.4列表(lists).Bootstrap提供三种标签来表现不同类型的列表。<ul>表示无序列表,<ul class="unstyled">表示无样式的无序列表,<ol>表示有序列表,<dl>表示描述列表,<dl class="dl-horizontal">表示竖排描述列表。图2-3较好显示了这几种列表:
图2-3 列表(lists)
2.表格(Table).依然使用<table><tr><th><td>等标签来表现表格。主要提供了四个css的类来控制表格的边和结构。表2-1显示了bootstrap的table可选项。
| 名字 |
Class |
描述 |
| Default |
None |
没有样式,只有行和列 |
| Basic |
.table |
只有在行间有竖线 |
| Bordered |
.table-bordered |
圆角和添加外边框 |
| Zebra-stripe |
.table-striped |
为奇数行添加淡灰色的背景色 |
| Condensed |
.table-condensed |
将横向的 padding 对切 |
表2-1 表格选项(Table Options)
我们可以将这些CSS类结合起来使用,如图2-4所示,显示一个混合的表格:
图2-4 表格(Table)
代码片段如下所示:
<div class="span8">
      <form class="form-horizontal">
        <fieldset>
          <div class="control-group">
            <label class="control-label" for="focusedInput">Focused input</label>
            <div class="controls">
              <input class="input-xlarge focused" id="focusedInput" type="text" value="This is focused…">
            </div>
          </div>
          <div class="control-group">
            <label class="control-label">Uneditable input</label>
            <div class="controls">
              <span class="input-xlarge uneditable-input">Some value here</span>
            </div>
          </div>
          <div class="control-group">
            <label class="control-label" for="disabledInput">Disabled input</label>
            <div class="controls">
              <input class="input-xlarge disabled" id="disabledInput" type="text" placeholder="Disabled input here…" disabled>
            </div>
          </div>
          <div class="control-group">
            <label class="control-label" for="optionsCheckbox2">Disabled checkbox</label>
            <div class="controls">
              <label class="checkbox">
                <input type="checkbox" id="optionsCheckbox2" value="option1" disabled>
                This is a disabled checkbox
              </label>
            </div>
          </div>
          <div class="control-group warning">
            <label class="control-label" for="inputWarning">Input with warning</label>
            <div class="controls">
              <input type="text" id="inputWarning">
              <span class="help-inline">Something may have gone wrong</span>
            </div>
          </div>
          <div class="control-group error">
            <label class="control-label" for="inputError">Input with error</label>
            <div class="controls">
              <input type="text" id="inputError">
              <span class="help-inline">Please correct the error</span>
            </div>
          </div>
          <div class="control-group success">
            <label class="control-label" for="inputSuccess">Input with success</label>
            <div class="controls">
              <input type="text" id="inputSuccess">
              <span class="help-inline">Woohoo!</span>
            </div>
          </div>
          <div class="control-group success">
            <label class="control-label" for="selectError">Select with success</label>
            <div class="controls">
              <select id="selectError">
                <option>1</option>
                <option>2</option>
                <option>3</option>
                <option>4</option>
                <option>5</option>
              </select>
              <span class="help-inline">Woohoo!</span>
            </div>
          </div>
          <div class="form-actions">
            <button type="submit" class="btn btn-primary">Save changes</button>
            <button class="btn">Cancel</button>
          </div>
        </fieldset>
      </form>
    </div>
3. 表单(Forms).Bootstrap的表单是非常惊艳的部分。最好的地方在于你如何使用这些hmtl标签,它都会有很好的表现效果,而且不需要其他多余的代码。无论多复杂的布局都可以根据这些简洁,可扩展,事件绑定的要素来轻易实现。主要提供了四四种表单选项,如表2-2所示:
| 名字 |
Class |
描述 |
| Vertical (default) |
.form-vertical (not required) |
堆放式, 可控制的左对齐标签 |
| Inline |
.form-inline |
左对齐标签和简约的内联控制块 |
| Search |
.form-search |
放大的圆角,具有美感的搜索框 |
| Horizontal |
.form-horizontal |
左漂浮, 右对齐标签 |
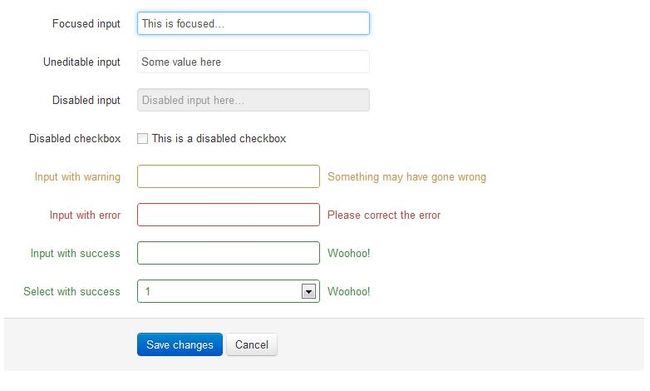
推荐到官方文档去体验下各种表单要素的真实效果,在chrome,Firefox等现代浏览器下显示十分优雅。同时可以使用.control-group来控制表单输入、错误等状态,需要wekit内核。如图2-5所示:
图2-5 表单状态控制
代码片段如下:
<div class="span8">
      <form class="form-horizontal">
        <fieldset>
          <div class="control-group">
            <label class="control-label" for="focusedInput">Focused input</label>
            <div class="controls">
              <input class="input-xlarge focused" id="focusedInput" type="text" value="This is focused…">
            </div>
          </div>
          <div class="control-group">
            <label class="control-label">Uneditable input</label>
            <div class="controls">
              <span class="input-xlarge uneditable-input">Some value here</span>
            </div>
          </div>
          <div class="control-group">
            <label class="control-label" for="disabledInput">Disabled input</label>
            <div class="controls">
              <input class="input-xlarge disabled" id="disabledInput" type="text" placeholder="Disabled input here…" disabled>
            </div>
          </div>
          <div class="control-group">
            <label class="control-label" for="optionsCheckbox2">Disabled checkbox</label>
            <div class="controls">
              <label class="checkbox">
                <input type="checkbox" id="optionsCheckbox2" value="option1" disabled>
                This is a disabled checkbox
              </label>
            </div>
          </div>
          <div class="control-group warning">
            <label class="control-label" for="inputWarning">Input with warning</label>
            <div class="controls">
              <input type="text" id="inputWarning">
              <span class="help-inline">Something may have gone wrong</span>
            </div>
          </div>
          <div class="control-group error">
            <label class="control-label" for="inputError">Input with error</label>
            <div class="controls">
              <input type="text" id="inputError">
              <span class="help-inline">Please correct the error</span>
            </div>
          </div>
          <div class="control-group success">
            <label class="control-label" for="inputSuccess">Input with success</label>
            <div class="controls">
              <input type="text" id="inputSuccess">
              <span class="help-inline">Woohoo!</span>
            </div>
          </div>
          <div class="control-group success">
            <label class="control-label" for="selectError">Select with success</label>
            <div class="controls">
              <select id="selectError">
                <option>1</option>
                <option>2</option>
                <option>3</option>
                <option>4</option>
                <option>5</option>
              </select>
              <span class="help-inline">Woohoo!</span>
            </div>
          </div>
          <div class="form-actions">
            <button type="submit" class="btn btn-primary">Save changes</button>
            <button class="btn">Cancel</button>
          </div>
        </fieldset>
      </form>
    </div>
  </div>
4.按钮(Buttons).Bootstrap提供多种样式的按钮,同样是通过CSS的类来控制,包括btn, btn-primary, btn-info,btn-success等不同颜色的按钮,亦可以简单通过.btn-large .btn-mini等CSS的class控制按钮大小,能够同时用在<a>,<button>,<input>标签上,非常简单易用。如图2-6所示,不同颜色的按钮:
图2-6 按钮(Buttons)
代码片段如下:
<table class="table table-bordered table-striped">
    <thead>
      <tr>
        <th>Button</th>
        <th>class=""</th>
        <th>Description</th>
      </tr>
    </thead>
    <tbody>
      <tr>
        <td><button class="btn" href="#">Default</button></td>
        <td><code>btn</code></td>
        <td>Standard gray button with gradient</td>
      </tr>
      <tr>
        <td><button class="btn btn-primary" href="#">Primary</button></td>
        <td><code>btn btn-primary</code></td>
        <td>Provides extra visual weight and identifies the primary action in a set of buttons</td>
      </tr>
      <tr>
        <td><button class="btn btn-info" href="#">Info</button></td>
        <td><code>btn btn-info</code></td>
        <td>Used as an alternative to the default styles</td>
      </tr>
      <tr>
        <td><button class="btn btn-success" href="#">Success</button></td>
        <td><code>btn btn-success</code></td>
        <td>Indicates a successful or positive action</td>
      </tr>
      <tr>
        <td><button class="btn btn-warning" href="#">Warning</button></td>
        <td><code>btn btn-warning</code></td>
        <td>Indicates caution should be taken with this action</td>
      </tr>
      <tr>
        <td><button class="btn btn-danger" href="#">Danger</button></td>
        <td><code>btn btn-danger</code></td>
        <td>Indicates a dangerous or potentially negative action</td>
      </tr>
      <tr>
        <td><button class="btn btn-inverse" href="#">Inverse</button></td>
        <td><code>btn btn-inverse</code></td>
        <td>Alternate dark gray button, not tied to a semantic action or use</td>
      </tr>
    </tbody>
  </table>


