Depthimage_to_laserscan安装并执行
Depthimage_to_laserscan安装并执行
(前提:以正确安装kinect驱动)
方法1:
1、下载fuerte版本的,并放在ros的执行路径,即ROS_PACKAGE_PATH。
2、执行roscore。
3、执行make,make all,maketest,在bin文件里会生成3个可执行文件,分别是
depthimage_to_laserscan,libtest,test_dtl。其中depthimage_to_laserscan为主要节点。
4、执行rostopic list –v,会有很多camera下的话题,包括订阅的话题scan。
5、mkdir构建.launch文件,并加入以下内容。
-------------简洁版----------------
<launch>
<nodepkg="depthimage_to_laserscan" type="depthimage_to_laserscan"name="depthimage_to_laserscan" args= “standalone depthimage_to_lasersacn/DepthImageToLaserScanNodelet”>
<remap from="image" to="/camera/depth_registered/image_raw"/>
<remap from="camera_info" to="/camera/depth_registered/camera_info"/>
<remap from="scan" to="/kinect_scan"/>
<param name="range_max" type="double"value="4"/>
</node>
</launch>
-----------------------------------
----------- depthimage_to_laserscan节点---------
发布的话题:
Image(sensor_msgs/Image)
Camera_info(sensor_msgs/CameraInfo)
订阅的话题:
Scan(sensor_msgs/LaserScan)
6、执行roslaunch 包名 .launch文件
7、在.launch文件中加载openni.launch文件(因为要启动ASUSXtion pro live摄像头),launch文件必须包含摄像头节点信息。
以下就是在一个包里嵌套其它的包。
如下:
---------------------包含openni.launch文件-----------------------
<launch>
<include file="$(find openni_launch)/launch/openni.launch"/ >
<nodepkg="depthimage_to_laserscan" type="depthimage_to_laserscan"name="depthimage_to_laserscan" args= “standalone depthimage_to_lasersacn/DepthImageToLaserScanNodelet /camera/rgb/image_viewer”>
<remap from="image" to="/camera/depth_registered/image_raw"/>
<remap from="camera_info"to="/camera/depth_registered/camera_info"/>
<remap from="scan" to="/kinect_scan"/>
<param name="range_max"type="double" value="4"/>
</node>
</launch>
--------------------------------------------
8、执行roslaunch depthimage_to_laserscan depthimage_to_laserscan.launch
执行 rosrun depthimage_to_laserscan depthimage_to_laserscanimage:=/camera/depth/image_raw
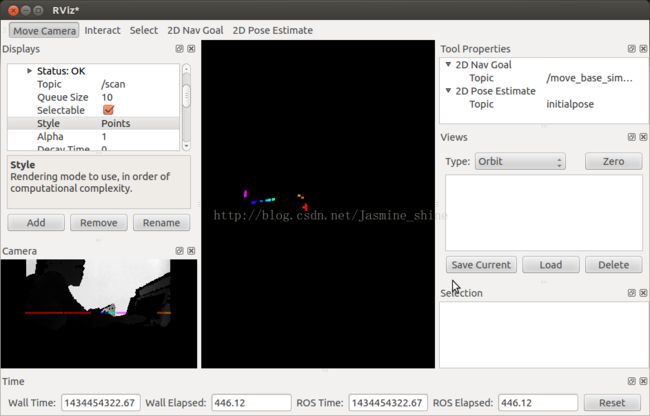
9、执行rosrun rviz rviz,添加camera和laserscan,就能正确输出depth image和伪激光点,如下所示:

10、附件
复杂的.launch文件
-------------------------------------------
<launch>
<!-- "camera" should uniquelyidentify the device. All topics are pushed down
into the "camera" namespace, and it is prepended to tf frameids. -->
<arg name="camera" default="camera"/>
<arg name="publish_tf" default="true"/>
<!-- Factory-calibrated depth registration -->
<arg name="depth_registration" default="true"/>
<arg if="$(argdepth_registration)" name="depth"value="depth_registered" />
<arg unless="$(arg depth_registration)"name="depth" value="depth" />
<!--Driver parameters -->
<arg name="color_depth_synchronization" default="false" />
<arg name="auto_exposure" default="true"/>
<arg name="auto_white_balance" default="true" />
<!-- Processing Modules -->
<argname="rgb_processing" default="true"/>
<arg name="ir_processing" default="true"/>
<arg name="depth_processing" default="true"/>
<arg name="depth_registered_processing" default="true"/>
<arg name="disparity_processing" default="true"/>
<arg name="disparity_registered_processing"default="true"/>
<arg name="scan_processing" default="true"/>
<!-- Worker threads for the nodelet manager -->
<arg name="num_worker_threads" default="4" />
<include file="$(findopenni_launch)/launch/openni.launch">
</include>
<!-- Laserscan topic -->
<arg name="scan_topic" default="scan"/>
<!-- Laserscan
This uses lazy subscribing, so will not activate until scan isrequested.
-->
<group if="$(arg scan_processing)">
<node pkg="depthimage_to_laserscan"type="depthimage_to_laserscan"name="depthimage_to_laserscan" args="loaddepthimage_to_laserscan/DepthImageToLaserScanNodelet $(arg camera)/$(argcamera)_nodelet_manager">
<!-- Pixel rows to use to generate the laserscan. For each column,the scan will
return the minimum value for those pixels centered vertically in theimage. -->
<param name="scan_height" value="10"/>
<param name="output_frame_id" value="/$(argcamera)_depth_frame"/>
<param name="range_min" value="0.45"/>
<remap from="image" to="$(arg camera)/$(argdepth)/image_raw"/>
<remap from="scan" to="$(arg scan_topic)"/>
<remap from="$(arg camera)/image" to="$(argcamera)/$(arg depth)/image_raw"/>
<remap from="$(arg camera)/scan" to="$(argscan_topic)"/>
</node>
</group>
</launch>
--------------------------------------------
方法2:
不使用launch文件,直接先执行$roslauch openni_launch openni.launch,再执行$rosrun depthimage_to_laserscan depthimage_to_laserscan image:=/camera/depth/image_raw,最后再调用rviz显示图像。
第2种方法是最简单的。
总结:
输入输出就是所谓的话题,用rviz进行显示
发布的话题:
Image(sensor_msgs/Image)
Camera_info(sensor_msgs/CameraInfo)
订阅的话题:
Scan(sensor_msgs/LaserScan)
问题:rosmake与make的区别?
rosmake是用在rosbuild(roscreate-pkg)创建工作空间的编译,rosbuild是ROS传统的编译系统,属于老版本。
而make是对已经存在了的包进行的编译。