Hello, Android 深入(二)
Activities and the Activity Lifecycle
-活动和活动生命周期
The Activity class contains the code that powers the user interface. The Activity is responsible for
responding to user interaction and creating a dynamic user experience.
活动类包含操纵用户界面的代码,活动负责响应用户交互并创建动态的用户体验。
In this section we introduce the Activity class, discuss the Activity Lifecycle, and dissect the code
that powers the user interface in our Phoneword application.
本节介绍活动类,讨论活动的生命周期,并仔细分析在Phoneword应用中操纵用户界面的代码。
Activity Class-活动类
Our Phoneword application has only one screen (Activity). The class that powers the screen is called
MainActivity and lives in the MainActivity.cs file. The name MainActivity has no special significance
in Android - although it’s convention to name the first Activity in an application " MainActivity",
Android wouldn’t care if we named it something else.
我们的Phoneword应用只有一个屏显(活动)。操控这一屏显的类被称为MainActivity并且存在于MainActiviey.cs文件中。命名“MainActiviey” 在安卓中没有特别的意义-尽管在一个应用中命名第一个活动为“MainActiviey”是一个惯例,如果我们命名为其它别的,安卓也不会介意。
If we open the MainActivity.cs file, we see that our MainActivity class is a subclass of the Activity class,
and that the Activity is adorned with the ActivityAttribute:
如果打开MainActivity.cs文件,会看到MainActivity类是一个Activity类的子类,而且该Activity被Activity属性修饰。
[Activity(Label = "Phoneword", MainLauncher = true, Icon = "@drawable/icon")]
public class MainActivity : Activity{...}
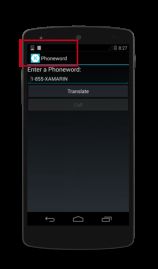
The Activity Attribute registers the Activity with the Android Manifest, letting Android know that this class is
part of the Phoneword application managed by this Manifest. The Label property sets the text to display
at the top of the screen, and theIcon sets the image to display next to the text, as illustrated by the
screenshot below:
该Activity属性随着Android Manifest注册了该Activity,让安卓知道这一类是被Manifest管理的Phoneword应用的一部分。Label属性设置在屏幕顶部显示的文本,Icon设置显示在文本之前的图像,如下图所示:
The MainLauncher property tells Android to display this Activity when the application starts up. This
property becomes important as we add more Activities (screens) to our application in the
Hello, Android Multiscreen guide.
MainLauncher属性告诉安卓当应用启动时显示该活动。当我们按Hello, Android Multiscreen指南在应用中增加更多的活动(屏)时,该属性变得很重要。
Now that we understand the basics of the MainActivity, let’s dive deeper into the Activity code by
introducing the Activity lifecycle.
刚才我们理解了MainActivity的基础知识,现在让我们通过介绍活动生命周更进一步深入到活动代码中,
Activity Lifecycle-活动生命周期
In Android, Activities go through different stages of a lifecycle depending on their interactions with the
user. Activities can be created, started and paused, resumed and destroyed, and so on. The Activity
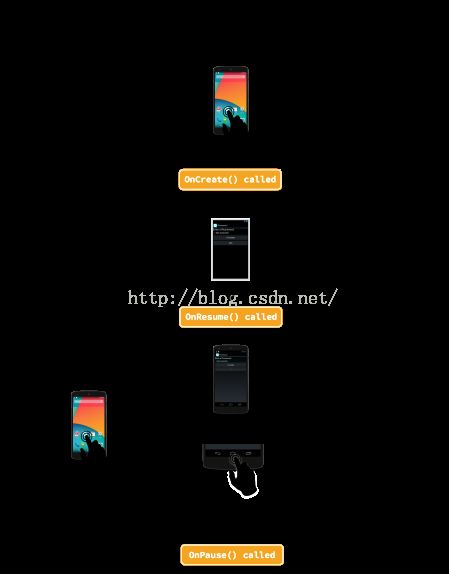
class contains methods that the system calls at certain points in the screen's lifecycle. The following
diagram illustrates a typical life of an Activity, and some of the corresponding lifecycle methods:
在Android,活动依赖与用户的交互,会经历一个生命周期的不同阶段,活动会被创建、开始、暂停、恢复、销毁,诸如此类。活动类包括方法,系统在屏显的生命周期的特定的点调用这些方法,下面的图表说明一个活动的典型生命,以及一些对应的生命周期方法:
By overriding Activity lifecycle methods, we can control how the Activity loads, how it reacts to the
user, and even what happens after it disappears from the device screen. For example, we can
override the lifecycle methods in the diagram above to perform some important tasks:
通过重载活动生命周期,我们可以控制活动如何装载、如何对用户做出反应、以及甚至其出现在设备屏幕上的发生什么。比如,我们可以重载上图中的生命周期方法来执行一些重要的任务:
· OnCreate – Create views, initialize variables, and do other prep work before the user sees the
Activity. This method is called only once when the Activity is loaded into memory.
创建视图、初始化变量、在用户看见活动之前做其他的准备工作,这个方法只有当活动被装载入内存时都会被调用一次。
·
· OnResume – Perform any tasks that need to happen every time the Activity returns to the device screen.
执行任何时候活动返回设备屏幕时需要发生的一切任务。
·
· OnPause – Perform any tasks that need to happen every time the Activity leaves the device screen.
执行任何时候活动离开设备屏幕时需要发生的一切任何。
When we add custom code to a lifecycle method in the Activity, we override that lifecycle method’s base implementation. We tap into the existing lifecycle method, which has some code already attached
to it, and we extend it with our own code. We call the base implementation from inside our method to
make sure the original code runs before our new code. We’ll see an example of this in the next section.
当我们增加自定义的代码到活动的生命周期方法时,我们重载那个生命周期方法的base实现。我们利用已存在的生命周期方法,该方法已经有一些代码存在,我们用自己的代码扩展它。我们从方法里调出 base实现来确保原始代码在我们的新代码之前执行。我们将在后面的章节中看一个例子。
The Activity Lifecycle is an important and complex part of Android, and we’re not going to dive into the
details just yet. If you’d like to learn more about Activities after you finish the Getting Started series, we
recommend reading
the Activity Lifecycleguide. For now, let’s focus on the first stage of the Activity Lifecycle, OnCreate.
活动生命周期是Android中一个重要而复杂的部分,我们现在将不会深入到其细节。在学完本《开始》系统教程后,如果你喜欢学习更多活动的知识,我们建议你阅读 活动生命周期指南。现在,我们聚集于活动生命周期的第一个阶段,OnCreate。
OnCreate
Android calls the Activity’s OnCreate method when it creates the Activity, before the screen is presented
to the user. We can override the OnCreate lifecycle method to create views and prepare our Activity to
meet the user:
Android在创建一个活动时调用该活动的OnCreate方法,此时屏显还没有展现给用户。我们可以重载OnCreate生命周期方法来创建视图并准备我们的活动与用户见面。
protected override void OnCreate (Bundle bundle)
{ base.OnCreate (bundle);
// Set our view from the "main" layout resource
SetContentView (Resource.Layout.Main);
// Additional setup code will go here }
In our Phoneword app, the first thing we do in OnCreate is load the user interface we created in the
Android designer. To load the UI, we call SetContentView and pass it the resource layout name for
the layout file - our Main.axml. Our layout is located atResource.Layout.Main:
在我们的Phoneword app中,我们在OnCreate中所做的第一件事是装载我们在Android设计器中创建的用户界面。要载UI,我们调用 SetContentView并给它传递我们的布局文件Main.axml的资源布局名称。我们的布局被定位在Resource.Layout.Main:
SetContentView (Resource.Layout.Main);
When the MainActivity starts up, it will create a view based on the contents of the Main.axml file.
Note that we’ve matched our layout name with our Activity name - Main.axml is the layout for
MainActivity. This isn’t required from Android’s point of view, but as we begin to add more screens
to the application, we’ll find this naming convention makes it easy for us to match the code file to
the layout file.
当MainActivity启动时,Android将创建一个基于Main.axml文件的内容的视图。注意我们已将布局名和活动名进行了一定的匹配-Main.axml是MainActivity的布局。从Android的观点来说,这是不必要的。但由于我们开始要增加更多的屏显到应用中,我们发现这种命名习惯使我们更易于将根据代码文找到相应的布局文件。
Once the layout file is set, we can start looking up our controls. To look up a control, we call
FindViewById and pass in the resource ID of the control:
一旦布局被设置好,我们就能开始查找我们的控件了,要查找控件,可调用FindViewById并将控件的资源ID传递给它。
EditText phoneNumberText = FindViewById<EditText>(Resource.Id.PhoneNumberText);
Button translateButton = FindViewById<Button>(Resource.Id.TranslateButton);
Button callButton = FindViewById<Button>(Resource.Id.CallButton);
Now that we have a reference to the controls in the layout file, we can start programming them to
respond to user interaction.
现在,我们对Layout文件中的控件有了一个了解,我们可以开始对它们进行编程来响应用户的互动了。
Responding to User Interaction
-响应用户互动
In Android, the Click event listens for the user’s touch. In our app, we handled the Click event with a lambda, but we could have also used a delegate
or a named event handler. Our final TranslateButton code resembled the following:
在Android中,Click事件监听用户的触摸,在我们的应用中,我们用一个lambda来处理Click事件,但我们也可以使用委托或命名的事件处理程序。我们最后的TranslateButton代码类似如下:
translateButton.Click += (object sender, EventArgs e) =>
{ // Translate user’s alphanumeric phone number to numeric
translatedNumber = Core.PhonewordTranslator.ToNumber(phoneNumberText.Text);
if (String.IsNullOrWhiteSpace(translatedNumber))
{
callButton.Text = "Call";
callButton.Enabled = false;
}
else
{
callButton.Text = "Call " + translatedNumber;
callButton.Enabled = true;
}
};
Additional Concepts Introduced in Phoneword
-Phoneword中介绍的附加概念
The Phoneword application introduced several concepts not covered in this guide. These concepts
include:
Phoneword应用介绍了几个概念,在本指南中没有提到,他们包括:
·
Change Button Text – We learned to change the text of a Button by editing that Button’s Text property. For example, the following code changes the callButton’s text to "Call":
改变按钮文本-我们学习了通过编辑按钮的文本属性改变按钮的文本,比如,下列代码改变CallButton的文本为“Call”:
·
callButton.Text = "Call";
·
·
Enable and Disable Buttons – Buttons can be in an Enabled or Disabled state. A disabled Button
won’t respond to user input. For example, the following code disables the callButton:
使按钮有效或无效-按钮可在有效或无效状态,无效的按钮将不会响应用户的输入。比如,下面的代码使callButton按钮无效:
·
callButton.Enabled = false;
·
For more information on buttons, refer to the Android Buttons guide.
更多按钮的信息,参见 Android 按钮指南。
·
Display an Alert Dialog – When the user presses the Call Button, our app shows an Alert Dialog
with the option to place or cancel a call. To create an Alert Dialog, we used an Alert Dialog Builder.
Our dialog consists of a Neutral button to place a call and a Negative button to cancels the call, as
illustrated by the code below:
显示一个警示对话框-当用户按Callbutton,应用程序显示一个拨打或取消电话的警示对话框。要创建一个警示对话框,可使用一个 Alert Dialog Builder。对话框包括一个中立的按钮来拨打电话,一个否定的按钮来取消电话,用以下代码说明:
·
var callDialog = new AlertDialog.Builder(this);
callDialog.SetMessage("Call " + translatedNumber + "?");
callDialog.SetNeutralButton("Call",
Delegate
{ // Create intent to dial phone
});
callDialog.SetNegativeButton("Cancel", delegate {});
// Show the alert dialog to the user and wait for response.
callDialog.Show();
·
·
Launch Phone App with Intent – When we wired up the CallButton, we sent an Intent to launch
the system phone app, passing in the telephone number we wanted to call, as illustrated by the
code sample below:
用意图开动手机应用-当我们按下CallButton,我们发送了一个意图来开动这个系统手机应用,将我们想要打的电话号码传进去,如以下代码所示:
·
var callIntent = new Intent(Intent.ActionCall);
callIntent.SetData(Android.Net.Uri.Parse("tel:" + translatedNumber));
StartActivity(callIntent);
·
Intents are covered in more depth in the Hello, Android Multiscreen guide. In that guide, we’ll learn to use Intents to launch other Activities (screens) and even other applications.
意图(Intents)在Hello, Android Multiscreen 指南中有更深的讨论,在那里,我们将学习使用意图开动其他的活动(屏显)甚至其他应用。
·
Testing, Deployment, and Finishing Touches
-测试、部署和收尾
Both Xamarin Studio and Visual Studio provide many options for testing and deploying an application.
This section covers debugging options, demonstrates testing applications on device, and introduces
tools for creating custom app icons for different screen densities.
Xamarin Studio 和 Visual Studio 都提供许多方法来测试和部署应用。本节讨论调试方法、演示在设备上测试应用并介绍为不同的屏幕密度创建自定义app图标的工具。
Debugging Tools
Sometimes issues in application code are difficult to diagnose. To help diagnose complex code issues,
we could Set a Breakpoint, Step Through Code, or Output Information to the Log Window.
有时候应用代码中的问题很难判断。为了帮助判断复杂地代码问题,我们可以通Set a设置断点, 步进代码 或 输出信息到日志窗口。
Deploy to a Device--部署到设备
The emulator is a good start for deploying and testing an application, but users will not consume the
final app in the emulator. We should test applications on a real device early and often.
模拟器是部署和测试应用的很好开端,但用户不会在模拟器上消费应用,我们应该及早并经常在真实的设备上测试应用。
Before an Android device can be used for testing applications, it needs to be configured for development.
The Set Up Device for Development guide provides thorough instructions on getting a device ready for
development.
Once the device is configured, we can deploy to it by plugging it in, selecting it from the Select Device dialog,
and starting the application:
一个Android设备能被用于测试应用前,它需要为开发被配置。为开发设置设备 指南提供了使设备为开发作好准备的全面说明。
This will launch the application on the device:
这将在设备上开动应用。
Set Icons for Different Screen Densities
-为不同的屏幕密度设置图标
Android devices come in different screen sizes and resolutions, and not all images look good on all
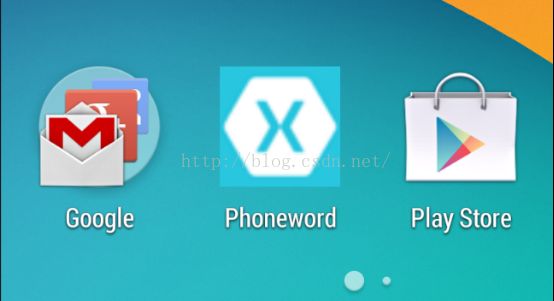
screens. For example, here is a screenshot of a low-density icon on a high-density Nexus 5. Notice how blurry it is compared to the surrounding icons:
安卓设备会有不同的屏幕尺寸和分辨率,不是所有的图像在所有的屏幕上都好看。比如,这是一个低密图标在高密Nexus 5上的屏幕截图,可以看到和周围的其他图标相比,这个图标非常模糊。
To account for this, it is good practice to add icons of different resolutions to the Resources folder.
Android provides different versions of the drawable folder to handle images of different densities,
including an ldpi version for low density, mdpi for medium, hdpi for high, and xhdpi and xxhdpi for
very high density screens. Icons of varying sizes are stored in the appropriate drawable-* folders:
为了解释这个,把不同分辨率的图标加入到Resources文件夹中是一个好的办法。安卓提供不同版本的绘图文件夹来处理不同密度的图像,包括ldpi版对应底密度、mdpi对应中密度、hdpi对应高,xhdpi和xxhdpi对应非常高的屏幕密度。不同尺寸的图标被存储在适当的drawable-*文件夹中。
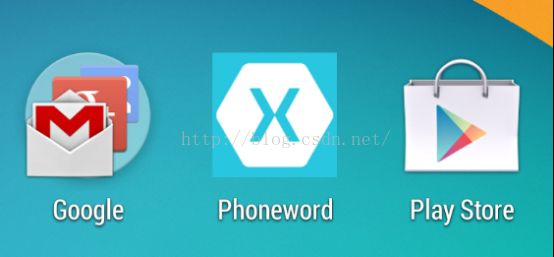
Android will pick the icon with the appropriate density:
安卓将排行合适密度的图标。
Generate Custom Icons
制作自定义图标
Not everyone has a designer available to create the custom icons and launch images an app needs
to stand out. Here are several alternate approaches to generating custom app artwork:
非常所有的人都有可用的设计器来创建自定义图标并生成使应用显得突出的图像。这些有几个适当方法来制作自定义app图像。
· Android Asset Studio – A web-based, in-browser generator for all types of Android icons, with links to other useful community tools. It works best in Google Chrome.
· Android Asset Studio-一个基于网页、在线生成所有类型安卓图标随带链接到其他有用社区的工具,可在Google Chrome中良好运行。
· Visual Studio – You can use this to create a simple icon set for your app directly in the IDE.
· Visual Studio-你可以使用这个来创建一个简单的图标集直接在IDE中用于你的app。
· Glyphish – High-quality prebuilt icon sets for free download and purchase.
· Glyphish -高品质重建图标套件,可自由下载和购买。
· Fivrr – Choose from a variety of designers to create an icon set for you, starting at $5. Can be hit or
miss but a good resource if you need icons designed on the fly.
· Fivrr --选择设计者为您创建一套图标,5元起价,无论如何,当你急着需要图标时,这是一个好的资源。
For more information about icon sizes and requirements, refer to the Android Resources guide.
更多图标尺寸和需求的信息,参见Android Resources 指南。
Summary-总结
Congratulations! You now have a solid understanding of the components of a Xamarin.Android application
as well as the tools required to create it.
祝贺你。现在你已经对Xamarin.Android应用的各部分以及需要用于创建Xamarin.Android应用的工具有了一个可靠的理解。
In the next tutorial in the Getting Started series, we'll extend our application to handle multiple screens as
we explore more advanced Android architecture and concepts.
在Getting Started 系列的下一个教程,我们将将应用扩展到操控多个屏显以探究更多高级的安卓体系结构和概念。


