Java的浅表克隆和深表克隆
前言
Java的克隆方法主要是使用Object类的clone()函数。这个方法的原型为:
protected Object clone()throws CloneNotSupportedException;
这个方法可以帮助我们将一个对象进行浅表克隆,并且赋值给引用变量。但是如果这个类没有实现java.lang.Cloneable接口,则在我们使用这个方法的时候,或者是在类中重写clone()方法的时候,则会直接抛出CloneNotSupportedException异常。
一、为什么使用clone()函数
当我们为一个引用变量赋值的时候,总体上有三种方法:Copy、Clone和new。
假设我们有一个已经建好了类:
    class Student implements Cloneable{

    private String name;
    private int age;
    private String sex;

    public String getName() {
        return name;
    }

    public void setName(String name) {
        this.name = name;
    }

    public int getAge() {
        return age;
    }

    public void setAge(int age) {
        this.age = age;
    }

    public String getSex() {
        return sex;
    }

    public void setSex(String sex) {
        this.sex = sex;
    }

    public Student() {
        name = null;
        age = 0;
        sex = null;
    }

    public Student(String _name, int _age, String _sex) {
        this.name = _name;
        this.age = _age;
        this.sex = _sex;
    }

    /*重写toString()函数,用于后面结果显示的简单性*/
    public String toString() {
        return "[" + name + "," + age + "," + sex + "]";
    }

    /*若要使用Clone函数,需要重写继承于Object的Clone()方法,在代码中直接调用 Object类的方法即可。 */
    public Object clone() throws CloneNotSupportedException {
        return super.clone();
    }
}- Copy:
当我们使用Copy来给一个引用变量赋值的时候,我们可以这么做:
Student st1=new Student(); Student st2=st1; 此时,我们仅仅是把第一个引用变量所存的地址给了第二个引用变量。St1与St2仍然指向的是同一个地址,当我们通过St2来修改对象属性的时候,此时St1也会跟着受影响。这并不是我们所希望看见的。
2. new:
当我们使用new来给一个引用变量赋值的时候,此时JVM首先会在堆开辟一块区域,然后调用该方法的构造函数来创建一个对象。并且将这块内存区域的地址赋值给一个引用变量。
Student st1=new Stuendt(); 这个就是我们最最常用的方式,但是这么做有一个弊端,那就是如果我们在类的构造函数中的代码量特别的多的话,测试每次创建一个对象都需要大量的时间,但是这些对象的初始值确实没有任何的变化,这样会大大的降低程序的执行效率。
3. Clone:
当我们利用Clone方法来代替new关键字的时候,此时可以改善上面的问题。因为当我们使用clone方法来克隆一个对象的时候,此时我们不需要通过关键字New来创建一个对象,而是直接在内存中,通过域对域的方式,直接创建在堆中创建一个对象,然后将对象的地址赋值给引用变量。
Student str=new Student();
Student temp=(Student)str.clone();
因为clone()函数返回的是Object类型,因此我们需要强制转换类型。另外,对于Student类中的基本类型,直接通过复制值的方式克隆,但是如果成员变量是一个引用类型(即:是另一个类的对象的引用,String除外),此时在克隆的时候,仅仅只是将这个引用变量的值克隆而已。因此克隆前后两个对象的某些成员变量指向同一个内存地址。这个就是克隆的浅表克隆方式。要想完全克隆,需要自己去实现(后面会讲)。
相比于通过关键字new来创建一个对象的引用的方式。这种方法的效率更加的高效。因此当我们用来初始化一些默认值不变的对象的时候,此时通过克隆比通过关键字new要高效的多。
二、前提类型
在我们讨论clone的浅表克隆和深表克隆时,我们需要一些前提代码,作为我们实验的基础。
class Birthday {
    private int year;
    private int month;
    private int day;

    public Birthday(int _year, int _month, int _day) {
        year = _year;
        month = _month;
        day = _day;
    }

    public int getYear() {
        return year;
    }

    public void setYear(int year) {
        this.year = year;
    }

    public int getMonth() {
        return month;
    }

    public void setMonth(int month) {
        this.month = month;
    }

    public int getDay() {
        return day;
    }

    public void setDay(int day) {
        this.day = day;
    }

    public String toString() {
        return "[" + year + "," + month + "," + day + "]";
    }
}
三、浅表克隆
class Student implements Cloneable {

    private String name;
    private int age;
    private String sex;
    private Birthday birthday;

    public String getName() {
        return name;
    }

    public void setName(String name) {
        this.name = name;
    }

    public int getAge() {
        return age;
    }

    public void setAge(int age) {
        this.age = age;
    }

    public String getSex() {
        return sex;
    }

    public void setSex(String sex) {
        this.sex = sex;
    }

    public Student(String _name, int _age, String _sex, int _year, int _month,
            int _day) {
        this.name = _name;
        this.age = _age;
        this.sex = _sex;
        birthday = new Birthday(_year, _month, _day);
    }

    public String toString() {
        return "[" + name + "," + age + "," + sex + "]" + birthday.toString();
    }

    public Object clone() throws CloneNotSupportedException {
        return super.clone();
    }

    public Birthday getBirthday() {
        return birthday;
    }

    public void setBirthday(Birthday birthday) {
        this.birthday = birthday;
    }

    public void setBirthday(int _year, int _month, int _day) {
        birthday.setYear(_year);
        birthday.setMonth(_month);
        birthday.setDay(_day);
    }
}
此时如果对于Student类而言,如果采用克隆的形式的话,仅仅只是利用了Java自带的浅表克隆形式。在这个类中,有一个public方法,这个方法是来源于Object类的。在本方法中,我们仅仅只是在方法体里面调用了父类的clone()函数而已,因此当我们克隆一个对象的时候,此时两个对象都有各自的name、sex、age等属性,但是由于Birthday是我们自己定义的类,因此在克隆前后,两个对象的birthday指向的是同一个对象,当我们通过一个对象来修改birthday属性的时候,此时另一个对象的birthday也会跟着改变。代码与结果如下:
try {
            Student s1 = new Student("SHEN", 20, "F",1992,8,23);
            Student s2 = (Student) s1.clone();
            System.out.println("S2:" + s2.toString());
            s2.setAge(30);
            s2.setName("GOU");
            s2.setSex("M");
            s2.setBirthday(2000,12,21);
            System.out.println("S1:" + s1.toString());
            System.out.println("S2:" + s2.toString());
        } catch (Exception e) {
            e.printStackTrace();
        }
运行结果:

所以,如果想要解决这个问题,我们就需要自己去重新实现clone()方法。
四、深表克隆
class worker implements Cloneable {
    private String name;
    private int age;
    private String sex;
    private Birthday birthday;

    public String getName() {
        return name;
    }

    public void setName(String name) {
        this.name = name;
    }

    public int getAge() {
        return age;
    }

    public void setAge(int age) {
        this.age = age;
    }

    public String getSex() {
        return sex;
    }

    public void setSex(String sex) {
        this.sex = sex;
    }

    public worker(String _name, int _age, String _sex, int _year, int _month,
            int _day) {
        this.name = _name;
        this.age = _age;
        this.sex = _sex;
        birthday = new Birthday(_year, _month, _day);
    }

    public String toString() {
        return "[" + name + "," + age + "," + sex + "]" + birthday.toString();
    }

    public Object clone() throws CloneNotSupportedException {
        return super.clone();

    }

    public worker cloneByDeep(Birthday bir) {
        worker w = null;
        try {
            w = (worker) this.clone();
            w.setBirthday(bir);
        } catch (Exception e) {
            e.printStackTrace();
        }
        return w;
    }

    public Birthday getBirthday() {
        return birthday;
    }

    public void setBirthday(Birthday birthday) {
        this.birthday = birthday;
    }

    public void setBirthday(int _year, int _month, int _day) {
        birthday.setYear(_year);
        birthday.setMonth(_month);
        birthday.setDay(_day);
    }
}
在这个方法中,我们按照自己的业务需求重新实现了克隆的方法– worker cloneByDeep(Birthday bir);在这个方法中,我们依然使用clone()方法来实现基本数据类型的克隆,然后对于我们自己引用类型–Birthday采用重新引用定位的方式,来实现深表克隆。
实验代码:
try {
            worker s1 = new worker("SHEN", 20, "F", 1992, 8, 23);
            worker s2 = s1.cloneByDeep(new Birthday(2000, 12, 21));
            System.out.println("S1:" + s1.toString());
            System.out.println("S2:" + s2.toString());
            s2.setAge(30);
            s2.setName("GOU");
            s2.setSex("M");
            s1.setBirthday(2010, 1, 1);
            s2.setBirthday(2015, 11, 11);
            System.out.println("S1:" + s1.toString());
            System.out.println("S2:" + s2.toString());
        } catch (Exception e) {
            e.printStackTrace();
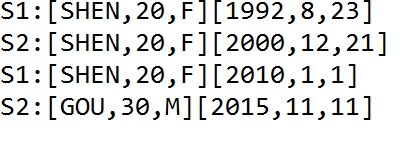
        }
运行结果:

以上为本人第一次写博客,如有问题,欢迎指正。谢谢!
2016/5/10 9:04:58