Struts2中Action的属性接收参数
Struts2中Action的属性接收参数,有三种传递并接收参数的方式,第一种是在Action添加成员属性接收参数,第二种是域模型,就是利用对象域来进行传递和接收参数,第三种是ModelDriven接收参数。接下来分别对这三种方式进行介绍。
1.在Action添加成员属性接收参数:即在自定义的Action中设置属性,以及相应的Setters和Getters方法,封装属性。
首先新建一个struts2项目,这里取名为ActionAttrParamInput,然后开始编写视图,打开index.jsp页面,代码如下:
index.jsp代码如下:
<%@ page language="java" import="java.util.*" pageEncoding="utf-8"%>
<%
String path = request.getContextPath();
String basePath = request.getScheme()+"://"+request.getServerName()+":"+request.getServerPort()+path+"/";
%>

<!DOCTYPE HTML PUBLIC "-//W3C//DTD HTML 4.01 Transitional//EN">
<html>
  <head>
    <base href="<%=basePath%>">

    <title>My JSP 'index.jsp' starting page</title>
	<meta http-equiv="pragma" content="no-cache">
	<meta http-equiv="cache-control" content="no-cache">
	<meta http-equiv="expires" content="0">
	<meta http-equiv="keywords" content="keyword1,keyword2,keyword3">
	<meta http-equiv="description" content="This is my page">
	<!--
	<link rel="stylesheet" type="text/css" href="styles.css">
	-->
  </head>

  <body>
    <form action="useradd!add" method="get">
    	姓名:<input type="text" name="name"/><br>
    	年龄:<input type="text" name="age"/><br>
    	<input type="submit" value="添加">
    </form>
  </body>
</html>
新建一个user_success.jsp页面,修改代码如下:
<%@ page language="java" import="java.util.*" pageEncoding="utf-8"%>
<%
String path = request.getContextPath();
String basePath = request.getScheme()+"://"+request.getServerName()+":"+request.getServerPort()+path+"/";
%>

<!DOCTYPE HTML PUBLIC "-//W3C//DTD HTML 4.01 Transitional//EN">
<html>
  <head>
    <base href="<%=basePath%>">

    <title>My JSP 'user_success.jsp' starting page</title>

	<meta http-equiv="pragma" content="no-cache">
	<meta http-equiv="cache-control" content="no-cache">
	<meta http-equiv="expires" content="0">
	<meta http-equiv="keywords" content="keyword1,keyword2,keyword3">
	<meta http-equiv="description" content="This is my page">
	<!--
	<link rel="stylesheet" type="text/css" href="styles.css">
	-->

  </head>

  <body>
    添加用户成功<br>
   用户名为: ${param.name }<br>
    年龄为:${param.age }<br>
  </body>
</html>
接着在src目录下新建一个UserAction类,放在com.gk.action包下,具体代码如下:
package com.gk.action;

import com.opensymphony.xwork2.ActionSupport;

public class UserAction extends ActionSupport {
	private String name;
	private int age;

	public String getName() {
		return name;
	}

	public void setName(String name) {
		this.name = name;
	}

	public int getAge() {
		return age;
	}

	public void setAge(int age) {
		this.age = age;
	}

	public String add() {
		return "success";
	}

}
然后配置struts.xml配置文件,代码如下:
<?xml version="1.0" encoding="UTF-8" ?>
<!DOCTYPE struts PUBLIC
    "-//Apache Software Foundation//DTD Struts Configuration 2.0//EN"
    "http://struts.apache.org/dtds/struts-2.0.dtd">

<struts>

<constant name="struts.enable.DynamicMethodInvocation" value="true"></constant>
<constant name="struts.devMode" value="true"></constant>
	<package name="user" namespace="/" extends="struts-default">
		<action name="useradd" class="com.gk.action.UserAction">
			<result>/user_success.jsp</result>
		</action>
	</package>
</struts>
然后部署此项目到Tomcat服务器上,开启Tomcat服务器,运行效果如下:
点击添加按钮后,跳转到另个页面:
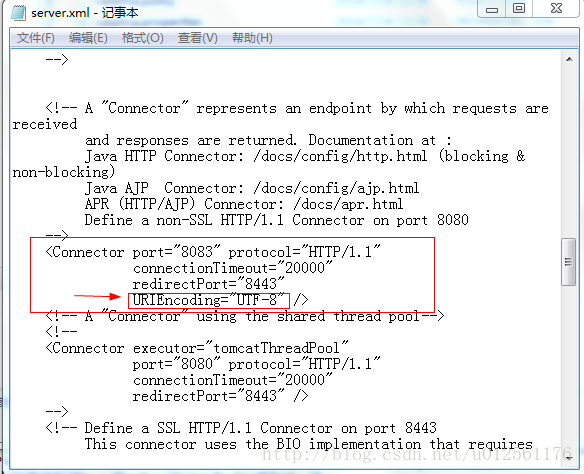
如果我们不用表单提交的话,使用超链接的方式,即url传参的话,会出现中文乱码的问题,解决办法是打开Tomcat的安装目录下的conf目录下的server.xml文件,加上下图红色箭头指向处的一句:
2.域模型,实际就是先把属性封装成一个类,即域,然后作为一个属性传递给自定义的Action类,所以我们可以把上面那个项目的代码进行修改:
首先,打开index.jsp页面,进行修改,具体代码如下:
<%@ page language="java" import="java.util.*" pageEncoding="utf-8"%>
<%
String path = request.getContextPath();
String basePath = request.getScheme()+"://"+request.getServerName()+":"+request.getServerPort()+path+"/";
%>

<!DOCTYPE HTML PUBLIC "-//W3C//DTD HTML 4.01 Transitional//EN">
<html>
  <head>
    <base href="<%=basePath%>">

    <title>My JSP 'index.jsp' starting page</title>
	<meta http-equiv="pragma" content="no-cache">
	<meta http-equiv="cache-control" content="no-cache">
	<meta http-equiv="expires" content="0">
	<meta http-equiv="keywords" content="keyword1,keyword2,keyword3">
	<meta http-equiv="description" content="This is my page">
	<!--
	<link rel="stylesheet" type="text/css" href="styles.css">
	-->
  </head>

  <body>
    <form action="useradd!add" method="get">
    	姓名:<input type="text" name="user.name"/><br>
    	年龄:<input type="text" name="user.age"/><br>
    	<input type="submit" value="添加">
    </form>
  </body>
</html>
打开user_success.jsp页面,进行修改,代码如下:
<%@ page language="java" import="java.util.*" pageEncoding="utf-8"%>
<%
String path = request.getContextPath();
String basePath = request.getScheme()+"://"+request.getServerName()+":"+request.getServerPort()+path+"/";
%>

<!DOCTYPE HTML PUBLIC "-//W3C//DTD HTML 4.01 Transitional//EN">
<html>
  <head>
    <base href="<%=basePath%>">

    <title>My JSP 'user_success.jsp' starting page</title>

	<meta http-equiv="pragma" content="no-cache">
	<meta http-equiv="cache-control" content="no-cache">
	<meta http-equiv="expires" content="0">
	<meta http-equiv="keywords" content="keyword1,keyword2,keyword3">
	<meta http-equiv="description" content="This is my page">
	<!--
	<link rel="stylesheet" type="text/css" href="styles.css">
	-->

  </head>

  <body>
    添加用户成功<br>
   用户名为: ${user.getName() }<br>
    年龄为:${user.getAge() }<br>
  </body>
</html>
在src目录下新建一个User类,放在com.gk.bean包下,把需要输入的表单内容属性放在一个JavaBean里面,即域里面,具体代码如下:
package com.gk.bean;

public class User {
	private String name;
	private int age;

	public String getName() {
		return name;
	}

	public void setName(String name) {
		this.name = name;
	}

	public int getAge() {
		return age;
	}

	public void setAge(int age) {
		this.age = age;
	}

}
再打开UserAction.java文件,修改里面的代码,完整代码如下:
package com.gk.action;

import com.gk.bean.User;
import com.opensymphony.xwork2.ActionSupport;

public class UserAction extends ActionSupport {
	private User user;// 声明User类对象

	public User getUser() {
		return user;
	}

	public void setUser(User user) {
		this.user = user;
	}

	public String add() {
		return "success";
	}

}
其中struts.xml配置文件不要修改它。
运行项目效果如下:
点击添加按钮如下:
其实这样貌似不是Action的属性接收参数,倒像是接收表单参数了,接下来第三种方式我们用另一种方式,使用超链接的方式跳转页面。
3.ModelDriven接收参数,使Action实现ModelDriven<User>这个接口,在实现接口时需要使用泛型,否则使用时需要转型,并利用其getModel()方法返回对象模型,从而获得传入的参数,我们也可以对其上的项目进行修改:
首先,打开index.jsp页面,修改成如下代码:
<%@ page language="java" import="java.util.*" pageEncoding="utf-8"%>
<%
String path = request.getContextPath();
String basePath = request.getScheme()+"://"+request.getServerName()+":"+request.getServerPort()+path+"/";
%>

<!DOCTYPE HTML PUBLIC "-//W3C//DTD HTML 4.01 Transitional//EN">
<html>
  <head>
    <base href="<%=basePath%>">

    <title>My JSP 'index.jsp' starting page</title>
	<meta http-equiv="pragma" content="no-cache">
	<meta http-equiv="cache-control" content="no-cache">
	<meta http-equiv="expires" content="0">
	<meta http-equiv="keywords" content="keyword1,keyword2,keyword3">
	<meta http-equiv="description" content="This is my page">
	<!--
	<link rel="stylesheet" type="text/css" href="styles.css">
	-->
  </head>

  <body>
   使用ModelDriven接收参数<a href="useradd!add?name=林业雄&age=23">添加用户</a>
  </body>
</html>
然后打开user_success.jsp页面,修改成如下代码,利用struts2自带的标签来获取参数:
<%@ page language="java" import="java.util.*" pageEncoding="utf-8"%>
<%@ taglib uri="/struts-tags"  prefix="s"%>
<%
String path = request.getContextPath();
String basePath = request.getScheme()+"://"+request.getServerName()+":"+request.getServerPort()+path+"/";
%>

<!DOCTYPE HTML PUBLIC "-//W3C//DTD HTML 4.01 Transitional//EN">
<html>
  <head>
    <base href="<%=basePath%>">

    <title>My JSP 'user_success.jsp' starting page</title>

	<meta http-equiv="pragma" content="no-cache">
	<meta http-equiv="cache-control" content="no-cache">
	<meta http-equiv="expires" content="0">
	<meta http-equiv="keywords" content="keyword1,keyword2,keyword3">
	<meta http-equiv="description" content="This is my page">
	<!--
	<link rel="stylesheet" type="text/css" href="styles.css">
	-->

  </head>

  <body>
    添加用户成功<br>
    用户名为:<s:property value="name"/><br/>
    年龄为:<s:property value="age"/>
  </body>
</html>
接着我们修改UserAction这个类,修改后代码如下:
package com.gk.action;

import com.gk.bean.User;
import com.opensymphony.xwork2.ActionSupport;
import com.opensymphony.xwork2.ModelDriven;

public class UserAction extends ActionSupport implements ModelDriven<User>{
	private User user=new User();// 声明User类对象

	public String add() {
		return "success";
	}

	@Override
	public User getModel() {
		// TODO Auto-generated method stub
		return user;
	}

}
User.java文件和struts.xml配置文件不用修改,修改完后运行,效果如下:
点击添加用户,效果如下:
参数被传入至Action后,会被ModelDriven对象根据参数名自动赋值给User对象相应的属性而生成User对象,并且由getModel()返回。那么我们在Action中就可以利用这个对象了。注意:(传入的参数名需要与对象模型中的成员属性一致)
Struts2重点在MVC的C层,即编写自定义的Action去协同Model和View的衔接。
工作原理:Filter类接收到Client传递的参数,然后首先会new一个User对象, 检查Action,发现已实现了ModelDriven接口,然后调用getModel()方法,为返回的Model调用set和get进行封装得到User对象的值
以上 就是Struts2中Action的属性接收参数,有三种传递并接收参数的方式,仅供大家学习参考,写得不好,请见谅,如有错误,请指出,谢谢!


