Android事件总线纷发库EventBus的使用方法
一,什么是事件总线纷发?
事件纷发是指将事件放入队列,用于管理和纷发;它能保证应用各部件之间高效的通信以及数据,事件的纷发,可以使各模块之间高内聚,低耦合,用于模块间解耦
二,EventBus介绍
Event Bus是一个发布 /订阅的事件总线。 Event Bus模式 —也被称为MessageBus或者发布者/订阅者(publisher/subscriber)模式 —可以让两个组件相互通信,但是他们之间并不相互知晓。基于事件总线管理/订阅/分发模式的。事件响应有更多的线程选择, EventBus
可以向不同的线程中发布事件。 EventBus支持 Sticky Event。使用时需要先注册订阅,然后向订阅者分发消息数据即可。包含4个成分:发布者,订阅者,事件,总线。订阅者可以订阅多个事件,发送者可以发布任何事件,发布者同时也可以是订阅者。分订阅、注册、发布、取消注册等步骤。
三,EventBus的主要方法
EventBus有订阅,注册,发布,取消注册等方法
注册:
<span style="font-size:14px;">//注册
EventBus.getDefault().register(this);
EventBus.getDefault().register(new MyClass());
//参数:消息接收(订阅)者    接收方法名   事件类
EventBus.getDefault().register(this,"setText",setEventText.class);</span>
发布:
// 发布
EventBus.getDefault().post(myEvent);
EventBus.getDefault().postSticky(new SecondActivityEvent("Message From
SecondActivity"));
接收订阅:
//接收处理订阅的方法
onEvent();
onEventMainThread();
onEventbackgroundThread();
onEventAsync();
取消注册:
<span style="font-size:18px;">// 取消注册
EventBus.getDefault().unregister(this);
</span><pre name="code" class="java"><span style="font-size:18px;">EventBus.getDefault().unregister(new MyClass());</span>
onEvent:如果使用onEvent作为订阅函数,那么该事件在哪个线程发布出来的,onEvent就会在这个线程中运行,也就是说发布事件和接收事件线程在同一个线程。使用这个方法时,在onEvent方法中不能执行耗时操作,如果执行耗时操作容易导致事件分发延迟。onEventMainThread:如果使用onEventMainThread作为订阅函数,那么不论事件是在哪个线程中发布出来的,onEventMainThread都会在UI线程中执行,接收事件就会在UI线程中运行,这个在Android中是非常有用的,因为在Android中只能在UI线程中跟新UI,所以在onEvnetMainThread方法中是不能执行耗时操作的。onEventBackground:如果使用onEventBackgrond作为订阅函数,那么如果事件是在UI线程中发布出来的,那么onEventBackground就会在子线程中运行,如果事件本来就是子线程中发布出来的,那么onEventBackground函数直接在该子线程中执行。onEventAsync:使用这个函数作为订阅函数,那么无论事件在哪个线程发布,都会创建新的子线程在执行onEventAsync.
四:EventBus实例:
下面以一个实例介绍接收消息的前两种方法:
首先在XMl布局中添加两个Button用于发送消息,两个TextView用于显示接收到的消息:
<RelativeLayout xmlns:android="http://schemas.android.com/apk/res/android"
    xmlns:tools="http://schemas.android.com/tools"
    android:layout_width="match_parent"
    android:layout_height="match_parent"
    android:paddingBottom="@dimen/activity_vertical_margin"
    android:paddingLeft="@dimen/activity_horizontal_margin"
    android:paddingRight="@dimen/activity_horizontal_margin"
    android:paddingTop="@dimen/activity_vertical_margin"
    tools:context="com.example.eventbus.MainActivity" >

    <TextView
        android:id="@+id/tv_content1"
        android:layout_width="wrap_content"
        android:layout_height="wrap_content"
        android:layout_alignParentTop="true"
        android:layout_centerHorizontal="true"
        android:layout_marginTop="124dp"
         android:text="1"/>

    <Button
        android:id="@+id/btn_send1"
        android:layout_width="wrap_content"
        android:layout_height="wrap_content"
        android:layout_alignParentBottom="true"
        android:layout_marginBottom="55dp"
        android:layout_toLeftOf="@+id/tv_content1"
        android:text="发送消息1" />

    <Button
        android:id="@+id/btn_send2"
        android:layout_width="wrap_content"
        android:layout_height="wrap_content"
        android:layout_alignBaseline="@+id/btn_send1"
        android:layout_alignBottom="@+id/btn_send1"
        android:layout_toRightOf="@+id/tv_content1"
        android:text="发送消息2" />

    <TextView
        android:id="@+id/tv_content2"
        android:layout_width="wrap_content"
        android:layout_height="wrap_content"
        android:layout_below="@+id/tv_content1"
        android:layout_marginTop="26dp"
        android:layout_toRightOf="@+id/btn_send1"
        android:text="2" />

</RelativeLayout>
建一个MyEvent对象:
public class MyEvent {

	String name;
	String company;

	public String getName() {
		return name;
	}
	public void setName(String name) {
		this.name = name;
	}
	public String getCompany() {
		return company;
	}
	public void setCompany(String company) {
		this.company = company;
	}
}
在MainActivity.class中添加如下代码:
private TextView tv_content1;
	private TextView tv_content2;
	private Button btn_send1;
	private Button btn_send2;

	@Override
	protected void onCreate(Bundle savedInstanceState) {
		super.onCreate(savedInstanceState);
		setContentView(R.layout.activity_main);

		initView();
	}

	private void initView() {
		tv_content1 = (TextView) this.findViewById(R.id.tv_content1);
		tv_content2 = (TextView) this.findViewById(R.id.tv_content2);
		btn_send1 = (Button) this.findViewById(R.id.btn_send1);
		btn_send2 = (Button) this.findViewById(R.id.btn_send2);
		btn_send1.setOnClickListener(new OnClickListener() {

			@Override
			public void onClick(View v) {
				MyEvent myEvent = new MyEvent();
				myEvent.setName("贾跃亭");
				myEvent.setCompany("乐视控股");
				// 发布
				EventBus.getDefault().post(myEvent);
			}
		});
		btn_send2.setOnClickListener(new OnClickListener() {

			@Override
			public void onClick(View v) {
				MyEvent myEvent = new MyEvent();
				myEvent.setName("周鸿祎");
				myEvent.setCompany("360");
				// 发布
				EventBus.getDefault().post(myEvent);
			}
		});
		// 注册
		EventBus.getDefault().register(this);
	}
点击按钮发送消息.
添加onEvent()方法:
public void onEvent(MyEvent myEvent) {
		if (myEvent.getCompany().equals("乐视控股")) {
			tv_content1.setText("贾跃亭  乐视控股");
		}
	}
添加onEventMainThread()方法:
public void onEventMainThread(MyEvent myEvent) {
		if (myEvent.getCompany().equals("360")) {
			tv_content2.setText("周鸿祎  360");
		}
	}
最后在onDestroy()方法中取消注册(也可以根据需求在合适的地方取消):
@Override
	protected void onDestroy() {
		super.onDestroy();
		// 取消注册
		EventBus.getDefault().unregister(this);
	}
运行程序:
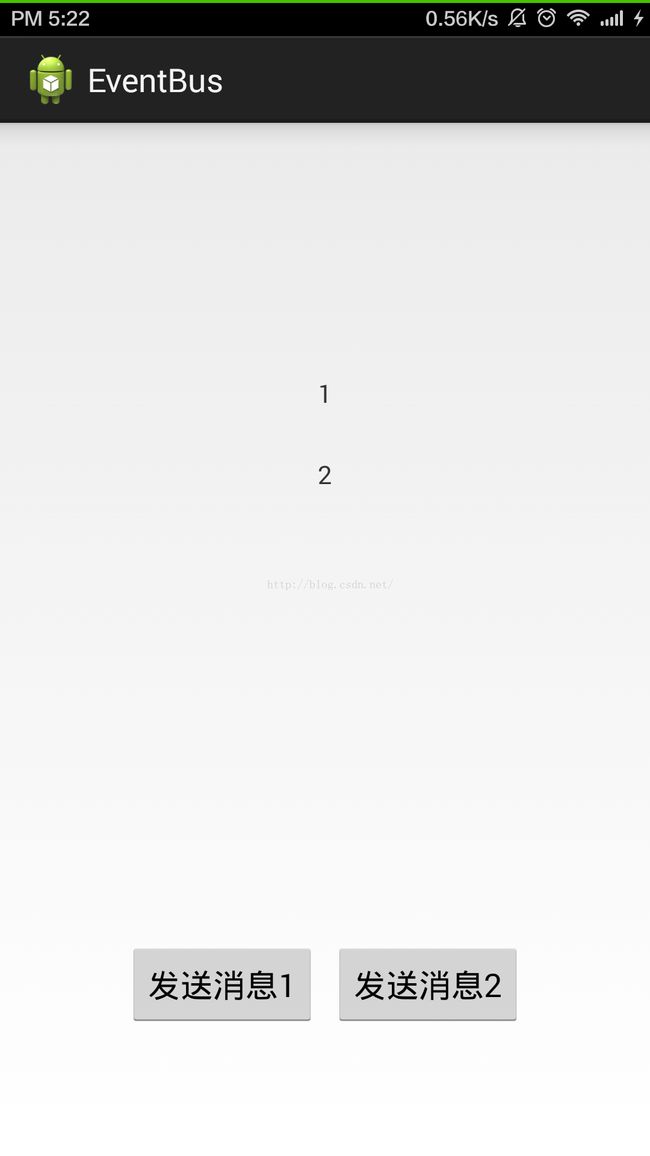
初始化界面如下图:
点击发送消息1,onEvent()接收到消息,显示内容如下图:
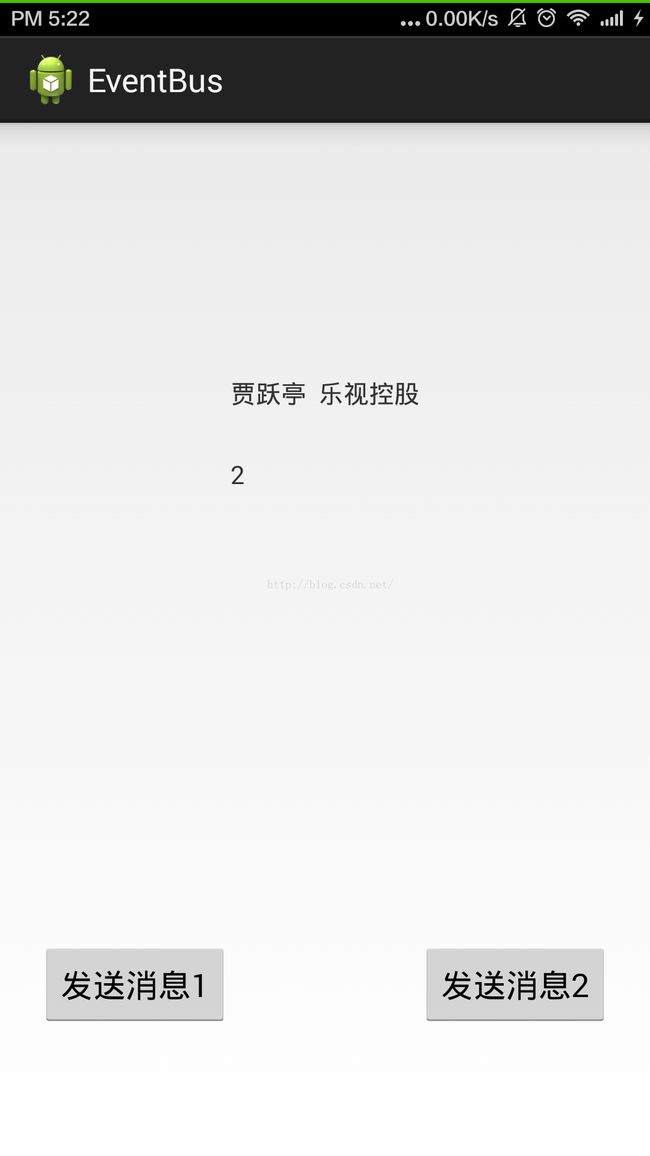
点击按钮发送消息2,onEventMainThread()接收到消息,内容如下图第二行文字所示:

本文参考了http://blog.csdn.net/harvic880925/article/details/40787203不足之处,欢迎交流指正!
欢迎关注微博,互相交流技术!点击这里关注http://weibo.com/momo91