Android 计步器开发
github 地址:https://github.com/zhouguangfu09/StepCounter
1. 程序图标
2. 点击图标,进入如下界面:
这个界面会有缓冲效果,然后进入程序的主界面.
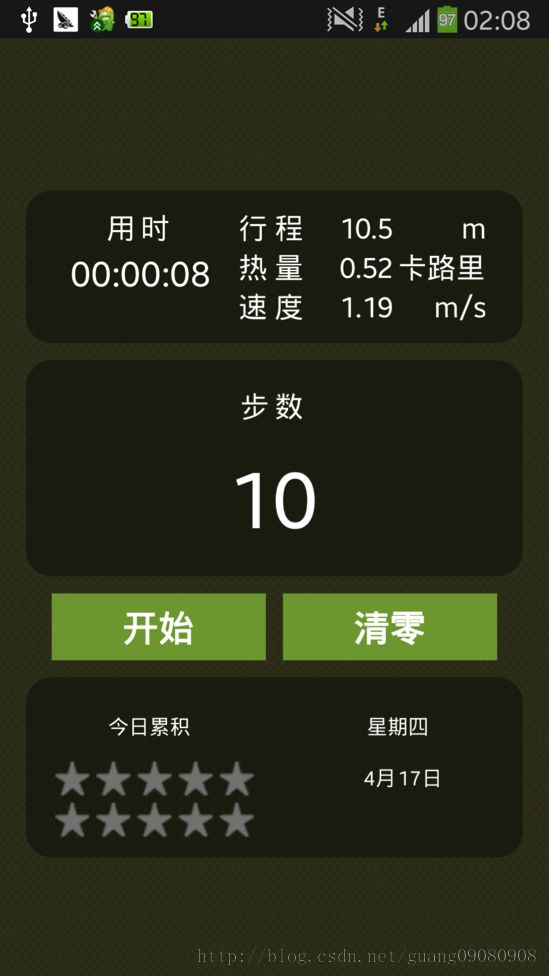
3.程序主界面:
点击开始按钮,并甩动胳膊,计步器开始计数,也可以暂停计数,如下图所示:
5.每走150步,系统奖励一个星星,最高10颗星星。同时软件会粗略的计算行程、热量、速度等参数。如上图所示。
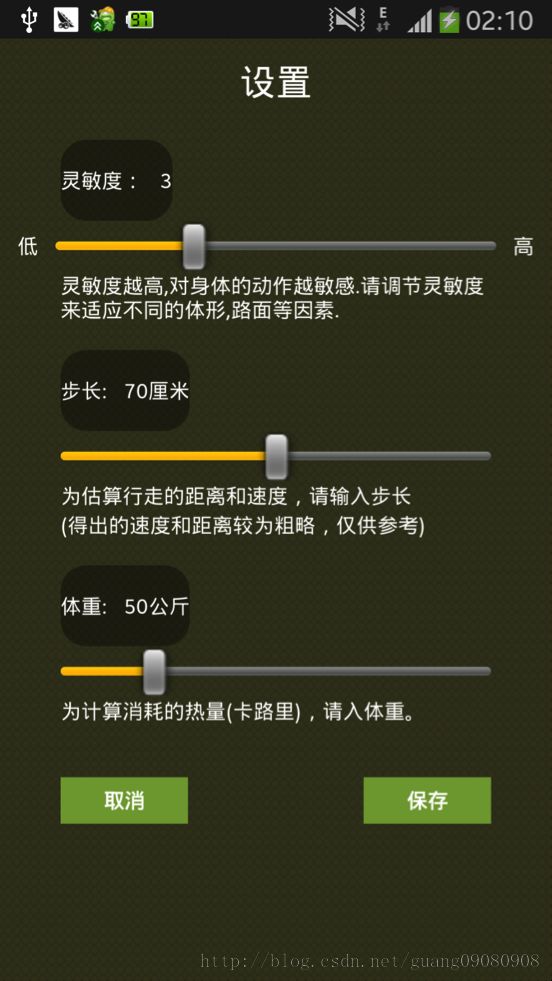
6.点击手机菜单键,点击“设置”选项,进入如下界面:
软件记步数的精准度跟用户的补偿以及体重有关,也跟用户设置的传感器的灵敏度有关系,在设置页面可以对相应的参数进行调节。一旦调节结束,可以重新开始。
7.在手机的主界面按返回键,退出程序。
源码部分解析:
源码主要包含UI控制逻辑代码以及胳膊甩动检测步数代码,下面重点说一下 步数检测代码,主要集中在StepDector.java文件中:
       public void onSensorChanged(SensorEventevent) {
              // Log.i(Constant.STEP_SERVER, "StepDetector");
              Sensor sensor = event.sensor;
              // Log.i(Constant.STEP_DETECTOR,"onSensorChanged");
              synchronized (this) {
                     if (sensor.getType() ==Sensor.TYPE_ORIENTATION) {
                     } else {
                            int j =(sensor.getType() == Sensor.TYPE_ACCELEROMETER) ? 1 : 0;
                            if (j == 1) {
                                   float vSum =0;
                                   for (int i =0; i < 3; i++) {
                                          finalfloat v = mYOffset + event.values[i] * mScale[j];
                                          vSum+= v;
                                   }
                                   int k = 0;
                                   float v =vSum / 3;

                                   floatdirection = (v > mLastValues[k] ? 1: (v < mLastValues[k] ? -1 : 0));
                                   if (direction== -mLastDirections[k]) {
                                          //Direction changed
                                          intextType = (direction > 0 ? 0 : 1); // minumum or
                                          //maximum?
                                          mLastExtremes[extType][k]= mLastValues[k];
                                          floatdiff = Math.abs(mLastExtremes[extType][k]- mLastExtremes[1 - extType][k]);

                                          if(diff > SENSITIVITY) {
                                                 booleanisAlmostAsLargeAsPrevious = diff > (mLastDiff[k] * 2 / 3);
                                                 booleanisPreviousLargeEnough = mLastDiff[k] > (diff / 3);
                                                 booleanisNotContra = (mLastMatch != 1 - extType);

                                                 if(isAlmostAsLargeAsPrevious && isPreviousLargeEnough &&isNotContra) {
                                                        end= System.currentTimeMillis();
                                                        if(end - start > 500) {// 此时判断为走了一步
                                                               Log.i("StepDetector","CURRENT_SETP:"
                                                                             +CURRENT_SETP);
                                                               CURRENT_SETP++;
                                                               mLastMatch= extType;
                                                               start= end;
                                                        }
                                                 }else {
                                                        mLastMatch= -1;
                                                 }
                                          }
                                          mLastDiff[k]= diff;
                                   }
                                   mLastDirections[k]= direction;
                                   mLastValues[k]= v;
                            }
                     }
              }
}
这个函数是一个传感器的回调函数,在其中可以根据从系统地加速度传感器获取的数值进行胳膊甩动动作的判断。主要从以下几个方面判断:
(1)人如果走起来了,一般会连续多走几步。因此,如果没有连续4-5个波动,那么就极大可能是干扰。
(2)人走动的波动,比坐车产生的波动要大,因此可以看波峰波谷的高度,只检测高于某个高度的波峰波谷。
(3)人的反射神经决定了人快速动的极限,怎么都不可能两步之间小于0.2秒,因此间隔小于0.2秒的波峰波谷直接跳过
通过重力加速计感应,重力变化的方向,大小。与正常走路或跑步时的重力变化比对,达到一定相似度时认为是在走路或跑步。实现起来很简单,只要手机有重力感应器就能实现。
1. 启动界面
程序启动界面带有缓冲效果,其中界面缓冲效果的配置文件在res/anim/目录下。如果计步器已经开始工作,则跳过程序启动界面,直接进入主界面。
       if (StepCounterService.FLAG || StepDetector.CURRENT_SETP > 0) {// 程序已经启动,直接跳转到运行界面
           Intent intent = new Intent(SplashActivity.this,StepCounterActivity.class); //创建一个新的Intent,指定当前应用程序上下文
//和要启动的StepActivity类
           startActivity(intent);                                         //传递这个intent给startActivity
           this.finish();
       } else {
           this.requestWindowFeature(Window.FEATURE_NO_TITLE);
           this.setContentView(R.layout.splash);

           animation = AnimationUtils.loadAnimation(SplashActivity.this,
                  R.anim.animation_splash);
           this.findViewById(R.id.iv_index).setAnimation(animation);
           animation.setAnimationListener(new AnimationListener() {// 动画监听,通过AnimationListener可以监听Animation的运行过程
                     @Override
                     public void onAnimationStart(Animation animation){
                         // TODOAuto-generated method stub
                     }
                     @Override
                     public void onAnimationRepeat(Animationanimation) {
                         // TODOAuto-generated method stub
                     }
                     @Override
                     public void onAnimationEnd(Animation animation) {// 动画结束时跳转至运行界面
                         // TODOAuto-generated method stub
                         Intent intent = new Intent(SplashActivity.this,
                                StepCounterActivity.class);
                         SplashActivity.this.startActivity(intent);
                         SplashActivity.this.finish();
                     }
                  });
       }
}
2. 程序主界面
(1)界面元素的初始化(比如步数,星期,日期,运行时间,行程,卡路里,速度,开始按钮和停止按钮)。
 //定义文本框控件
    private TextView tv_show_step;// 步数
    private TextView tv_week_day;// 星期
    private TextView tv_date;// 日期

    private TextView tv_timer;// 运行时间

    private TextView tv_distance;// 行程
    private TextView tv_calories;// 卡路里
    private TextView tv_velocity;// 速度

    private Button btn_start;// 开始按钮
    private Button btn_stop;// 停止按钮

    // 十颗星标
    private ImageView iv_star_1;
    private ImageView iv_star_2;
    private ImageView iv_star_3;
    private ImageView iv_star_4;
    private ImageView iv_star_5;
    private ImageView iv_star_6;
    private ImageView iv_star_7;
    private ImageView iv_star_8;
    private ImageView iv_star_9;
    private ImageView iv_star_10;

    private long timer = 0;// 运动时间
    private static long startTimer = 0;// 开始时间
    private static long tempTime = 0;

    private Double distance = 0.0;// 路程:米
    private Double calories = 0.0;// 热量:卡路里
    private Double velocity = 0.0;// 速度:米每秒

    private int step_length = 0;  //步长
    private int weight = 0;       //体重
    private int total_step = 0;   //走的总步数

    DatagramSocket socket;
    InetAddress serverAddress;
    DatagramPacket  send_package1;
    private Thread thread;  //定义线程对象
(2)利用消息机制对主界面的UI元素进行更新。定义了一个handler,当检测的步数变化时,更新主界面显示的信息。主要代码如下:
    Handler handler = new Handler() {// Handler对象用于更新当前步数,定时发送消息,调用方法查询数据用于显示??????????
                                           //主要接受子线程发送的数据, 并用此数据配合主线程更新UI
                                       //Handler运行在主线程中(UI线程中), 它与子线程可以通过Message对象来传递数据,
       //Handler就承担着接受子线程传过来的(子线程用sendMessage()方法传递Message对象,(里面包含数据)
       //把这些消息放入主线程队列中,配合主线程进行更新UI。

       @Override                  //这个方法是从父类/接口继承过来的,需要重写一次
       public void handleMessage(Message msg) {
           // TODO Auto-generated method stub
           super.handleMessage(msg);        // 此处可以更新UI

           countDistance();     //调用距离方法,看一下走了多远

           if (timer != 0 && distance != 0.0) {

              // 体重、距离
               // 跑步热量(kcal)=体重(kg)×距离(公里)×1.036
              calories = weight * distance * 0.001;
              //速度velocity
              velocity = distance * 1000 / timer;
           } else {
              calories =0.0;
              velocity =0.0;
           }

           countStep();          //调用步数方法

           tv_show_step.setText(total_step + "");// 显示当前步数

           tv_distance.setText(formatDouble(distance));// 显示路程
           tv_calories.setText(formatDouble(calories));// 显示卡路里
           tv_velocity.setText(formatDouble(velocity));// 显示速度

           tv_timer.setText(getFormatTime(timer));// 显示当前运行时间

           changeStep();// 设置当前步数和星标

       }
(3)初始化主界面的信息。
    /**
     * 初始化界面
     */
    private void init() {

       step_length =SettingsActivity.sharedPreferences.getInt(
              SettingsActivity.STEP_LENGTH_VALUE, 70);
       weight =SettingsActivity.sharedPreferences.getInt(
              SettingsActivity.WEIGHT_VALUE, 50);

       countDistance();
       countStep();
       if ((timer += tempTime) != 0 && distance != 0.0) {  //tempTime记录运动的总时间,timer记录每次运动时间

           // 体重、距离
           // 跑步热量(kcal)=体重(kg)×距离(公里)×1.036,换算一下
           calories = weight * distance * 0.001;

           velocity = distance * 1000 / timer;
       } else {
           calories = 0.0;
           velocity = 0.0;
       }

       tv_timer.setText(getFormatTime(timer + tempTime));

       tv_distance.setText(formatDouble(distance));
       tv_calories.setText(formatDouble(calories));
       tv_velocity.setText(formatDouble(velocity));

       tv_show_step.setText(total_step + "");

       btn_start.setEnabled(!StepCounterService.FLAG);
       btn_stop.setEnabled(StepCounterService.FLAG);

       if(StepCounterService.FLAG) {
           btn_stop.setText(getString(R.string.pause));
       } else if (StepDetector.CURRENT_SETP > 0) {
           btn_stop.setEnabled(true);
           btn_stop.setText(getString(R.string.cancel));
       }

       setDate();
    }
(4)计算距离和步长。
    /**
     * 计算行走的距离
     */
    private void countDistance() {
       if (StepDetector.CURRENT_SETP % 2 == 0) {
           distance = (StepDetector.CURRENT_SETP / 2) * 3 * step_length * 0.01;
       } else {
           distance = ((StepDetector.CURRENT_SETP / 2) * 3 + 1) * step_length * 0.01;
       }
    }

    /**
     * 实际的步数
     */
    private void countStep() {
       if (StepDetector.CURRENT_SETP % 2 == 0) {
           total_step = StepDetector.CURRENT_SETP;
       } else {
           total_step = StepDetector.CURRENT_SETP +1;
       }

       total_step = StepDetector.CURRENT_SETP;
    }
3. 后台检测传感器信息的服务(service).
//service负责后台的需要长期运行的任务
 // 计步器服务
 // 运行在后台的服务程序,完成了界面部分的开发后
 // 就可以开发后台的服务类StepService
 // 注册或注销传感器监听器,在手机屏幕状态栏显示通知,与StepActivity进行通信,走过的步数记到哪里了???
public class StepCounterService extends Service {

    public static Boolean FLAG = false;// 服务运行标志

    private SensorManagermSensorManager;// 传感器服务
    private StepDetector detector;// 传感器监听对象

    private PowerManager mPowerManager;// 电源管理服务
    private WakeLock mWakeLock;// 屏幕灯

    @Override
    public IBinder onBind(Intent intent) {
       // TODOAuto-generated method stub
       return null;
    }

    @Override
    public void onCreate() {
       // TODOAuto-generated method stub
       super.onCreate();

       FLAG = true;// 标记为服务正在运行

       // 创建监听器类,实例化监听对象
       detector = new StepDetector(this);

       // 获取传感器的服务,初始化传感器
       mSensorManager = (SensorManager) this.getSystemService(SENSOR_SERVICE);
       // 注册传感器,注册监听器
       mSensorManager.registerListener(detector,
              mSensorManager.getDefaultSensor(Sensor.TYPE_ACCELEROMETER),
              SensorManager.SENSOR_DELAY_FASTEST);

       // 电源管理服务
       mPowerManager = (PowerManager) this
              .getSystemService(Context.POWER_SERVICE);
       mWakeLock = mPowerManager.newWakeLock(PowerManager.SCREEN_DIM_WAKE_LOCK
              |PowerManager.ACQUIRE_CAUSES_WAKEUP, "S");
       mWakeLock.acquire();
    }

    @Override
    public void onDestroy() {
       // TODOAuto-generated method stub
       super.onDestroy();
       FLAG = false;// 服务停止
       if (detector != null) {
           mSensorManager.unregisterListener(detector);
       }

       if (mWakeLock != null) {
           mWakeLock.release();
       }
    }


