Android DiskLRUCache图片下载优化 <20>
前面的博客都涉及到了很多关于从服务器获取图片资源的方法,比如LRUCache,图片压缩等,下面介绍的是物理储存介质作为cache的介质,即图片资源临时保存到物理储存介质上.
<1> : 工程代码:不知道为什么居然有70多M,也是醉了!
http://pan.baidu.com/s/1ntQcl3V
工程代码有参照老外的code.
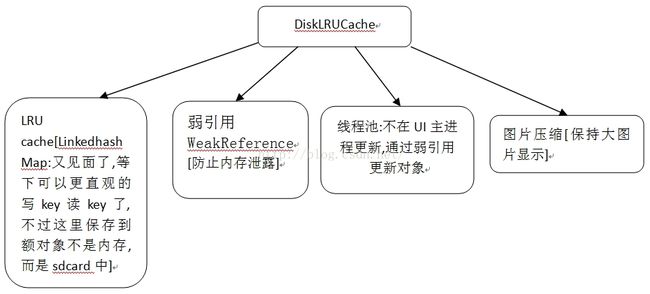
<2> : 基本的技术面如下:具体使用放到异步线程中
<3> : 一般引用的库:disklrucache-2.0.1.jar,可以在上面提供的工程中,或者自行单独下载,然后通过GUI反编译工具反编译出来,就可以看到完整的代码了.
具体的操作:
<a> : 由于需要保存资源到物理介质上,那么就要事先设定保存路径:
DiskApplication.java中:
File cacheLocation;

        // If we have external storage use it for the disk cache. Otherwise we use
        // the cache dir
        if (Environment.MEDIA_MOUNTED.equals(Environment.getExternalStorageState())) {
            cacheLocation = new File(
                    Environment.getExternalStorageDirectory() + "/Android-BitmapCache");
        } else {
            cacheLocation = new File(getFilesDir() + "/Android-BitmapCache");
        }
        cacheLocation.mkdirs();

        BitmapLruCache.Builder builder = new BitmapLruCache.Builder(this);
        builder.setMemoryCacheEnabled(true).setMemoryCacheMaxSizeUsingHeapSize();
        builder.setDiskCacheEnabled(true).setDiskCacheLocation(cacheLocation);

        mCache = builder.build();
保存路径加入设置在/sdcard/Android-Bitmapcache,也可以设置在APP 对应的data/data/packagename/cache下
由于jar包的类是:
public static DiskLruCache open(File directory, int appVersion, int valueCount, long maxSize)
静态返回的,直接使用:接着上面那个build方法实现:
public BitmapLruCache build() {
            final BitmapLruCache cache = new BitmapLruCache(mContext);

            if (isValidOptionsForMemoryCache()) {
                if (Constants.DEBUG) {
                    Log.d("BitmapLruCache.Builder", "Creating Memory Cache");
                }
                cache.setMemoryCache(new BitmapMemoryLruCache(mMemoryCacheMaxSize, mRecyclePolicy));
            }

            if (isValidOptionsForDiskCache()) {
                new AsyncTask<Void, Void, DiskLruCache>() {

                    @Override
                    protected DiskLruCache doInBackground(Void... params) {
                        try {
                            return DiskLruCache.open(mDiskCacheLocation, 0, 1, mDiskCacheMaxSize);
                        } catch (IOException e) {
                            e.printStackTrace();
                            return null;
                        }
                    }

                    @Override
                    protected void onPostExecute(DiskLruCache result) {
                        cache.setDiskCache(result);
                    }

                }.execute();
            }

            return cache;
        }
缓存大小
mDiskCacheMaxSize:1024*1024*10=10M
<b> : 下载等到的图片Bitmap保存到物理介质上:另外还有几个:
public CacheableBitmapDrawable put(final String url, final Bitmap bitmap,
            Bitmap.CompressFormat compressFormat, int compressQuality) {

        CacheableBitmapDrawable d = new CacheableBitmapDrawable(url, mResources, bitmap,
                mRecyclePolicy, CacheableBitmapDrawable.SOURCE_UNKNOWN);

        if (null != mMemoryCache) {
            mMemoryCache.put(d);
        }

        if (null != mDiskCache) {
            checkNotOnMainThread();

            final String key = transformUrlForDiskCacheKey(url);
            final ReentrantLock lock = getLockForDiskCacheEdit(key);
            lock.lock();

            OutputStream os = null;

            try {
                DiskLruCache.Editor editor = mDiskCache.edit(key);
                os = editor.newOutputStream(0);
                bitmap.compress(compressFormat, compressQuality, os);
                os.flush();
                editor.commit();
            } catch (IOException e) {
                Log.e(Constants.LOG_TAG, "Error while writing to disk cache", e);
            } finally {
                IoUtils.closeStream(os);
                lock.unlock();
                scheduleDiskCacheFlush();
            }
        }

        return d;
    }
通过输出流写入到物理介质,同时通过DiskLruCache中的内部类Editor进行保存,前面博客中LRUCache中是自动保存的,但是DiskLruCache是需要自己添加Key值的,由于DiskLruCache中是通过LinkedHashMap保存的,可想而知是需要提供key值的.程序中还有一个put方法,是类似的.
<c> : 如何将缓存的图片资源拿出来使用呢?
@Override
        public InputStream getInputStream() {
            try {
                DiskLruCache.Snapshot snapshot = mDiskCache.get(mKey);
                if (snapshot != null) {
                    return snapshot.getInputStream(0);
                }
            } catch (IOException e) {
                Log.e(Constants.LOG_TAG, "Could open disk cache for url: " + mKey, e);
            }
            return null;
        }
从上面看返回InputStream的一个输入流对象,转换成Bitmap很简单,最简约的写法:
Bitmap bitmap = BitmapFactory.decodeStream(is);
但实际程序作了图片压缩:
private CacheableBitmapDrawable decodeBitmap(InputStreamProvider ip, String url,
            BitmapFactory.Options opts) {

        Bitmap bm = null;
        InputStream is = null;
        int source = CacheableBitmapDrawable.SOURCE_NEW;

        try {
            if (mRecyclePolicy.canInBitmap()) {
                // Create an options instance if we haven't been provided with one
                if (opts == null) {
                    opts = new BitmapFactory.Options();
                }

                if (opts.inSampleSize <= 1) {
                    opts.inSampleSize = 1;

                    if (addInBitmapOptions(ip, opts)) {
                        source = CacheableBitmapDrawable.SOURCE_INBITMAP;
                    }
                }
            }

            // Get InputStream for actual decode
            is = ip.getInputStream();
            // Decode stream
            bm = BitmapFactory.decodeStream(is, null, opts);
        } catch (Exception e) {
            Log.e(Constants.LOG_TAG, "Unable to decode stream",  e);
        } finally {
            IoUtils.closeStream(is);
        }

        if (bm != null) {
            return new CacheableBitmapDrawable(url, mResources, bm, mRecyclePolicy, source);
        }
        return null;
    }

    private boolean addInBitmapOptions(InputStreamProvider ip, BitmapFactory.Options opts) {
        // Create InputStream for decoding the bounds
        final InputStream is = ip.getInputStream();
        // Decode the bounds so we know what size Bitmap to look for
        opts.inJustDecodeBounds = true;
        BitmapFactory.decodeStream(is, null, opts);
        IoUtils.closeStream(is);

        // Turn off just decoding bounds
        opts.inJustDecodeBounds = false;
        // Make sure the decoded file is mutable
        opts.inMutable = true;

        // Try and find Bitmap to use for inBitmap
        Bitmap reusableBm = mMemoryCache.getBitmapFromRemoved(opts.outWidth, opts.outHeight);
        if (reusableBm != null) {
            if (Constants.DEBUG) {
                Log.i(Constants.LOG_TAG, "Using inBitmap");
            }
            SDK11.addInBitmapOption(opts, reusableBm);
            return true;
        }

        return false;
    }
<d> : 清楚cache,清除key:
mDiskCache.remove(key);
<4> : 运行结果:这里要注意,APP的data/data目录下也保存了,下面的缓存在即使卸载APP的情况下也不会被删除.

文件夹中具体:部分显示如下
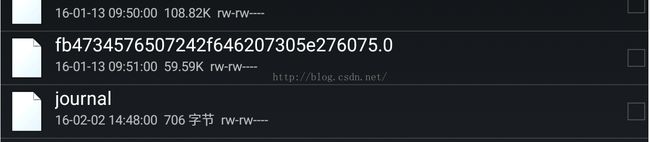
这里面可以看一下journal文件中的显示:

程序在open的时候设定的参数在最前面几行,下面是资源key.
<5> : 测试步骤:
第一步:打开网络,运行,显示图片;
第二步:完全退出app,关闭网络,重新打开APP,发现在没有网络的情况下,图片照样显示出来.