gazebo+ros搭建单目仿真环境:贴有二维码的天花板+kobuki+camera(1)
gazebo搭建单目仿真环境:贴有二维码的天花板+kobuki+image
说明
现在要做基于天花板二维码单目slam,之前都是实物跑,太耗时间了,而且贴二维码与布二维码对实物环境要求太高,所以选择用gazebo做一个仿真环境。
要搭建这一仿真环境,需要做的事有:
1. 搭建布满二维码信息的环境: 天花板平面屋子+ 二维码
2 实验平台搭建: 机器人kobuki + camera
3 gazebo中相机插件
一. 二维码环境搭建
搭建二维码环境分两步,一是二维码信息在gazebo中的显示, 二是 带天花板的屋子设计。
方案分析与探讨:
1) sketchup pro 画环境 --》 找了半天找不到尺寸约束信息,操作不熟,放弃。不过这建墙挺方便的。
2)solidworks 能够很容易尺寸信息,还可以贴图。之前有一点操作经验,这简易环境没问题。画好长时间装好。环境与贴图都建好了,
但是这只能保存为 stl格式, gazebo可以调用,但这种格式只保存几何信息,无法保存图片信息。在者这种米制的导入gazebo还很大(可以调scale缩小),尺寸上
还是不好约束。。。====》》》还是不得不放弃了。
3) 直接利用gazebo的SDF文件格式书写相应的搭建。四根柱子加一个面支撑起来就可以了。
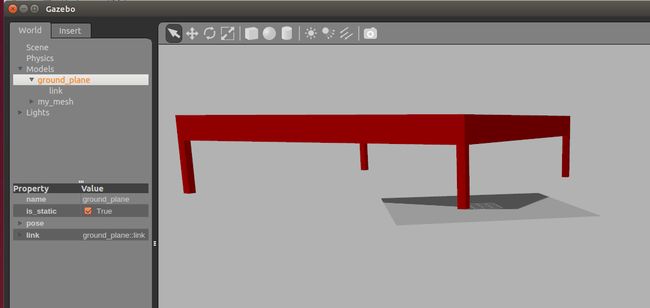
2)sdf加载stl格式    my_mesh.world

<?xml version="1.0"?>
<sdf version="1.4">
  <world name="default">
    <include>
      <uri>model://ground_plane</uri>
    </include>
    <include>
      <uri>model://sun</uri>
    </include>

    <model name="my_mesh">
      <pose>0 0 0  0 0 0</pose>
      <static>true</static>
      <link name="body">
          <visual name="visual">
              <pose>10 10 0 0 0 180</pose>
              <geometry>
                  <mesh>
                    <uri>file://map.STL</uri>
                    <scale>0.01 0.01 0.01</scale>
                  </mesh>
              </geometry>

              <material>
                <ambient>1 0 0 1</ambient>
                <diffuse>1 0 0 1</diffuse>
                <specular>0.1 0.1 0.1 1</specular>
                <emissive>0 0 0 0</emissive>
              </material>

           </visual>
      </link>
    </model>

  </world>
</sdf>


gazebo   my_mesh.world
注意:如果是利用gazebo xx.world 其中的uri model是基于gazebo库中的模型,file是相对xx.world的当前路径下的 file:// ;如果是利用roslaunch导入时却无法
直接用,不知道其相对路径是相对那一个的,只能是写全局路径,注意全局路径的写法///(三斜杠)file:///home/yhzhao/model/map.STL
.world 文件一般放置全部环境, <model> 是相对于 world世界坐标系的, 相对坐标为: <pose>0 0 0 0 0 0</pose>
一个world 可以有多个<model> 存在.
3) 详解
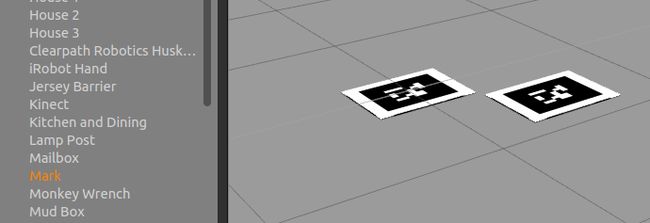
之前见过gazebo中物体有图片包装贴纸的,所以就打算将二维码贴在方块上,把方块挂到天花板上。
打开gazebo 随便找个insert带图片纹理的物体:——》 beer 啤酒罐 : 圆柱加贴纸。。再到~/.gazebo/model/beer中查看模型源码,发现修改很容易。
model.sdf
model.config
materials 文件夹
-- /scripts/beer.material 纹理信息
--//textures/beer.png
| =======beer ========= model.sdf <?xml version='1.0'?> <sdf version='1.4'> <model name="beer"> <link name='link'> <pose>0 0 0.115 0 0 0</pose> <inertial> <mass>0.390</mass> <inertia> <ixx>0.00058</ixx> <ixy>0</ixy> <ixz>0</ixz> <iyy>0.00058</iyy> <iyz>0</iyz> <izz>0.00019</izz> </inertia> </inertial> <collision name='collision'> <geometry> <cylinder> <radius>0.055000</radius> <length>0.230000</length> </cylinder> </geometry> </collision> <visual name='visual'> <geometry> <cylinder> <radius>0.055000</radius> <length>0.230000</length> </cylinder> </geometry> <material> <script> <uri>model://beer/materials/scripts</uri> <uri>model://beer/materials/textures</uri> <name>Beer/Diffuse</name> </script> </material> </visual> </link> </model> </sdf> |
========mark ========= <?xml version='1.0'?> <sdf version='1.4'> <model name="mark"> <link name='link'> <pose>0 0 0.115 0 0 0</pose> <inertial> <mass>0.390</mass> <inertia> <ixx>0.00058</ixx> <ixy>0</ixy> <ixz>0</ixz> <iyy>0.00058</iyy> <iyz>0</iyz> <izz>0.00019</izz> </inertia> </inertial> <collision name='collision'> <geometry> <box> <size>.496 .496 .01</size> </box> </geometry> </collision> <visual name='visual'> <geometry> <box> <size>.496 .496 .01</size> </box> </geometry> <material> <script> <uri>model://mark/materials/scripts</uri> <uri>model://mark/materials/textures</uri> <name>Mark/Diffuse</name> </script> </material> </visual> </link> </model> </sdf> |
| model.config <?xml version="1.0"?> <model> <name>Beer</name> <version>1.0</version> <sdf version="1.4">model.sdf</sdf> <author> <name>Maurice Fallon</name> </author> <description> Beer </description> </model> |
<?xml version="1.0"?> <model> <name>Mark</name> <version>1.0</version> <sdf version="1.4">model.sdf</sdf> <author> <name>Maurice Fallon</name> </author> <description> Mark </description> </model> |
| - /scripts/beer.material material Beer/Diffuse { technique { pass { texture_unit { texture beer.png filtering anistropic max_anisotropy 16 } } } } |
material Mark/Diffuse { technique { pass { texture_unit { texture mark.png filtering anistropic max_anisotropy 16 } } } } |
说明 :
<material>
<script>
<uri>model://beer/materials/scripts</uri> 脚本路径
<uri>model://beer/materials/textures</uri>
<name>Beer/Diffuse</name>
</script>
</material>
材质纹理配置文件。。注意 <name>Beer/Diffuse</name> 与 material Beer/Diffuse 名称一致
- /scripts/beer.material 可以有多个 material Beer/Diffuse1 // material Beer/Diffuse2 一类的。。
单个环境搭好后就需要搭建环境model。
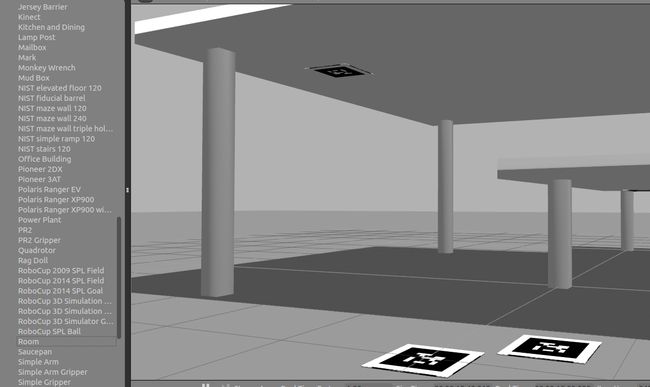
四个立体柱子 + 加一个面(其实也是立体柱子) 不同尺寸
注意 link 与 joint 的设置 ;尺寸中有 相对位置和 自身的大小。
代码如下 直接做一个room
<?xml version="1.0"?>

<model>
  <name>Room</name>
  <version>1.0</version>
  <sdf version="1.4">model.sdf</sdf>

  <author>
    <name>Maurice Fallon</name>
  </author>

  <description>
    Room
  </description>
</model>
<?xml version='1.0'?>
<sdf version='1.4'>
  <model name="room">
    <link name='link_1'>
      <pose>0 0 0 0 0 0</pose>
      <inertial>
        <mass>2.390</mass>
        <inertia>
          <ixx>0.00058</ixx>
          <ixy>0</ixy>
          <ixz>0</ixz>
          <iyy>0.00058</iyy>
          <iyz>0</iyz>
          <izz>0.00019</izz>
        </inertia>
      </inertial>
      <collision name='collision'>
        <geometry>
                <box>
                  <size>.2 .2 2.4</size>
                </box>
        </geometry>
      </collision>

      <visual name='visual'>
        <geometry>
                <box>
                   <size>.2 .2 2.4</size>
                </box>
        </geometry>
      </visual>
    </link>

     <link name='link_2'>
      <pose>0 5 0 0 0 0</pose>
      <inertial>
        <mass>2.390</mass>
        <inertia>
          <ixx>0.00058</ixx>
          <ixy>0</ixy>
          <ixz>0</ixz>
          <iyy>0.00058</iyy>
          <iyz>0</iyz>
          <izz>0.00019</izz>
        </inertia>
      </inertial>
      <collision name='collision'>
        <geometry>
                <box>
                  <size>.2 .2 2.4</size>
                </box>
        </geometry>
      </collision>

      <visual name='visual'>
        <geometry>
                <box>
                   <size>.2 .2 2.4</size>
                </box>
        </geometry>
      </visual>
    </link>
     <link name='link_3'>
      <pose>5 5 0 0 0 0</pose>
      <inertial>
        <mass>2.390</mass>
        <inertia>
          <ixx>0.00058</ixx>
          <ixy>0</ixy>
          <ixz>0</ixz>
          <iyy>0.00058</iyy>
          <iyz>0</iyz>
          <izz>0.00019</izz>
        </inertia>
      </inertial>
      <collision name='collision'>
        <geometry>
                <box>
                  <size>.2 .2 2.4</size>
                </box>
        </geometry>
      </collision>

      <visual name='visual'>
        <geometry>
                <box>
                   <size>.2 .2 2.4</size>
                </box>
        </geometry>
      </visual>
    </link>
     <link name='link_4'>
      <pose>5 0 0 0 0 0</pose>
      <inertial>
        <mass>2.390</mass>
        <inertia>
          <ixx>0.00058</ixx>
          <ixy>0</ixy>
          <ixz>0</ixz>
          <iyy>0.00058</iyy>
          <iyz>0</iyz>
          <izz>0.00019</izz>
        </inertia>
      </inertial>
      <collision name='collision'>
        <geometry>
                <box>
                  <size>.2 .2 2.4</size>
                </box>
        </geometry>
      </collision>

      <visual name='visual'>
        <geometry>
                <box>
                   <size>.2 .2 2.4</size>
                </box>
        </geometry>
      </visual>
    </link>

     <link name='link'>
      <pose>2.5 2.5 1.2 0 0 0</pose>
      <collision name='collision'>
        <geometry>
                <box>
                  <size>6 6 0.2</size>
                </box>
        </geometry>
      </collision>

      <visual name='visual'>
        <geometry>
                <box>
                   <size>6 6 0.2</size>
                </box>
        </geometry>
      </visual>
    </link>


    <link name='mark_1'>
      <pose>0.8 0.8 1.0 0 0 0</pose>
      <inertial>
        <mass>0.390</mass>
        <inertia>
          <ixx>0.00058</ixx>
          <ixy>0</ixy>
          <ixz>0</ixz>
          <iyy>0.00058</iyy>
          <iyz>0</iyz>
          <izz>0.00019</izz>
        </inertia>
      </inertial>
      <collision name='collision'>
        <geometry>
                <box>
                  <size>.496 .496 .01</size>
                </box>
        </geometry>
      </collision>

      <visual name='visual'>
        <geometry>
                <box>
                  <size>.496 .496 .01</size>
                </box>
        </geometry>

        <material>
          <script>
            <uri>model://room/materials/scripts</uri>
            <uri>model://room/materials/textures</uri>
            <name>Mark/Diffuse</name>
          </script>
        </material>
      </visual>
    </link>


    <joint name="camera_joint_1" type="revolute">
      <child>link_1</child>
      <parent>link</parent>
      <axis>
        <xyz>0 0 -2</xyz>
        <limit>
          <upper>0</upper>
          <lower>0</lower>
        </limit>
      </axis>
    </joint>


    <joint name="camera_joint_2" type="revolute">
      <child>link_2</child>
      <parent>link</parent>
      <axis>
        <xyz>0 0 -2</xyz>
        <limit>
          <upper>0</upper>
          <lower>0</lower>
        </limit>
      </axis>
    </joint>

    <joint name="camera_joint_3" type="revolute">
      <child>link_3</child>
      <parent>link</parent>
      <axis>
        <xyz>0 0 -2</xyz>
        <limit>
          <upper>0</upper>
          <lower>0</lower>
        </limit>
      </axis>
    </joint>

    <joint name="camera_joint_4" type="revolute">
      <child>link_4</child>
      <parent>link</parent>
      <axis>
        <xyz>0 0 -2</xyz>
        <limit>
          <upper>0</upper>
          <lower>0</lower>
        </limit>
      </axis>
    </joint>

    <joint name="mark_joint_4" type="revolute">
      <child>mark_1</child>
      <parent>link</parent>
      <axis>
        <xyz>0 0 -2</xyz>
        <limit>
          <upper>0</upper>
          <lower>0</lower>
        </limit>
      </axis>
    </joint>


  </model>
</sdf> |
material Mark/Diffuse
{
  technique
  {
    pass
    {
      texture_unit
      {
        texture mark.png
        filtering anistropic
        max_anisotropy 16
      }
    }
  }
} |
<link name='link_2'>
<pose>0 5 0 0 0 0</pose> 表示质心位置 xyz rpy (位置是相对统一room的起始原点而言的,当room作为model加入world时,则需要先设置model就=即room的
起始原点到world原点的相对信息。)
<joint name="camera_joint_1" type="revolute"> joint 的设置
<child>link_1</child>
<parent>link</parent>
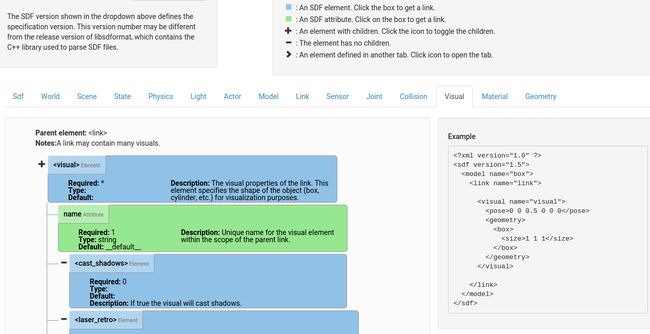
补充: sdf文件书写,注意参考下面这张图与sdf.可以清楚sdf各层属性间的层次关系。
参考:
sdf http://sdformat.org/spec?ver=1.5&elem=visual#visual_material
gazebo http://www.gazebosim.org/tutorials?cat=build_world


