dojo EnhancedGrid的两种实现方式对比
后台测试数据初始化:
static List<User> arrD = new ArrayList< User >();
	static{
		for( int i = 0; i < 51; i ++ ){
			User u = new User();
			u.setId( i );
			u.setName( "test"+i );
			if( i % 2 == 0 ){
				u.setDesc( "dev admin user" );
				u.setLoginNum( 10 );
			}else{
				u.setDesc( "dev oper user" );
				u.setLoginNum( 20 );
			}
			arrD.add( u );
		}
	}
后台rest服务:
	@GET
	@POST
	@Path("/getUsers")
	//@Consumes(MediaType.APPLICATION_FORM_URLENCODED)
	@Produces("application/json")
	public List< User > getUsers(@Context HttpServletRequest request,@Context HttpServletResponse response){

		//items=0-9
		//items=10-19
		// 如果request header中没有Range参数,则返回全部记录
		if( request.getHeader("Range") == null ){
			return arrD;
		}else{
			// store会在request header中添加Range参数,参数值类似这种:items=0-9,表明了查询范围。此处要提取该参数值
			String[] range = request.getHeader("Range").replaceAll("items=", "").split("-");
			// 查询起点
			int from = Integer.parseInt(range[0]);
			// 查询终点
			int to = Integer.parseInt(range[1]);
			// 防止越界
			if( to > arrD.size() ){
				to = arrD.size() - 1;
			}
			// 还要告诉grid记录总数有多少,以及当前查询范围
			String contentRange = String.format("items %d-%d/%d", from,to,arrD.size());
			// response header中添加Content-Range参数,参数值类似这种:items 0-9/51
			response.setHeader("Content-Range", contentRange);
			// 查询结果
			return arrD.subList(from, to+1);
		}

	}
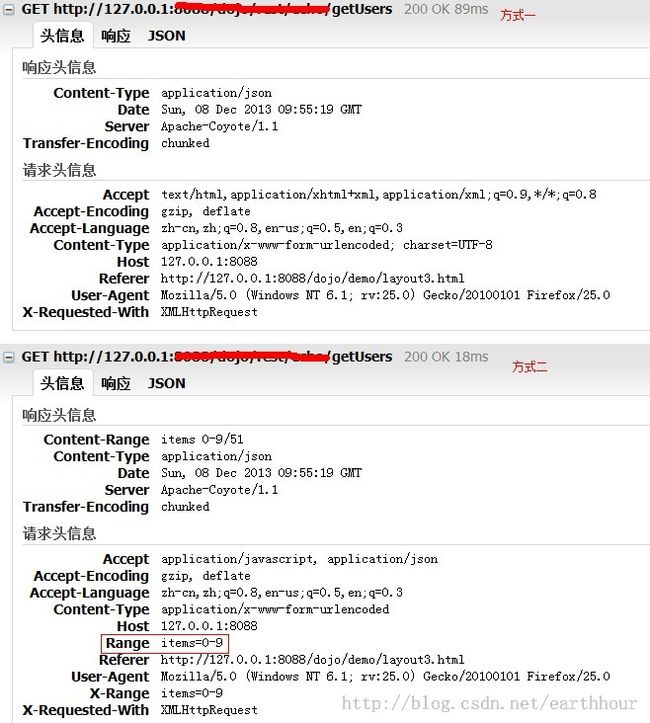
代码中request.getHeader("Range")是为了取得EnhancedGrid传递过来的查询范围参数,这个参数在request header中,如图
而response.setHeader("Content-Range", contentRange);是传递给EnhancedGrid的参数,该参数要放到response header中,如图
EnhancedGrid根据这一参数计算出记录总数,以及分页。
前台dojo实现方式一:
		require([
		 		"dojox/grid/EnhancedGrid",
		 		"dojox/grid/enhanced/plugins/IndirectSelection" ,
		                "dojox/grid/enhanced/plugins/Pagination",
		 		"dojo/request/xhr",
		 		"dojo/store/Memory",
		 		"dojo/data/ObjectStore",
		 		"dojo/domReady!"
		 		], function(EnhancedGrid,IndirectSelection,Pagination,xhr,Memory,ObjectStore){
			xhr.get("/dojo/rest/getUsers", {
				  headers:{ 'Content-Type': 'application/x-www-form-urlencoded; charset=UTF-8' },
			    handleAs: "json"
			  }).then(function(data){

				  var mem = new Memory({data:data});
				  var dataStore = new ObjectStore({objectStore: mem});

				  grid = new EnhancedGrid({
						store: dataStore,
						plugins:{
							indirectSelection: {headerSelector:true, width:"40px", styles:"text-align: center;"},
							pagination: true
						},

						//query: { id: "*" },
						structure: [
							{ name: "用户名", field: "name", width: "84px" },
							{ name: "用户名描述", field: "desc", width: "84px" },
							{ name: "允许登录数", field: "loginNum", width: "60px" }
						]
					}, "userList");
				  grid.startup();

			  })
		});
<div id="userList" style="height: 200px;"></div>实现方式二:
	<div data-dojo-type="dojo/store/JsonRest" data-dojo-id="userData" data-dojo-props='target: "/dojo/rest/getUsers"'></div>
	<div data-dojo-type="dojo/data/ObjectStore" data-dojo-id="UserStore" data-dojo-props="objectStore: userData"></div>
	<table data-dojo-type="dojox/grid/EnhancedGrid"
	data-dojo-props='store: UserStore, autoWidth:true, autoHeight:true, rowSelector: "20px",
	plugins:{
		indirectSelection: {headerSelector:true, width:"40px", styles:"text-align: center;"},
		pagination: {description: true,sizeSwitch: true,pageStepper: true,gotoButton: true}
	}'
	>
		<thead>
		    <tr>
			    <th field="id" width= "50px" >序号</th>
			    <th field="name" width= "200px" >用户名</th>
			    <th field="desc" width= "200px" >用户名描述</th>
			    <th field="loginNum" width= "200px" >允许登录数</th>
		    </tr>
		</thead>
	</table>
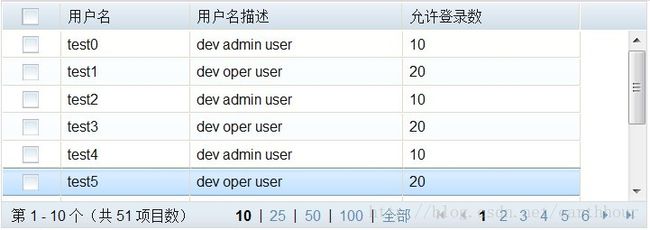
这两种方式都能实现EnhancedGrid的翻页功能
但是,第一种方式是一次性加载全部数据,request header中不添加Range;第二种方式是懒惰加载,包含Range,如图
返回结果:
这是第二种方式的返回结果。第一种方式的返回结果左侧为0~50


