Spring的简单使用
Spring是贯穿表现、业务和持久层的整合框架,使用基本的JavaBean来完成之前只能由EJB完成的任务。Spring核心机制是依赖注入,也称控制反转。是指在程序运行中,如果需要另一个对象协助的话,无需在代码中创建对象的实例,而是依赖外部容器的注入,这里负责管理注入的就是Spring。
普通Java项目下测试IOC效果
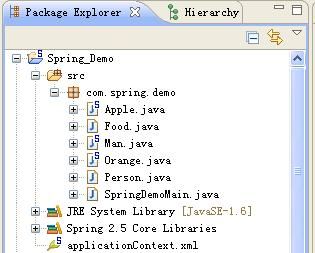
1. 新建java Project,命名为Spring_Demo,添加Spring开发能力,注意spring的配置文件applicationContext.xml不要放在/src目录中,而放在Spring_Demo根目录下。
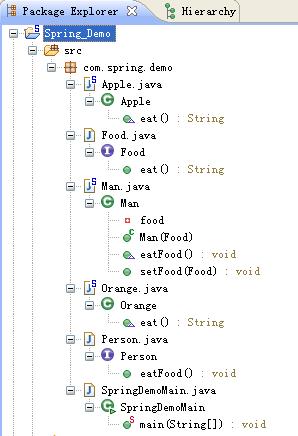
2. 新建Person接口和实现类Man。Food接口和Apple实现类。结构如图
3. 修改applicationContext.xml文件,为两个bean建立关联:
<?xml version="1.0" encoding="UTF-8"?><beans xmlns="http://www.springframework.org/schema/beans"xmlns:xsi="http://www.w3.org/2001/XMLSchema-instance"xmlns:p="http://www.springframework.org/schema/p"xsi:schemaLocation="http://www.springframework.org/schema/beans http://www.springframework.org/schema/beans/spring-beans-2.5.xsd"> <bean id="man"class="com.spring.demo.Man"> <property name="food"> <ref local="orange"></ref> </property> </bean> <bean id="apple"class="com.spring.demo.Apple"> </bean></beans>
以上配置文件,将apple作为参数传入man类实例中,man类实例采用setFood方法,将apple实例传入man类。
4. 新建测试文件:
packagecom.spring.demo;
importorg.springframework.context.ApplicationContext;
importorg.springframework.context.support.FileSystemXmlApplicationContext;
public classSpringDemoMain {
public static void main(String[] args) {
ApplicationContext context = newFileSystemXmlApplicationContext("applicationContext.xml");
Person p =(Person)context.getBean("man");
p.eatFood();
}
}
以上代码实例化Man变量,调用eatFood方法,返回当前使用的具体Food实例类。
Spring实现了Bean的解耦合,使他们在代码上并没有纠缠在一起,我们可以自己修改配置文件,从而来实现另外的功能。
5. 新建一个Food接口的实现Orange
package com.spring.demo;
public class Orangeimplements Food {public String eat() {return" Orange";}}
6. 修改applicationContext.xml文件,新建bean配置,修改传值。
<beanid="apple"class="com.spring.demo.Apple"></bean>
同时修改
<propertyname="food"><reflocal="orange"></ref></property>
上文在<ref/>处实现了设值注入,另外还有一种注入方式是构造函数注入。
7. 修改Man类,增加带参构造方法。
public Man(Food food) {this.food = food;}
8. 修改配置文件为构造注入方式。
<constructor-argindex="0"><reflocal="orange"/></constructor-arg>
WeB方式下使用Spring
再来看web方式下,实现Spring的测试项目spring_example。这个例子中helloWorld.jsp输入关键字,提交后就可以在showMessages.jsp中显示结果。
1. 新建webProject项目spring_example,附加Spring开发环境。注意附加两个库:SpringCore Libraries和Spring WebLibraries。
2. 配置Web.xml内容,进行servlet启动配置,URL映射和首页定制。
<?xmlversion="1.0"encoding="UTF-8"?>
<web-appversion="2.4"xmlns="http://java.sun.com/xml/ns/j2ee"
xmlns:xsi="http://www.w3.org/2001/XMLSchema-instance"xsi:schemaLocation="http://java.sun.com/xml/ns/j2ee http://java.sun.com/xml/ns/j2ee/web-app_2_4.xsd">
<servlet>
<servlet-name>spring</servlet-name>
<servlet-class>org.springframework.web.servlet.DispatcherServlet</servlet-class>
<load-on-startup>1</load-on-startup>
</servlet>
<servlet-mapping>
<servlet-name>spring</servlet-name>
<url-pattern>*.form</url-pattern>
</servlet-mapping>
<welcome-file-list>
<welcome-file>index.jsp</welcome-file>
</welcome-file-list>
<login-config>
<auth-method>BASIC</auth-method>
</login-config>
</web-app>
3. 配置[servlet-name]-servlet.xml文件,这个文件位于WEB-INF目录下。配置bean对象来解析JSP作为视图层技术。
<?xmlversion="1.0"encoding="UTF-8"?>
<beansxmlns="http://www.springframework.org/schema/beans"
xmlns:xsi="http://www.w3.org/2001/XMLSchema-instance"
xsi:schemaLocation="http://www.springframework.org/schema/beanshttp://www.springframework.org/schema/beans/spring-beans-2.5.xsd">
<beanid="viewResolver"class="org.springframework.web.servlet.view.InternalResourceViewResolver">
<propertyname="prefix"value="/"></property>
<propertyname="suffix"value=".jsp"></property>
</bean>
</beans>
4. 设计helloWorld.jsp文件,设计表格,action设定为helloWorld.form
<formaction="helloWorld.form">
<inputname="message"/>
<inputtype="submit"value="submit"/>
</form>
5. 新建包com.springexample.spring,新建HelloWorldForm类,设定message字串变量和getter、setter方法。
package com.springexample.spring;
public class HelloWorldForm {
private Stringmessage;
public String getMessage() {returnmessage;}
public void setMessage(String message) {this.message = message;}
}
6. 新建控制器类HelloWorldController,这个类继承自AbstractCommandController,在Handle方法中返回一个ModelAndView对象,在构造方法中设定绑定表单类。
packagecom.springexample.spring;
importjavax.servlet.http.HttpServletRequest;
importjavax.servlet.http.HttpServletResponse;
importorg.springframework.validation.BindException;
importorg.springframework.web.servlet.ModelAndView;
importorg.springframework.web.servlet.mvc.AbstractCommandController;
public classHelloWorldController extends AbstractCommandController {
private String showMessagePage;
public String getShowMessagePage(){return showMessagePage;}
public void setShowMessagePage(StringshowMessagePage) {this.showMessagePage = showMessagePage; }
protected ModelAndViewhandle(HttpServletRequest arg0,
HttpServletResponse arg1,Object arg2, BindException arg3)
throws Exception {
HelloWorldForm helloWorldForm =(HelloWorldForm)arg2;
return newModelAndView(getShowMessagePage(),"helloworldform",helloWorldForm);
}
public HelloWorldController(){setCommandClass(HelloWorldForm.class);}
}
7. 配置spring-servlet.xml文件,增加一个ControllerBean配置,对其进行注入。
<beanid="helloWorldController"class="com.springexample.spring.HelloWorldController"><propertyname="showMessagePage"><value>showMessage</value></property></bean>
8. 新建输出页面showMessage.jsp,页面中或得helloworldform实例,输出内容。
<beanid="urlMapping"class="org.springframework.web.servlet.handler.SimpleUrlHandlerMapping"><propertyname="mappings"><props><propkey="/helloWorld.form">helloWorldController</prop></props></property></bean>
9. 部署运行之。

