直方图图像检测
函数 cvCalcBackProject 计算直方图的反向投影, 对于所有输入的单通道图像同一位置的象素数组。该函数根据相应的象素数组,放置对应的直方块的值到输出图像中。
觉得文档写的很详细,虽然我没怎么懂,还是粘贴过来慢慢看:
calcBackProject
Calculates the back projection of a histogram.
C++: void calcBackProject(const Mat* images, int nimages, const int* channels, InputArray hist, OutputArray backProject, const float** ranges, double scale=1, bool uniform=true )
C++: void calcBackProject(const Mat* images, int nimages, const int* channels, const SparseMat& hist, OutputArray backProject, const float** ranges, double scale=1, bool uniform=true )
Python: cv2.calcBackProject(images, channels, hist, ranges, scale[, dst]) → dst
C: void cvCalcBackProject(IplImage** image, CvArr* backProject, const CvHistogram* hist)
Python: cv.CalcBackProject(image, back_project, hist) → None
Parameters:
images – Source arrays. They all should have the same depth, CV_8U or CV_32F , and the same size. Each of them can have an arbitrary number of channels.
nimages – Number of source images.
channels – The list of channels used to compute the back projection. The number of channels must match the histogram dimensionality. The first array channels are numerated from 0 to images[0].channels()-1 , the second array channels are counted from images[0].channels() to images[0].channels() + images[1].channels()-1, and so on.
hist – Input histogram that can be dense or sparse.
backProject – Destination back projection array that is a single-channel array of the same size and depth as images[0] .
ranges – Array of arrays of the histogram bin boundaries in each dimension. See calcHist() .
scale – Optional scale factor for the output back projection.
uniform – Flag indicating whether the histogram is uniform or not (see above).
The functions calcBackProject calculate the back project of the histogram. That is, similarly to calcHist , at each location (x, y) the function collects the values from the selected channels in the input images and finds the corresponding histogram bin. But instead of incrementing it, the function reads the bin value, scales it by scale , and stores in backProject(x,y) . In terms of statistics, the function computes probability of each element value in respect with the empirical probability distribution represented by the histogram. See how, for example, you can find and track a bright-colored object in a scene:
Before tracking, show the object to the camera so that it covers almost the whole frame. Calculate a hue histogram. The histogram may have strong maximums, corresponding to the dominant colors in the object.
When tracking, calculate a back projection of a hue plane of each input video frame using that pre-computed histogram. Threshold the back projection to suppress weak colors. It may also make sense to suppress pixels with non-sufficient color saturation and too dark or too bright pixels.
Find connected components in the resulting picture and choose, for example, the largest component.
This is an approximate algorithm of the CamShift() color object tracker.
See also calcHist()
单通道:
#pragma once
using namespace cv;
class histogram1D {
private:
	int hisSize;
	float range[2];
	const float *hisrange;
	int channels[1];
public:
	histogram1D() {
		hisSize = 256;
		range[0] = 0;
		range[1] = 1;
		hisrange = range;
		channels[0] = 0;
	}
	Mat gethistogram(Mat & img) {
		Mat result;
		hisSize = 256;
		range[0] = 0;
		range[1] = 256;
		channels[0] = 0;

		calcHist(&img, 1, channels, Mat(), result, 1, &hisSize, &hisrange);
		normalize(result, result, 0, result.rows, NORM_MINMAX, -1, Mat());
		calcBackProject(&img, 1, channels, result, result, &hisrange, 255);

		return result;
	}
};
/*
单通道检测图像区域
*/
#include<opencv2\opencv.hpp>
#include<iostream>
#include"histogram.h"
using namespace cv;
using namespace std;
int main() {
	Mat img = imread("D://图片//5.jpg");
	if (img.empty())
		return -1;

	Mat result;
	Mat imgroi = img(Rect(0, 0, img.cols/2, img.rows));
	cvtColor(imgroi, imgroi, CV_BGR2HSV);
	vector<Mat> channel;
	split(imgroi, channel);
	imgroi = channel[0];

	imshow("imgroi",imgroi);

	histogram1D hist;
	result = hist.gethistogram(imgroi);
	threshold(result, imgroi, 222, 255, THRESH_BINARY_INV);

	imshow("img", imgroi);

	waitKey(0);
	destroyAllWindows;
	return 0;
}
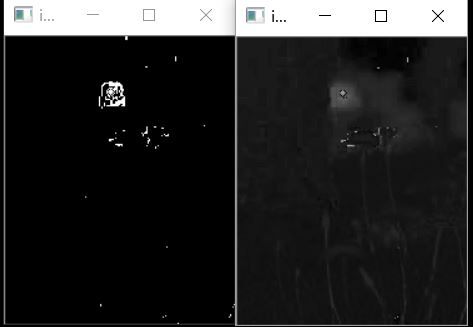
运行结果:
第一张是最终结果,后一张是H通道的敏感区域显示
