3D Slicer+Qt-easy-build+VS2013
填补3D Slicer配置步骤空白~~~
废话:
科研菜鸟终于要走出敲代码这一步了,只是离心水的机器学习越来越远,不过走进可视化这个领域还是蛮令人激动的。
需要用到3D Slicer这个开源库,需要自己写一个程序来读取医学数据模型等来做可视化。网上可供参考的资料太少,唯一的一个还是13年基于xp下的,但还是有一定的参考性,决定苦读官方资料,做一个靠自己的程序媛,并且拒绝了师兄的帮助。查询了官网针对开发者的资料。对一个大学四年都在计算机专业男生的帮助下毕业的渣渣程序媛,最近被师兄吐槽怎么连计算机有什么硬件,怎么装软件都不会!终于要独立了。已经自己配置好了OSG的库,没有任何人帮忙,感觉自己好厉害,哈哈。慢慢进步。不能废话了,这是一个专业的博客。
正文:
参考资料:官网资料 点击打开链接
零、目的
编译Slicer debug版本,所以要求qt 也是debug版的
一、准备
1、cmake-3.5.0-win32-x86点击打开链接
2、Git-2.8.1-64点击打开链接
3、SlikSvn
4、QT 4.8.7 支持SSL 使用qt-easy-build点击打开链接
5、VS2013
二、安装VS2013
不赘述
三、配置Git
使用默认的方式安装Git。Git是一个特别强大的版本控制工具,支持很多不同的“工作流”针对独立开发者和合作开发。安装成功后将安装路径添加到Path变量中(设置环境变量)。
四、配置QT
可以直接略过前面的ABC失败的方法,直接转到D成功的方法。
(A)失败方法1
GitHub上链接贴在上面了
是一个脚本,该脚本可以很简单的build 支持openssl的qt。
首先要添加一个Visual studio command prompt 到VS2013的工具里:方法见此点击打开链接
打开这个command prompt,把GitHub那个链接里面的Visual Studio 2013 64-bit release版本的脚本粘贴到窗口中,回车,自己会开始配置QT。过程有点慢,实验室网速太渣。
失败了,用这个easy build 同门开玩笑说是easy build=rebuild。我思考了一下,官网给的easy build 都是Qt4了,现在都是Qt5。决定还是自己下载Qt配置吧,然后在加上SSL support。
不知道问题是什么。
(B)失败方法2
(1) Qt5+ssl
1.Qt5.4.2qt-opensource-windows-x86-msvc2013_opengl-5.4.2.exe 点击打开链接
2.qt-vs-addin-1.2.5.exe点击打开链接
先装opensource,再使用addin将Qt加到VS2013中,再进行相应配置,详见另外的文章。点击打开链接
(2) ssl
1.点击打开链接
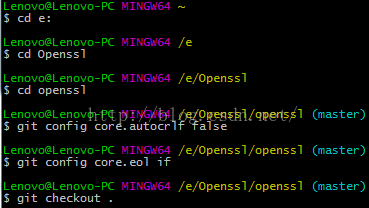
使用git clone openssl
cd e:
cd Openssl
$ git clone git://git.openssl.org/openssl.git

2.下面是转载歪果仁的回复,应该管用点击打开链接
Assuming Windows you can download its installation from Win32 OpenSSL Installation Project page. You need to download this one for 64-bit windows developing or this one for 32-bit. Just run the stup and every thing will be done easily. The default installation directory is : C:\OpenSSL-Win32
In Qt creator if want to link a library to your project you can just add this line to your .pro file(project file ) :
LIBS += -L/path/to -llibnameSo here's what we do for this library( for example to link ubsec.lib )
LIBS += -LC:/OpenSSL-Win32/lib -lubsecPay attention to -L and -l.See this question. You don't even need to specify .lib at the end of the library name.
For including .h files add this line to your .pro file :
INCLUDEPATH += C:/OpenSSL-Win32/includeafter that you can include a file like this :
#include <openssl/aes.h>(C)最后一次挣扎
使用第一次失败的方法中下载下来的qt-everywhere-opensource-src-4.8.7.zip
然后按照网上唯一可查的中文配置指南进行一定更改点击打开链接
3.2 安装 QT 4.7.4 源代码
点击qt-everywhere-opensource-src-4.8.4.tar.gz解压到某个目录,如C:/Qt/4.8.4 目录下(路径不要包含空格,否则会编译出错);
3.3 编译QT 4.8.4
① Windows2000/xp中新增一个系统环境变量QMAKESPEC,值为win32-msvc2013
② 在系统环境变量的path中添加C:/Qt/4.8.4/bin
③ 从Windows 的“开始”按钮点击,打开 VS2013 Command Program; 路径如下:
进入QT 4.7.4 源代码目录,如:
> C:/
> cd C:/Qt/4.8.4
执行configure 目录,参数如下:
>configure.exe -opensource -confirm-license -debug -webkit -nomake examples -nomake demos
等待一段时间后,运行 nmake 命令,如:
> nmake
等待数小时后(视机器条件而定),编译成功即可;
希望成功啊!!两天了!!我宝贵的时间啊!!
(D)绝对最后一次挣扎,已经过去6天了经历了n次重装,我这暴脾气。用一个崭新的系统迎接3D Slicer,希望他能够进入姐姐的怀抱。
VS2013+Update5安装
还是使用的官网给的easy-build,不过要做一些改动。
先用那一行命令,在VS2013的Command Prompt里运行,下载那些必要的东西。
@powershell -Command "$destDir='C:\D\Support';$buildType='Debug';$qtPlatform='win32-msvc2013';$bits='64';iex ((new-object net.webclient).DownloadString('https://raw.githubusercontent.com/jcfr/qt-easy-build/4.8.7/windows_build_qt.ps1'))"
肯定会编译失败的,哈哈哈,已经试了无数次和无数台机子了。
(1)修改C:\D\Support\qt..\src\3rdparty\webkit\source\webcore\platform\DefaultLocalizationStrategy.cpp,定位到327行,修改那些看起来奇怪的引号。
不过我现在在思考,既然我都不配置这个webkit功能,也不需要修改webkit里面的源代码了吧。
(2)修改cmake文件,包含configure qt这部分的,把-webkit删掉,意思是不要这个webkit功能,因为总是这里出错,查资料说webkit是不支持静态编译的,所以肯定会出错,不知道为啥,哈哈。
(3)修改qt-easy-build-4.8.7.zip中的ps1文件,删掉function always-download-file里面的三个cross-platform script的下载,也就是不让他每次都重新下载那个cmake文件。
然后,宝宝用了个很蠢的方法,把自己修改好的这个ps1文件传到github上面,然后修改上面那一行命令的下载路径,这样下载的ps1文件就是宝宝修改过的了,哈哈,因为实在不懂这个脚本命令。
(D)终于成功编译Qt了!完成了一大步!
上面的方法都验证失败,其实还是用的easybuild,因为作者回复了,在作者的帮助下编译成功了,现在分享一下github上面的过程。切记!一定要使用VS2013 64bit 的console啊!不然会冲突的。
@powershell -Command "$destDir='C:\D\Support';$buildType='Debug';$qtPlatform='win32-msvc2013';$bits='64';iex ((new-object net.webclient).DownloadString('https://raw.githubusercontent.com/jcfr/qt-easy-build/4.8.7-update-to-cmake-3.4.3/windows_build_qt.ps1'))"
First error
platform\DefaultLocalizationStrategy.cpp(327) : error C2065: “selection”: 未声明的标识符(undeclared identifier)
platform\DefaultLocalizationStrategy.cpp(327) : error C2228: “.replace”的左边必须有类/结构/联合(on the left of ‘replace’ must have a class / structure / joint)j
om: C:\D\Support\qt-4.8.7-64-vs2013-deb\src\3rdparty\webkit\Source\WebCore\Makefile.WebKit.Debug [tmp\obj\debug_shared\DefaultLocalizationStrategy.obj] Error 2
jom: C:\D\Support\qt-4.8.7-64-vs2013-deb\src\3rdparty\webkit\Source\WebCore\Makefile.WebKit [debug] Error 2
jom: C:\D\Support\qt-4.8.7-64-vs2013-deb\src\3rdparty\webkit\Source\Makefile.WebKit [sub-WebCore-make_default-ordered] Error 2
jom: C:\D\Support\qt-4.8.7-64-vs2013-deb\Makefile [sub-webkit-make_default-ordered] Error 2
Solution:
change the code in line 327 in DefaultLocalizationStrategy.cpp. There are some strange quotation mark, change it ,and add “\” before quotation mark.
change to the following:
return WEB_UI_STRING("Look Up \"<selection>\"", "Look Up context menu item with selected word").replace("<selection>", truncatedStringForLookupMenuItem(selectedString));
Second error
GraphicsLayerQt.cpp lib /NOLOGO /OUT:debug\webcore.lib @C:\Users\GJC\AppData\Local\Temp\webcore.lib.4228.196593.jomtmp\obj\debug_shared\DefaultLocalizationStrat
jom: C:\D\Support\qt-4.8.7-64-vs2013-deb\src\3rdparty\webkit\Source\WebCore\Makefile.WebKit.Debug [debug\webcore.lib] Error 1112
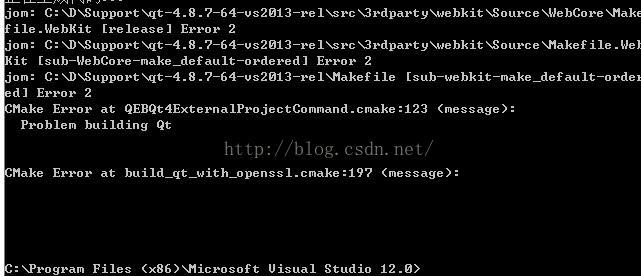
egy.obj : fatal error LNK1112: 模块计算机类型“x64”与目标jom: C:\D\Support\qt-4.8.7-64-vs2013-deb\src\3rdparty\webkit\Source\WebCore\Makefile.WebKit [debug] Error 2计算机类型“X86”冲突(linking problem: fatal error LNK1112: module machine type 'x64' conflicts with target machine type 'X86')
jom: C:\D\Support\qt-4.8.7-64-vs2013-deb\src\3rdparty\webkit\Source\Makefile.WebKit [sub-WebCore-make_default-ordered] Error 2jom: C:\D\Support\qt-4.8.7-64-vs2013-deb\Makefile [sub-webkit-make_default-ordered] Error 2CMake Error at QEBQt4ExternalProjectCommand.cmake:123 (message): Problem building Qt
Solution
No exact solution, I think maybe some times before, I used wrong console(32bit) to compile and then I changed to 64bit console which may cause conflicts. So my solution is to delete all the files I downloaded and compiled before.
Then success.
Good luck for all confused.
五、CHECKOUT slicer source files检查slicer 资源文件
以下命令都在git bash里面输入。
打开Git Bash,选一个盘,建一个MyProjects的文件夹E:\MyProjects
在Git Bash命令窗口中输入
1.clone github repository
自己选一个路径我的是E:\MyProjects
cd MyProjects git clone git://github.com/Slicer/Slicer.git2.设置开发环境Setup the development environment:
cd Slicer ./Utilities/SetupForDevelopment.sh3.Configure the
git svn bridge to ensure the mapping with svn revision.配置git svn
cd Slicer
git svn init http://svn.slicer.org/Slicer4/trunk
git update-ref refs/remotes/git-svn refs/remotes/origin/master
git checkout master
git svn rebase
If you plan to compile Slicer to develop your own extensions and test these extensions on Slicer releases, it is convenient to download the source code directly from SVN and specify the revision number corresponding to the release you want.如果准备编译Slicer来建立自己的程序,通过SVN下载源码会比较方便。
svn co http://svn.slicer.org/Slicer4/trunk Slicer-r23774 -r 23774这个下载还是配置过程还是有点久
不太懂整个过程,总之按照步骤来吧,每一步我都做了。
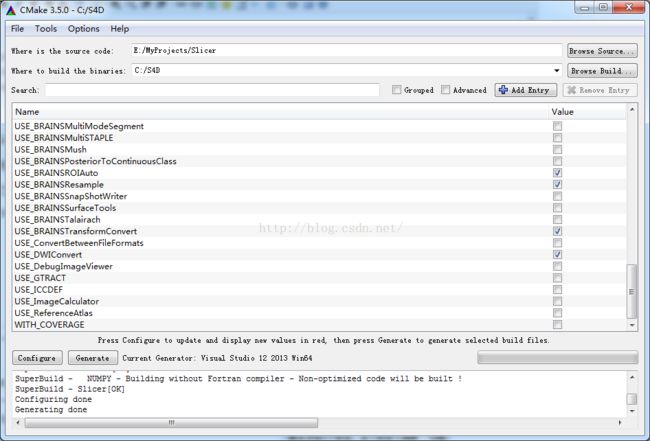
六、CONFIGURE and generate Slicer solution files使用Cmake配置和产生sln文件
注意,这里build 路径必须是这样简单的名字,太复杂会出错。
多点几次configure,修改 QT_QMAKE_EXECUTABLE 的路径到 qmake.exe, 通常在路径bin(例如, C:/path/to/qt-everywhere-opensource-build-4.8.6/bin/qmake.exe我的是在C:/D/Support/qt-4.8.7-64-vs2013-deb/bin/qmake.exe。
然后再把Slicer_USE_SimpleITK 这个选项取消掉。再configure,直到没有红色的。然后点generate。生成的Slicer.sln在C:\S4D中。
然后用VS2013进行debug版本的编译。该过程需联网,感觉在下载东西。

