AndEngine002——HelloWorld!AndEngine
我先表示一下,作为入门来说,这个不是很好用。我没有完全做成功,估计是在下载的时候出了问题。
参考网址:
http://www.andengine.org/forums/tutorials/eclipse-andengine-and-helloworld-t380.html
Tip 2 - Getting AndEngine
建议2-获取AndEngine
Nicolas has made a smart choice with the way he distributes AndEngine. He usesMercurial, which is a Version Control System for projects. It can be directlyused with Google Code, and that’s a massive plus!! It also has a Plugin for usewithin Eclipse, which you can download/setup by following the guide below:
Nicolas在很多渠道上都发布了他的AndEngine。
http://www.javaforge.com/project/HGE
下面是Mercurial 的Plugin的安装方法。
Once you have this installed, it is time to download the AndEngine examples. This is where you should spend a good few hours looking through all of the Examples,familiarizing yourself with the structure of AndEngine and how you would go about accomplishing various tasks.
To download the AndEngine Examples, following these steps:
安装好之后,你就可以去下载AndEngine的例子了。我们建议你最好花费一些时间去浏览这些例子。这对于你使用AndEngine很有帮助。下边是获取示例的步骤。
1. File -> New Project
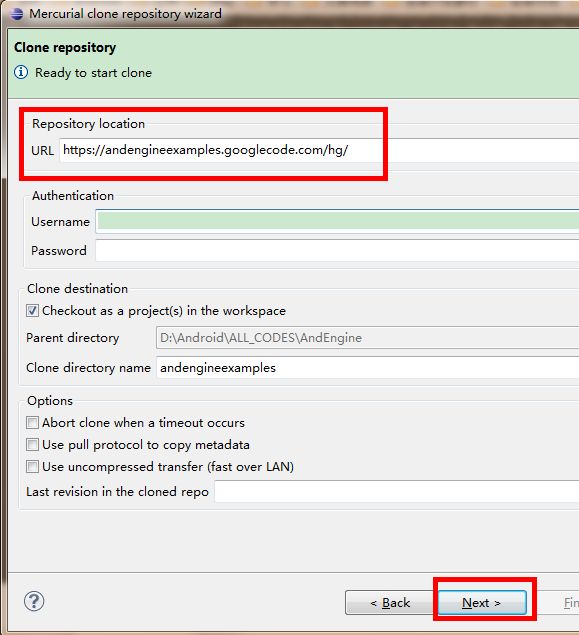
2. Select the Clone Existing Mercurial Repository under the Mercurial folder
3.In the URL field, copy and paste the following link:
https://andengineexamples.googlecode.com/hg/
4.Optional - If you want to change the Local Projects Name, enter your preferredname in the Clone Directory Name field.
5. Press Next. This should then be shown a screen with what will be downloaded.
6. Press Next and then Finish to pull the AndEngineExamples down.
Welldone, you now have the AndEngine Examples on your system!
Note: If you cannot see the AndEngine Examples Project within your EclipseWorksapce, then try to import the project from your workspace. You can do thisby selecting File -> Import -> Existing Projects Into Workspace.
Right, so we now have the AndEngine Examples on our system. So go away, andlike I said before, look through them all. See what they all do, build them andtry them on your Phone or Emulator. Once you are done, then move onto the next tip.
上面例子的步骤截图如下。
确定之后软件开始下载源代码,学校的网速比较慢,一共下载了35M左右的数据包。
Tip 3 - Hello World
建议3-HelloWorld(为了让入门的同学更清楚的看到示例,我们将会在后面的教程中将AndEngine的每一个例子进行拆解)
So, now that we have everything setup, and that we have had a look at theExamples for AndEngine, you are going to want to try and code somethingyourself. Well, your in luck. This tip will show you how to create your ownProject, and display a simple Sprite on the Screen.
So, first up, create a New Project! Go to File -> New, and the selectAndroid Project from the Android folder. Choose a name for your Project, suchas "HelloWorld".
Now this is done, we need to import the AndEngine Library into out project sothat we can actually use it! Follow these steps:
1. Right Click on your Projects Name
2. Select New -> Folder and create a folder called lib
3. Open up your AndEngine Examples Project, and go to the lib folder.
4. Copy the andengine.jar
5. Past the andengine.jar into your newly created lib folder.
Now you need to add the Library to your Projects Build Path. This is very easy,so follow these steps:
1. Open your lib folder
2. Right Click on the andengine.jar
3. Select Build Path -> Add To Build Path
You now have the AndEngine Library setup in your project! So lets get down tosome code
Open up the default Activity for your Project, which should be calledHelloWorld.java if you named your project like I said. Now, DELETE EVERYTHINGfrom this file, EXCEPT the package line at the top of the file.
Once you have done this, copy and paste the following code into your file:
publicclass HelloWorld extends BaseGameActivity {
     // ===========================================================
     // Constants
     //===========================================================

     private static final int CAMERA_WIDTH =720;
     private static final int CAMERA_HEIGHT =480;

     // ===========================================================
     // Fields
     //===========================================================

     private Camera mCamera;

     //===========================================================
     // Constructors
     // ===========================================================

     //===========================================================
     // Getter & Setter
     //===========================================================

     //===========================================================
     // Methods for/from SuperClass/Interfaces
     //===========================================================

     @Override
     public Engine onLoadEngine() {
         this.mCamera = new Camera(0, 0,CAMERA_WIDTH, CAMERA_HEIGHT);
         return new Engine(newEngineOptions(true, ScreenOrientation.LANDSCAPE, newRatioResolutionPolicy(CAMERA_WIDTH, CAMERA_HEIGHT), this.mCamera));
     }

     @Override
     public void onLoadResources() {
     }

     @Override
     public Scene onLoadScene() {
         this.mEngine.registerUpdateHandler(newFPSLogger());

         final Scene scene = new Scene(1);
         scene.setBackground(newColorBackground(0, 0, 0.8784f));

         return scene;
     }

     @Override
     public void onLoadComplete() {

     }

     //===========================================================
     // Methods
     // ===========================================================

     //===========================================================
     // Inner and Anonymous Classes
     //===========================================================
}
Thenpress Ctrl+Shift+O and your project should sort all of the Import Statementsout for you.
Before you build, make sure you add the following line into youeAndroidManifest.xml file:
<uses-permissionandroid:name="android.permission.WAKE_LOCK"/>
This allows AndEngine to run and usethe permissions it needs.
Now, try to build and run this. If it builds properly, it should run on your Phone/Emulatorand display a blue background. If so, well done you have written your firstAndEngine Project! Its as simple as that. If you want do display a Sprite,check out the following SpriteExample which will display a Sprite on yourScreen.
SpriteExample
To get use to Touch, check out the following examples, and try to add them toyour Project:
SpriteRemove Example
TouchDrag Example
Thats the end of this tutorial. If you feel more needs to be added, such as howto do something within AndEngine, let me know and ill add it in.
Otherwise see you next time!


