android 选项卡TabHost
选项卡主要有TabHost、TabWiget和 FramentLayout3个组件组成,用于实现一个多标签的用户界面,通过他可以将一个复杂的对话分隔成若干个标签页,实现对信息的分类显示和管理。使用给组件不仅可以使界面美观大方,还可以有效地减少窗体个数。
在Android中,实现选项卡的一半步骤如下:
(1)在布局文件中添加实现选项卡所需的TabHost、TabWiget和 FramentLayout组件。
(2)编写各个标签页中要显示内容所对应的XML布局文件。
(3)在Activity个,获取并初始化TabHost组件。
(4)为TabHost对象添加标签页。
1.主布局文件:
activity_main.layout.xml:
<TabHost xmlns:android="http://schemas.android.com/apk/res/android"
    xmlns:tools="http://schemas.android.com/tools" android:layout_width="match_parent"
    android:layout_height="match_parent" android:paddingLeft="@dimen/activity_horizontal_margin"
    android:paddingRight="@dimen/activity_horizontal_margin"
    android:paddingTop="@dimen/activity_vertical_margin"
    android:paddingBottom="@dimen/activity_vertical_margin" tools:context=".MainActivity"
    android:id="@android:id/tabhost">

    <RelativeLayout
        android:layout_width="fill_parent"
        android:layout_height="fill_parent"
        android:orientation="vertical">
        <TabWidget
            android:layout_width="fill_parent"
            android:layout_height="wrap_content"
            android:id="@android:id/tabs"
            android:layout_alignParentBottom="true"></TabWidget>
        <FrameLayout
            android:layout_width="fill_parent"
            android:layout_height="fill_parent"
            android:id="@android:id/tabcontent"></FrameLayout>
    </RelativeLayout>

</TabHost>
2.编写各标签页要显示内容对应的XML布局文件。
tab1.xml
<?xml version="1.0" encoding="utf-8"?>
<LinearLayout xmlns:android="http://schemas.android.com/apk/res/android"
    android:layout_width="match_parent" android:layout_height="match_parent"
    android:orientation="vertical"
    android:id="@+id/linearLayout01">

    <TextView
        android:layout_width="wrap_content"
        android:layout_height="wrap_content"
        android:text="我是Tab1"/>
    <TextView
        android:layout_width="wrap_content"
        android:layout_height="wrap_content"
        android:background="@drawable/img01"/>
</LinearLayout>
tab2.xml:
MainActivity.java<?xml version="1.0" encoding="utf-8"?> <LinearLayout xmlns:android="http://schemas.android.com/apk/res/android" android:layout_width="match_parent" android:layout_height="match_parent" android:orientation="vertical" android:id="@+id/linearLayout02"> <TextView android:layout_width="wrap_content" android:layout_height="wrap_content" android:text="我是Tab2"/> <TextView android:layout_width="wrap_content" android:layout_height="wrap_content" android:background="@drawable/img02"/> </LinearLayout>
public class MainActivity extends ActionBarActivity {

    private TabHost tabHost=null;
    private TabWidget tabWidget=null;
    private FrameLayout frameLayout=null;
    @Override
    protected void onCreate(Bundle savedInstanceState) {
        super.onCreate(savedInstanceState);
        setContentView(R.layout.activity_main);

        tabHost= (TabHost) findViewById(android.R.id.tabhost); //声明TabHost组件对象
        tabHost.setup();  //初始化TabHost组件

        //为TabHost对象添加标签页。
        LayoutInflater inflater=LayoutInflater.from(this); //申明LayoutInflater对象
        inflater.inflate(R.layout.tab1,tabHost.getTabContentView());
        inflater.inflate(R.layout.tab2,tabHost.getTabContentView());
        tabHost.addTab(tabHost.newTabSpec("未接电话")
                .setIndicator("未接电话")
                .setContent(R.id.linearLayout01)); //添加第一个标签页
        tabHost.addTab(tabHost.newTabSpec("已接电话")
                .setIndicator("已接电话",getResources().getDrawable(R.drawable.icon))
                .setContent(R.id.linearLayout02)); //添加第二个标签页
    }

    @Override
    public boolean onCreateOptionsMenu(Menu menu) {
        // Inflate the menu; this adds items to the action bar if it is present.
        getMenuInflater().inflate(R.menu.menu_main, menu);
        return true;
    }

    @Override
    public boolean onOptionsItemSelected(MenuItem item) {
        // Handle action bar item clicks here. The action bar will
        // automatically handle clicks on the Home/Up button, so long
        // as you specify a parent activity in AndroidManifest.xml.
        int id = item.getItemId();

        //noinspection SimplifiableIfStatement
        if (id == R.id.action_settings) {
            return true;
        }

        return super.onOptionsItemSelected(item);
    }
}
setIndicator()可以设置选项卡得图标和文字。
需要注意几点是:
TabHost必须为 android:id="@android:id/tabhost" ,
TabWidget 必须为 android:id="@android:id/tabs" ,
FrameLayout android:id="@android:id/tabcontent" ;
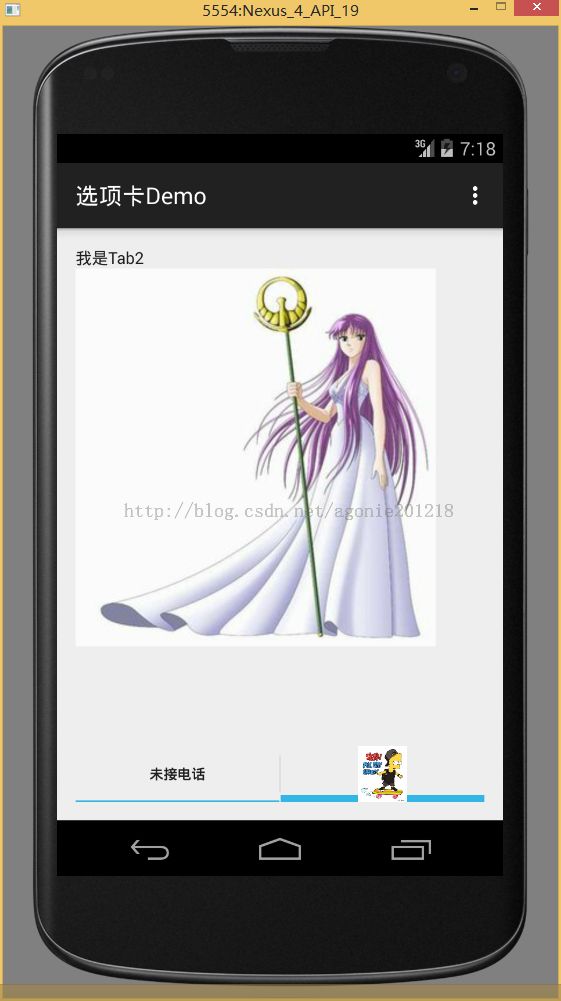
效果图(更改TabWiget位置可以实现让TabWiget显示在顶端或低端):
demo下载:http://download.csdn.net/detail/agonie201218/8654711