用OpenSceneGraph实现的NeHe OpenGL教程 - 第三课
-
简介
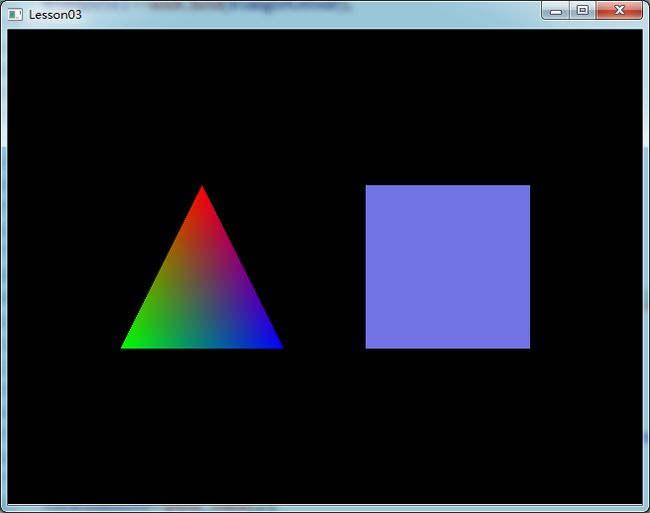
这节课将在第二课的基础上讨论如何使用颜色。与OpenGL类似,OSG也提供了两种色彩模式。我们将对四边形只使用一种颜色显示,对三角形则要对每个顶点设置一个颜色。事实上在第二课中我们已经设置颜色了,只是我们设置的都是单一的白色,按照本课的要求,我们只需要在第二课的基础上修改少量的代码。
-
修改颜色
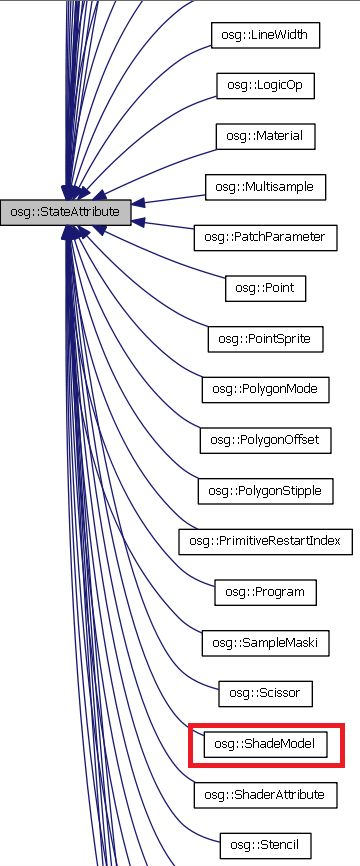
OpenGL是一个状态机,在OpenGL中需要设置很多状态量,一般由glEnable和glDisable的方式进行开关,同时对于纹理光照等还可能涉及到属性值的设置,在OSG中通过StateSet对这些过程进行了封装。OSG采用的是包围体层次的形式来构建不同层次,不同功能的场景节点,每一个节点都可以保存多种类型的渲染模式和属性,而父子节点之间存在多种渲染状态的继承关系,我们将一个节点所赋予的多个渲染状态,包括各种属性和模式成为一个渲染状态几何,用StateSet来表示,对于ShadeModel可以查看它的类结构,知道它是一种状态属性,同时我们还可以看到更多对于OpenGL状态的封装,以后会使用到
首先我们将OSG的颜色模式进行修改(实现glShadeModel的效果):(OSG中默认采用的就是SMooth模式,因此下面这段代码可以删除)
	osg::Group *root = new osg::Group;
	//默认采用的是osg::ShadeModel的SMooth模式,因此下面这段代码可以不添加
	osg::ShadeModel *shadeModel = new osg::ShadeModel;
	shadeModel->setMode(osg::ShadeModel::SMOOTH);
	root->getOrCreateStateSet()->setAttribute(shadeModel, osg::StateAttribute::ON);
接下来添加绘制三角形的颜色,并修改绑定方式为逐点绑定的方式
	//设置三角形颜色
	//与第二课不一样的颜色绑定方式,我们对每一个点都绑定一种
	//颜色,中间的平滑过渡由OSG自动计算完成
	osg::Vec4Array *triangleColorArray = new osg::Vec4Array;
	triangleColorArray->push_back(osg::Vec4(1.0f, 0.0f, 0.0f, 1.0f));
	triangleColorArray->push_back(osg::Vec4(0.0f, 1.0f, 0.0f, 1.0f));
	triangleColorArray->push_back(osg::Vec4(0.0f, 0.0f, 1.0f, 1.0f));
	triangleGeometry->setColorArray(triangleColorArray);
	triangleGeometry->setColorBinding(osg::Geometry::BIND_PER_VERTEX);
绘制四边形的代码类似,不同的是采用BIND_OVERALL的方式
	//四边形由于使用的是单一的颜色,因此将这种颜色绑定到所有的顶点即可
	osg::Vec4Array *quadColorArray = new osg::Vec4Array;
	quadColorArray->push_back(osg::Vec4(0.5f,0.5f,1.0f,1.0f));
	quadGeometry->setColorArray(quadColorArray);
	quadGeometry->setColorBinding(osg::Geometry::BIND_OVERALL);
编译运行程序
附:本课源码(源码中可能存在错误和不足,仅供参考)
#include "../osgNeHe.h"

#include <QtCore/QTimer>
#include <QtGui/QApplication>
#include <QtGui/QVBoxLayout>

#include <osgViewer/Viewer>
#include <osgDB/ReadFile>
#include <osgQt/GraphicsWindowQt>

#include <osg/MatrixTransform>
#include <osg/ShadeModel>


class ViewerWidget : public QWidget, public osgViewer::Viewer
{
public:
	ViewerWidget(osg::Node *scene = NULL)
	{
		QWidget* renderWidget = getRenderWidget( createGraphicsWindow(0,0,100,100), scene);

		QVBoxLayout* layout = new QVBoxLayout;
		layout->addWidget(renderWidget);
		layout->setContentsMargins(0, 0, 0, 1);
		setLayout( layout );

		connect( &_timer, SIGNAL(timeout()), this, SLOT(update()) );
		_timer.start( 10 );
	}

	QWidget* getRenderWidget( osgQt::GraphicsWindowQt* gw, osg::Node* scene )
	{
		osg::Camera* camera = this->getCamera();
		camera->setGraphicsContext( gw );

		const osg::GraphicsContext::Traits* traits = gw->getTraits();

		camera->setClearColor( osg::Vec4(0.0, 0.0, 0.0, 1.0) );
		camera->setViewport( new osg::Viewport(0, 0, traits->width, traits->height) );
		camera->setProjectionMatrixAsPerspective(45.0f, static_cast<double>(traits->width)/static_cast<double>(traits->height), 0.1f, 100.0f );
		camera->setViewMatrixAsLookAt(osg::Vec3d(0, 0, 1), osg::Vec3d(0, 0, 0), osg::Vec3d(0, 1, 0));

		this->setSceneData( scene );

		return gw->getGLWidget();
	}

	osgQt::GraphicsWindowQt* createGraphicsWindow( int x, int y, int w, int h, const std::string& name="", bool windowDecoration=false )
	{
		osg::DisplaySettings* ds = osg::DisplaySettings::instance().get();
		osg::ref_ptr<osg::GraphicsContext::Traits> traits = new osg::GraphicsContext::Traits;
		traits->windowName = name;
		traits->windowDecoration = windowDecoration;
		traits->x = x;
		traits->y = y;
		traits->width = w;
		traits->height = h;
		traits->doubleBuffer = true;
		traits->alpha = ds->getMinimumNumAlphaBits();
		traits->stencil = ds->getMinimumNumStencilBits();
		traits->sampleBuffers = ds->getMultiSamples();
		traits->samples = ds->getNumMultiSamples();

		return new osgQt::GraphicsWindowQt(traits.get());
	}

	virtual void paintEvent( QPaintEvent* event )
	{
		frame();
	}

protected:

	QTimer _timer;
};


osg::Node*	buildScene()
{
	osg::Group *root = new osg::Group;
	//默认采用的是osg::ShadeModel的SMooth模式,因此下面这段代码可以不添加
	osg::ShadeModel *shadeModel = new osg::ShadeModel;
	shadeModel->setMode(osg::ShadeModel::SMOOTH);
	root->getOrCreateStateSet()->setAttribute(shadeModel, osg::StateAttribute::ON);

	//设置三角形的平移(glTranslate)
	osg::MatrixTransform *triangleMT = new osg::MatrixTransform;
	triangleMT->setMatrix(osg::Matrix::translate(-1.5, 0.0, -6.0));

	osg::Geometry *triangleGeometry = new osg::Geometry;

	//设置三角形顶点
	osg::Vec3Array *triangleVertexArray = new osg::Vec3Array;
	triangleVertexArray->push_back(osg::Vec3(0.0f, 1.0f, 0.0f));
	triangleVertexArray->push_back(osg::Vec3(-1.0f,-1.0f, 0.0f));
	triangleVertexArray->push_back(osg::Vec3(1.0f,-1.0f, 0.0f));
	triangleGeometry->setVertexArray(triangleVertexArray);

	//设置三角形颜色
	//与第二课不一样的颜色绑定方式,我们对每一个点都绑定一种
	//颜色,中间的平滑过渡由OSG自动计算完成
	osg::Vec4Array *triangleColorArray = new osg::Vec4Array;
	triangleColorArray->push_back(osg::Vec4(1.0f, 0.0f, 0.0f, 1.0f));
	triangleColorArray->push_back(osg::Vec4(0.0f, 1.0f, 0.0f, 1.0f));
	triangleColorArray->push_back(osg::Vec4(0.0f, 0.0f, 1.0f, 1.0f));
	triangleGeometry->setColorArray(triangleColorArray);
	triangleGeometry->setColorBinding(osg::Geometry::BIND_PER_VERTEX);

	triangleGeometry->addPrimitiveSet(new osg::DrawArrays(osg::PrimitiveSet::TRIANGLES, 0, 3));
	osg::Geode *triangleGeode = new osg::Geode;

	//关闭光照
	triangleGeode->getOrCreateStateSet()->setMode(GL_LIGHTING, osg::StateAttribute::OFF);
	triangleGeode->addDrawable(triangleGeometry);
	triangleMT->addChild(triangleGeode);

	//四边形部分
	osg::MatrixTransform *quadMT = new osg::MatrixTransform;
	quadMT->setMatrix(osg::Matrix::translate(1.5, 0.0, -6.0));
	osg::Geometry *quadGeometry = new osg::Geometry;
	osg::Vec3Array *quadVertexArray = new osg::Vec3Array;
	quadVertexArray->push_back(osg::Vec3(-1.0f, 1.0f, 0.0f));
	quadVertexArray->push_back(osg::Vec3(1.0f, 1.0f, 0.0f));
	quadVertexArray->push_back(osg::Vec3(1.0f,-1.0f, 0.0f));
	quadVertexArray->push_back(osg::Vec3(-1.0f,-1.0f, 0.0f));
	quadGeometry->setVertexArray(quadVertexArray);

	//四边形由于使用的是单一的颜色,因此将这种颜色绑定到所有的顶点即可
	osg::Vec4Array *quadColorArray = new osg::Vec4Array;
	quadColorArray->push_back(osg::Vec4(0.5f,0.5f,1.0f,1.0f));
	quadGeometry->setColorArray(quadColorArray);
	quadGeometry->setColorBinding(osg::Geometry::BIND_OVERALL);

	osg::DrawElementsUByte *vertexIndices = new osg::DrawElementsUByte(osg::PrimitiveSet::QUADS, 4);
	vertexIndices->push_back(0);
	vertexIndices->push_back(1);
	vertexIndices->push_back(2);
	vertexIndices->push_back(3);
	quadGeometry->addPrimitiveSet(vertexIndices);
	osg::Geode *quadGeode = new osg::Geode;
	quadGeode->addDrawable(quadGeometry);
	quadMT->addChild(quadGeode);

	root->addChild(triangleMT);
	root->addChild(quadMT);

	return root;
}


int main( int argc, char** argv )
{
	QApplication app(argc, argv);
	ViewerWidget* viewWidget = new ViewerWidget(buildScene());
	viewWidget->setGeometry( 100, 100, 640, 480 );
	viewWidget->show();
	return app.exec();
}

