android学习之SimpleAdapter
这篇文章我们来谈谈SimpleAdapter,ArrayAdapter就不谈了,因为感觉确实太简单了而且感觉在开发中也用不上,然后SimpleAdapter在开发中感觉可以简单的使用,而且本身也不是很难,至于BaseAdapter也会在后面的文章中谈论到。这里我们先谈谈MVC的设计把,一般来说M代码模型层,也就是数据的处理,在我们这篇文章中,也就是数据的准备,而V层也就是我们的显示层,也就是这篇文章中的ListView,最后就是C层,也就是控制层,也就是这篇文章中的Adapter,代码中都添加了注释,相信大家都能看懂:
代码:
package com.jk.simpleadapterdemo;

import java.util.ArrayList;
import java.util.HashMap;

import android.os.Bundle;
import android.app.Activity;
import android.view.Menu;
import android.view.View;
import android.widget.AdapterView;
import android.widget.AdapterView.OnItemClickListener;
import android.widget.ListView;
import android.widget.SimpleAdapter;
import android.widget.Toast;

public class MainActivity extends Activity implements OnItemClickListener {

	ListView lv;
	ArrayList<HashMap<String, Object>> data = new ArrayList<HashMap<String, Object>>();

	@Override
	protected void onCreate(Bundle savedInstanceState) {
		super.onCreate(savedInstanceState);
		setContentView(R.layout.activity_main);
		init();
	}

	private void init() {
		// bundle the lv with the id
		lv = (ListView) findViewById(R.id.lv);
		// prepare the data
		HashMap<String, Object> row0 = new HashMap<String, Object>();
		row0.put("image", R.drawable.btn_sound);
		row0.put("name", "btn_sound");
		data.add(row0);
		HashMap<String, Object> row1 = new HashMap<String, Object>();
		row1.put("image", R.drawable.btn_sound_off);
		row1.put("name", "btn_sound_off");
		data.add(row1);
		HashMap<String, Object> row2 = new HashMap<String, Object>();
		row2.put("image", R.drawable.btn_sound_off_press);
		row2.put("name", "btn_sound_off_press");
		data.add(row2);
		HashMap<String, Object> row3 = new HashMap<String, Object>();
		row3.put("image", R.drawable.btn_sound_press);
		row3.put("name", "btn_sound_press");
		data.add(row3);
		HashMap<String, Object> row4 = new HashMap<String, Object>();
		row4.put("image", R.drawable.btn_start);
		row4.put("name", "btn_start");
		data.add(row4);
		HashMap<String, Object> row5 = new HashMap<String, Object>();
		row5.put("image", R.drawable.btn_start_press);
		row5.put("name", "btn_start_press");
		data.add(row5);
		/**
		 * setAdapter 1.context 2.datasource 3.the layout of the item 4.the data
		 * should be show 5.the data of the style
		 */
		SimpleAdapter adapter = new SimpleAdapter(this, data, R.layout.lv_row,
				new String[] { "image", "name" }, new int[] { R.id.iv_row,
						R.id.tv_row });
		// set the adapter
		lv.setAdapter(adapter);
		// set the listener
		lv.setOnItemClickListener(this);
	}

	@Override
	public void onItemClick(AdapterView<?> arg0, View arg1, int arg2, long arg3) {
		// deal the onclick event show the position item that you touched
		Toast.makeText(this, "position" + (arg2 + 1), Toast.LENGTH_SHORT)
				.show();

	}
}
因为这篇文章谈论的是ListView,所以我将布局文件的代码也贴上
<RelativeLayout xmlns:android="http://schemas.android.com/apk/res/android"
    xmlns:tools="http://schemas.android.com/tools"
    android:layout_width="match_parent"
    android:layout_height="match_parent"
    android:paddingBottom="@dimen/activity_vertical_margin"
    android:paddingLeft="@dimen/activity_horizontal_margin"
    android:paddingRight="@dimen/activity_horizontal_margin"
    android:paddingTop="@dimen/activity_vertical_margin"
    tools:context=".MainActivity" >

    <ListView
        android:id="@+id/lv"
        android:layout_height="wrap_content"
        android:layout_width="wrap_content"></ListView>

</RelativeLayout>
<?xml version="1.0" encoding="utf-8"?>
<LinearLayout xmlns:android="http://schemas.android.com/apk/res/android"
    android:layout_width="match_parent"
    android:layout_height="match_parent"
    android:orientation="horizontal" >
    <ImageView
        android:id="@+id/iv_row"
        android:layout_height="48dp"
        android:layout_width="48dp"
        />
    <TextView
        android:id="@+id/tv_row"
        android:layout_height="match_parent"
        android:layout_width="match_parent"
        android:gravity="center"/>

</LinearLayout>
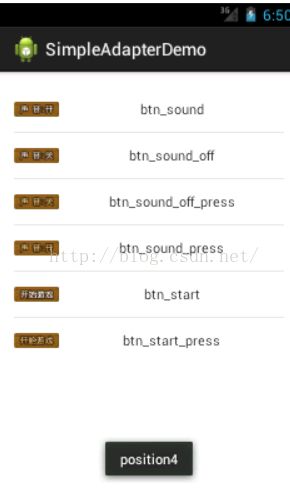
最后附带一张结果运行图