Android之Activity生命周期
Android之Activity生命周期
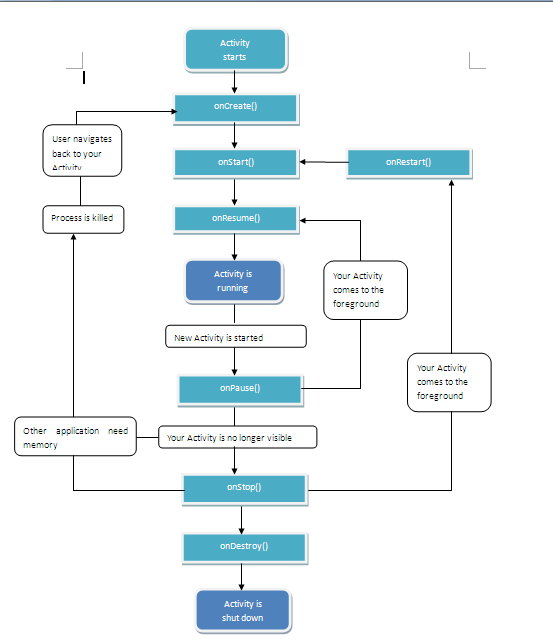
首先我们还是来看一下Android API提供的Activity生命周期图,如下图所示。可以看出,一个Activity的生命周期会经历onCreate()→onStart()→onResume()→onPause()→onStop()→onDestroy()这几个过程。不过光看图还是有点抽象,下面我们结合一个小例子来熟悉一下Activity的生命周期具体的流程。
首先我们新建一个项目ActivityLifecycle,通过在各个继承的函数中加入log信息来跟踪程序执行的状况。第一个Activity的代码如下所示:
public class ActivityTest extends Activity{
	private static final String TAG="ActivityTest";

	@Override
	protected void onCreate(Bundle savedInstanceState) {
		super.onCreate(savedInstanceState);
		setContentView(R.layout.activity_main);
		Log.e(TAG, "onCreate");
		Button btn=(Button)findViewById(R.id.button1);
		//监听button的事件信息
		btn.setOnClickListener(new View.OnClickListener() {

			@Override
			public void onClick(View v) {
				//新建一个Intent意图对象
				Intent intent=new Intent();
				//指定intent要启动的类
				intent.setClass(ActivityTest.this, Activity2.class);
				//启动一个新的Activity
				startActivity(intent);
				//关闭当前的Activity
				ActivityTest.this.finish();
			}
		});
		Button btn2=(Button)findViewById(R.id.button2);
		//监听button的事件信息
		btn2.setOnClickListener(new View.OnClickListener() {

			@Override
			public void onClick(View v) {
				//关闭当前的Activity
				ActivityTest.this.finish();
			}
		});
	}
	//程序开始
	@Override
	protected void onStart() {
		super.onStart();
		Log.e(TAG, "onStart");
	}
	//程序恢复
	@Override
	protected void onResume() {
		super.onResume();
		Log.e(TAG, "onResume");
	}
	//程序暂停
	@Override
	protected void onPause() {
		super.onPause();
		Log.e(TAG, "onPause");
	}
	//程序停止
	@Override
	protected void onStop() {
		super.onStop();
		Log.e(TAG, "onStop");
	}
	//程序销毁
	@Override
	protected void onDestroy() {
		super.onDestroy();
		Log.e(TAG, "onDestroy");
	}
	//程序重启
	@Override
	protected void onRestart() {
		super.onRestart();
		Log.e(TAG, "onRestart");
	}
}
第二个Activity的代码如下所示。与ActivityTest类似,在每个地方中加上一些log信息,用于记录当前运行状态。
public class Activity2 extends Activity {
	private static final String TAG = "Activity2";

	@Override
	protected void onCreate(Bundle savedInstanceState) {
		super.onCreate(savedInstanceState);
		setContentView(R.layout.activity_2);
		Log.e(TAG, "onCreate");
		Button btnStartNew = (Button) findViewById(R.id.btnStartNew);
		// 监听button的事件信息
		btnStartNew.setOnClickListener(new View.OnClickListener() {

			@Override
			public void onClick(View v) {
				// 新建一个Intent对象
				Intent intent = new Intent();
				// 指定intent要启动的类
				intent.setClass(Activity2.this, ActivityTest.class);
				// 启动一个新的Activity
				startActivity(intent);
				// 关闭当前的Activity
				Activity2.this.finish();
			}
		});
		Button btnExit=(Button)findViewById(R.id.btnExit);
		btnExit.setOnClickListener(new View.OnClickListener() {

			@Override
			public void onClick(View v) {
				//关闭当前的Activity
				Activity2.this.finish();
			}
		});
	}
	//程序开始
	@Override
	protected void onStart() {
		super.onStart();
		Log.e(TAG, "onStart");
	}
	//程序恢复
	@Override
	protected void onResume() {
		super.onResume();
		Log.e(TAG, "onResume");
	}
	//程序暂停
	@Override
	protected void onPause() {
		super.onPause();
		Log.e(TAG, "onPause");
	}
	//程序停止
	@Override
	protected void onStop() {
		super.onStop();
		Log.e(TAG, "onStop");
	}
	//程序销毁
	@Override
	protected void onDestroy() {
		super.onDestroy();
		Log.e(TAG, "onDestroy");
	}
	//程序重启
	@Override
	protected void onRestart() {
		super.onRestart();
		Log.e(TAG, "onRestart");
	}
}
我们在布局文件中简单定义了两个Button和一个TextView,一个Button用来切换到另一个Activity,另一个Button用于关闭当前界面,TextView用来显示当前Activity的名称。第一个Activity对应的布局文件activity_main.xml代码如下:
<?xml version="1.0" encoding="utf-8"?>
<LinearLayout xmlns:android="http://schemas.android.com/apk/res/android"
    android:layout_width="match_parent"
    android:layout_height="match_parent"
    android:orientation="vertical" >

    <TextView
        android:id="@+id/info"
        android:layout_width="match_parent"
        android:layout_height="wrap_content"
        android:text="ActivityTest" />

    <Button
        android:id="@+id/button1"
        android:layout_width="wrap_content"
        android:layout_height="wrap_content"
        android:text="启动第二个Activity" />

    <Button
        android:id="@+id/button2"
        android:layout_width="wrap_content"
        android:layout_height="wrap_content"
        android:text="关闭当前Activity" />

</LinearLayout>
第二个Activity对应的布局文件activity_2.xml代码如下:
<?xml version="1.0" encoding="utf-8"?>
<LinearLayout xmlns:android="http://schemas.android.com/apk/res/android"
    android:layout_width="match_parent"
    android:layout_height="match_parent"
    android:orientation="vertical" >


    <TextView
        android:id="@+id/info"
        android:layout_width="match_parent"
        android:layout_height="wrap_content"
        android:text="第二个Activity" />


    <Button
        android:id="@+id/btnStartNew"
        android:layout_width="wrap_content"
        android:layout_height="wrap_content"
        android:text="Button" />


    <Button
        android:id="@+id/btnExit"
        android:layout_width="wrap_content"
        android:layout_height="wrap_content"
        android:text="Button" />

</LinearLayout>
然后我们要在AndroidManifest.xml文件中声明这两个Activity,如下所示:
<manifest xmlns:android="http://schemas.android.com/apk/res/android"
    package="com.veione.activitytest"
    android:versionCode="1"
    android:versionName="1.0" >

    <uses-sdk
        android:minSdkVersion="9"
        android:targetSdkVersion="21" />

    <application
        android:allowBackup="true"
        android:icon="@drawable/ic_launcher"
        android:label="@string/app_name"
        android:theme="@style/AppTheme" >
        <activity android:name="com.veione.activitytest.ActivityTest" >
            <intent-filter>
                <action android:name="android.intent.action.MAIN" />

                <category android:name="android.intent.category.LAUNCHER" />
            </intent-filter>
        </activity>
        <activity android:name="com.veione.activitytest.Activity2" />
    </application>

</manifest>
最后我们运行此程序。首先我们启动程序,可以看到Activity经历了onCreate、onStart、onResume这3个函数,如图所示。
然后我们单击“启动第二个Activity”,可以看到ActivityTest显示了onPause,如图所示。接下来执行Activity中的onCreate->onStart->onResume(),然后在ActivityTest中执行了onStop->onDestroy将ActivityTest依次停止、销毁。
我们在第二个Activity中单击"关闭",可以看到log信息如图所示,Activity依次执行了onPause->onStop->onDestroy。
自此我们整个Activity的生命周期是不是都已经掌握了呢,反正我已经掌握了。


