用laravel4.2实现一个简单的图片墙博客(五)页面设计和布局(View)
前面四章我们简单地介绍了如何用laravel4.2构建一个基本博客的服务端代码,包括了数据库配置、控制器配置、路由配置和模型设计,这些都是该博客的后端部分,也是整个博客得以架构起来的基础,体现了整个博客运行、路由、运算的所有逻辑,在这些逻辑之上,展现出我们要展现给用户的界面和功能。
接下来,我们简要介绍一下页面的设计。我们一开始设立的目标很简单,用户可以po图片在博客上,博客分为标题、图片、描述、以及它的所有评论,删除图片时会把该图片对应的所有信息都依次删除。但是所有的页面数量并不少,而且这部分代码算是最多了,基本都是时间活儿,慢慢修改和调整。
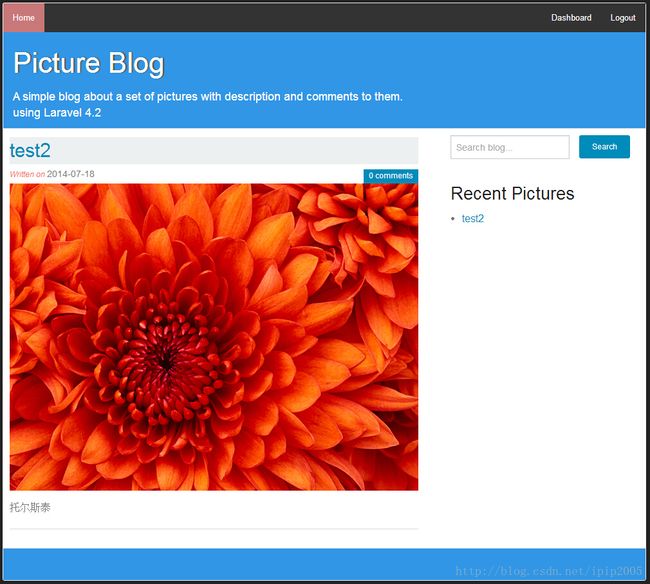
先介绍一下home页面,主页面:
主页面生成的逻辑:
在BaseController.php中,有一句
protected $layout = 'master';然后所有的Controller类都继承自这个控制器基类,这表明我们所有的控制器的主页面都是由master.blade.php指定的,路由到任意一个控制器时,都会把这个master界面作为主界面
1#......master.blade.php
<!DOCTYPE html>
<html class="no-js" lang="en">
<head>
    <meta charset="utf-8">
    <meta name="viewport" content="width=device-width">
    @section('title')
        <title>{{{$title}}}</title> <!-- using {{$title}} is bad here eg:</title><script>alert('hello')</script> -->
    @show
    {{ HTML::style('assets/css/foundation.css') }}
    {{ HTML::style('assets/css/custom.css') }}

</head>
<body>
<div class="row main">
    <div class="small-12 large-12 column" id="masthead">
        <header>
            <nav class="top-bar" data-topbar>
                <ul class="title-area">
                    <!-- Title Area -->
                    <li class="name"></li>
                    <!-- Remove the class "menu-icon" to get rid of menu icon. Take out "Menu" to just have icon alone -->
                    <li class="toggle-topbar menu-icon"><a href="#"><span>Menu</span></a></li>
                </ul>
                <section class="top-bar-section">
                    <ul class="left">
                        <li class="{{(strcmp(URL::full(), URL::to('/')) == 0) ? 'active' : ''}}"><a href="{{URL::to('/')}}">Home</a></li>
                    </ul>
                    <ul class="right">
                        @if(Auth::check())
                            <li class="{{ (strpos(URL::current(), URL::to('admin/dash-board'))!== false) ? 'active' : '' }}">
                                {{HTML::link('admin/dash-board','Dashboard')}}
                            </li>
                            <li class="{{ (strpos(URL::current(), URL::to('logout'))!== false) ? 'active' : '' }}" >
                                {{HTML::link('logout','Logout')}}
                            </li>
                        @else
                            <li class="{{ (strpos(URL::current(), URL::to('login'))!== false) ? 'active' : '' }}">
                                {{HTML::link('login','Login')}}
                            </li>
                        @endif
                    </ul>
                </section>
            </nav>
            <div class="sub-header">
                <hgroup>
                    <h1>{{HTML::link('/','Picture Blog')}}</h1>
                    <h2>A simple blog about a set of pictures with description and comments to them.</h2>
                    <h2>using Laravel 4.2</h2>
                </hgroup>
            </div>
        </header>
    </div>
    <div class="row">
    <span style="white-space:pre">	</span><div class="small-12 large-12 column">
        <span style="white-space:pre">	</span>{{$main}}
        </div>
    </div>
    <div class="row">
        <div class="small-12 large-12 column">
            <footer class="site-footer"></footer>
        </div>
    </div>
</div>
{{ HTML::script('./assets/js/vendor/jquery.js') }}
{{ HTML::script('./assets/js/foundation.min.js') }}
<script>
    $(document).foundation();
</script>
{{ HTML::script('./assets/js/vendor/custom.modernizr.js') }}
</body>
</html>
css,js的相关内容,请参考 w3cscholl教程 其实你还能在里面学到更多php、html、html5的东西,关于界面设计,很多都是经验的东西,基本上过一遍教程,就能自己动手开始设计设计了,参考教程的案例,可以更加丰富对相关模块的理解。
基本上,在master这个view里,我们定义了title($title由页面生成时代码指定),topbar,sub-header,footer,算是主页的全部修饰,之后所有页面,都会带上这些修饰。倘若我们需要在某个页面中不使用这个模板来修饰,也可以在相关的控制器中重新指定$layout来修改默认布局。
具体每一个html类怎么定义它们的属性,都写在几个css文件中,这些都可以自行设计,或者参考我之后放出的代码。
有读者会发现效果和我第一章放出的参考链接uncletoo 很像,因为是学习阶段,页面设计这块我基本都参考了源码,但为了更好地对页面设计有个了解,我对每一个模块都作了自己的修改,至少能知道怎么看代码,怎么修改,以及套上一些自己的想法。
蓝色的部分,以及topbar都是master中定义的模板,那中间的部分又是什么呢?
其实我们进入首页链接的时候,就已经放出一个路由'/',在routes.php中有初始路由的定向:
Route::controller('/', 'BlogController');
由于初始路由之后没有其他信息了,它默认调用index,即BlogController的getIndex()方法
public function getIndex()
    {
        $pictures = Picture::orderBy('id', 'desc')->paginate(10);
        $pictures->getFactory()->setViewName('pagination::simple');
        $this->layout->title = 'Home Page | Picture Wall Blog';
        $this->layout->main = View::make('home')->nest('content', 'index', compact('pictures'));
    }
首先它定义了一个分页机制,每一页10张图片的信息
它赋值了title的值(详见master.blade.php中的header部分{{{$title}}}),$this->layout->main代表master模板中的
<div class="row">
        {{$main}}
    </div>
它被一个新生成的view替代:home:
2#......home.blade.php:
{{-- home page --}}
<div class="small-8 large-8 column">
  <div class="content">
    {{$content}}
  </div>
</div>
<div class="small-4 large-4 column">
  <aside class="sidebar">
    @include('sidebar')
  </aside>
</div>
nest函数代表了将其中的$content部分替代为index。compach是一个php函数,用来把变量和它的值构成一个数组,表示index需要使用的数据集pictures:
3#......index.blade.php:
对每一个图片,我们都显示一个块来显示它们
@if(!empty($notFound))
<p>Sorry nothing found for your query!</p>
@else
@foreach($pictures as $picture)
	<article class="picture">
		<header class="picture-header">
			<h1 class="picture-title">
				{{link_to_route('picture.show',$picture->title,$picture->id)}}
			</h1>
			<div class="clearfix">
				<span class="left date">{{explode(' ',$picture->created_at)[0]}}</span>
				<span class="right label">{{$picture->comment_count}} comments </span>
			</div>
		</header>
		<div>
			{{HTML::image($picture['image'],$picture['image'])}}
		</div>
		<div class="picture-description">
			<p>{{$picture->description}}</p>
		</div>
		<footer class="picture-footer">
			<hr>
		</footer>
	</article>
@endforeach
{{$pictures->links()}}
@endif
好了,博客的实现就全部介绍到这里,感谢uncletoo博客教程,让我学到了很多,实现好每一个模块之后我会放出源码!
源码下载地址
