Contour Processing
http://www.cnblogs.com/xiaomaLV2/archive/2011/12/28/2304824.html
Coutours 屬於XLD結構
a) 圖 邊緣覆蓋在原始圖像上
b)縮放 a)中的 矩形區域,凸顯控制點
c)輪廓可以分割成線。圓。橢圓等,可以得出它們的 角度 中心 半徑等
Basic Concept
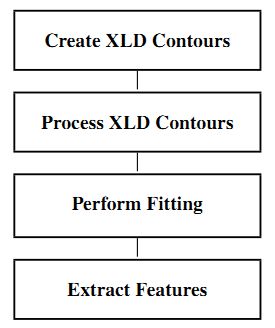
create XLD contours
最常用的方法是 用Extract Edges Or Lines方法,結果將轉化為XLD
Process XLD Contours
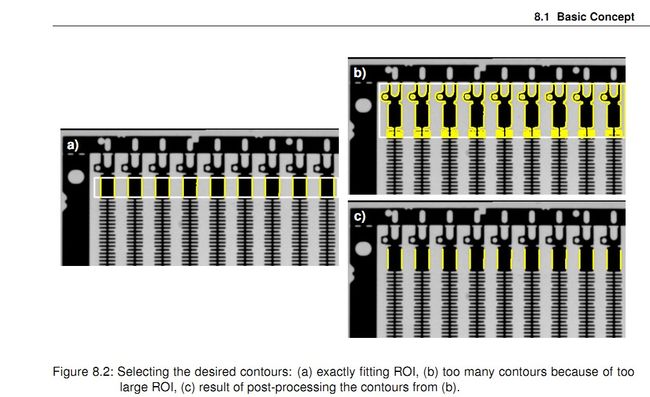
典型的情況 如 a)所示,只作用於指定的區域
許多時候 ROI選擇過大 如圖 b) ,這個時候要把 輪廓進行分割,只選擇平行的部分 如圖 c)
另外的原因,處理輪廓是因為包換了不希望得到的噪聲,比如低對比度。
Perform Fitting
通過 fitting 操作,(a line, a rectangle, or a circular or elliptic arc,)來逼近(a line, a rectangle, or a circular or elliptic arc)。
Extract Features
From both raw contours and processed contour parts features can be determined. Some of these consider
the contour as a linear object. Others treat a contour as the outer boundary of an object. Obviously,
the center of gravity makes sense only for a closed object, whereas the curvature is a feature of a linear
object.
例子 提取公路
***************************************************************
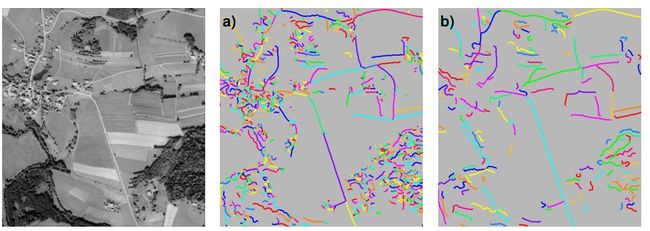
* 1.lines_gauss 結果圖a)所示 得到許多不想要的 小片段
* 2.select_contours_xld(Lines,LongContours,'contour_length',15,1000,0,0) 選擇[15,1000]輪廓長度 這樣就消除了小的輪廓
* 3.union_collinear_contours_xld (LongContours, UnionContours, 30, 2, 9, 0.7, 'attr_keep') 把共線的輪廓連接在一起。結果 如圖b)
* 3.union_collinear_contours_xld (LongContours, UnionContours, 30, 2, 9, 0.7, 'attr_keep') 把共線的輪廓連接在一起。結果 如圖b)
*
********************************************************
read_image(Image,'mreut4_3')
get_image_size(Image,Width,Height)
dev_close_window()
dev_open_window(0,0,Width,Height,'black',WindowID)
lines_gauss(Image,Lines,1.5,2,8,'light','true','bar-shaped','true')
select_contours_xld(Lines,LongContours,'contour_length',15,1000,0,0)
union_collinear_contours_xld (LongContours, UnionContours, 30, 2, 9, 0.7, \
'attr_keep')
Extended Concept
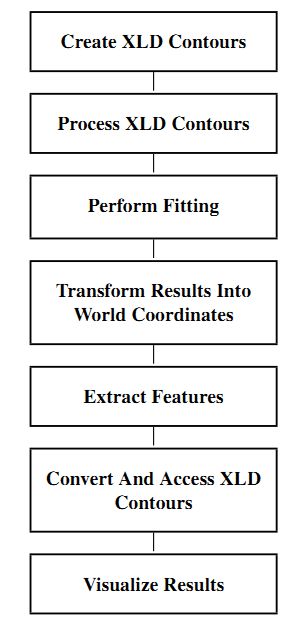
1.Create XLD Contour
標准的方法是調用輪廓提取函數來創建輪廓。
邊緣輪廓提取:edges_sub_pix, edges_color_sub_pix, or zero_crossing_sub_pix
線條提取:lines_gauss, lines_facet, or lines_color
亞像素blob分析:threshold_sub_pix
如果像素精度足夠的話,可以用edge filter 如sobel_amp edges_image 或者 line filter 如bandpass_image
細化邊緣然後轉換XLD, gen_contours_skeleton_xld.
gen_contour_polygon_xld gen_contour_polygon_rounded_xld
draw_xld draw_xld_mod 交互式生成
gen_contour_region_xld 根據region生成輪廓
2.Process XLD Contours
segment_contours_xld 這個操作有多種模式:Splitting into line segments, linear and circular segments, or linear and elliptic segments.
select_obj 單獨的一個可以用此得到。Perform Fitting 來做適配操作,比如趨近於圓的的輪廓。
get_contour_global_attrib_xld 得到輪廓趨近於什麼屬性如 線段,橢圓,圓等
split_contours_xld gen_polygons_xld 可以通過這個組合操作,得到自己想要的那部分輪廓,如只想要輪廓中的圓等等。
輪廓處理中很重要的一步,是抑制無關的輪廓,可以通過select_shape_xld(提供差不多30中形狀特征)來完成。
通過制定單個或多個特征的最大值最小值,可以靈活的選擇輪廓,
select_contours_xld。
select_xld_point 用鼠標交互式選擇輪廓。
如果輪廓有缺口裂縫,分裂的小塊將被作為獨立的對象,這位後續的處理增加了難度。
union_collinear_contours_xld union_straight_contours_xld 合並線段
union_adjacent_contours_xld union_cocircular_contours_xld union_cotangential_contours_xld 合並相鄰輪廓
shape_trans_xld With this operator you can, e.g., transform the contour into its surrounding circle, convex hull, or surrounding rectangle.
對於相交的輪廓
intersection_closed_contours_xld 兩個輪廓的交叉部分。
difference_closed_contours_xld
兩個輪廓不同的部分。
union2_closed_contours_xld 合並兩個輪廓
3.Perform Fitting
With the operator fit_line_contour_xld you can determine the parameters of a line segment. The
operator provides different optimization methods, most of which are suppressing outliers. It returns the
coordinates of the start and the end point of the fitted line segment and the normal form of the line. To
visualize the results, you can use the operator gen_contour_polygon_xld.
operator provides different optimization methods, most of which are suppressing outliers. It returns the
coordinates of the start and the end point of the fitted line segment and the normal form of the line. To
visualize the results, you can use the operator gen_contour_polygon_xld.
To fit a rectangle into a contour, the operator fit_rectangle2_contour_xld can be used. It provides
various optimization methods as well. The returned parameters comprise mainly the center position, the
extent, and the orientation of the rectangle. To generate the obtained rectangle for a visualization, you
can use the operator gen_rectangle2_contour_xld.
For the fitting of circular and elliptic segments the operators fit_circle_contour_xld and
fit_ellipse_contour_xld are available. They also provide various optimization methods. For a
circular segment the center and the radius are returned together with the angle range of the visible part.
In addition, a second radius and the orientation of the main axis are returned for elliptic segments. To
visualize the results of both operators, you can use either the operator gen_ellipse_contour_xld or
the operator gen_circle_contour_xld.
4.Extract Features
HALCON offers various operators to access the feature values. Commonly used shape features are
calculated by area_center_xld, compactness_xld, convexity_xld, eccentricity_xld, di-
ameter_xld, and orientation_xld. The hulls of the contours can be determined with small-
est_circle_xld or smallest_rectangle2_xld. Features based on geometric moments are calcu-
lated, e.g., by moments_xld.
calculated by area_center_xld, compactness_xld, convexity_xld, eccentricity_xld, di-
ameter_xld, and orientation_xld. The hulls of the contours can be determined with small-
est_circle_xld or smallest_rectangle2_xld. Features based on geometric moments are calcu-
lated, e.g., by moments_xld.
5.Convert And Access XLD Contours
Finally, it might be necessary to access the raw data of the contours or to convert contours into another
data type, e.g., into a region.
You can access the coordinates of the control points with the operator get_contour_xld. It returns
the row and column coordinates of all control points of a contour in two tuples of floating-point val-
ues. In case of a contour array (tuple), you must loop over all the contours and select each one using
select_obj.
To convert contours to regions, simply call the operator gen_region_contour_xld. The operator
paint_xld paints the contour with anti-aliasing into an image.
The operators for edge and line extraction not only return the XLD contours but also so-called
attributes. Attributes are numerical values; they are associated either with each control point
(called contour attribute) or with each contour as a whole (global contour attribute). The operators
get_contour_attrib_xld and get_contour_global_attrib_xld enable you to access these val-
ues by specifying the attribute name. More information on this topic can be found in the description of
the step Determine Contour Attributes on page 74.
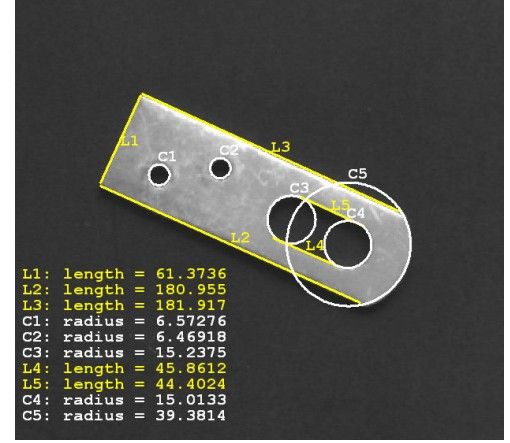
例子:把輪廓分割成 線段和圓的形式 Example: solution_guide/basics/measure_metal_part.hdev
*****************************************************************************************
* segment_contours_xld
(
Contours
:
ContoursSplit
:
*
Mode
, List of values: 'lines', 'lines_circles', 'lines_ellipses'
*
SmoothCont
, 如果>0,contours將做平滑處理,印制較小的分塊,能更好的fit 圓和橢圓
*
MaxLineDist1
,
MaxLineDist2
: )
* 思路:edges_sub_pix 生成輪廓
* select_obj獲取單個輪廓
* get_contour_global_attrib_xld獲取該輪廓的屬性,判斷是線段還是圓
* fit_circle_contour_xld gen_ellipse_contour_xld 找出該輪廓最可能逼近的圓 生成圓
* fit_line_contour_xld gen_contour_polygon_xld 找出該輪廓最可能逼近的線段,生成線段。
*****************************************************************************************
read_image(Image,'metal-parts/metal-parts-01')
get_image_size(Image,Width,Height)
dev_update_window('off')
dev_close_window()
dev_open_window(0,0,Width,Height,'black',WindowID)
dev_display(Image)
* 提取輪廓
edges_sub_pix (Image, Edges, 'lanser2', 0.5, 40, 90)
segment_contours_xld (Edges, ContoursSplit, 'lines_circles', 5, 4, 2)
sort_contours_xld (ContoursSplit, SortedContours, 'upper_left', 'true', 'column')
count_obj(SortedContours,NumSegments)
NumCirCles :=0
NumLines :=0
for i :=1 to NumSegments by 1
select_obj(SortedContours,SingleSegment,i)
* Attrib = -1 線段 0 橢圓 1圓
get_contour_global_attrib_xld(SingleSegment,'cont_approx',Attrib)
if(Attrib =1)
NumCirCles :=NumCirCles +1
*對單個輪廓做 圓逼近
fit_circle_contour_xld (SingleSegment, 'atukey', -1, 0, 0, 3, 2, Row, Column, Radius, StartPhi, EndPhi, PointOrder)
*根據逼近結果生成一個圓輪廓
gen_ellipse_contour_xld (ContEllipse, Row, Column, 0, Radius, Radius, 0, 6.28318, 'positive', 1.5)
dev_set_color('white')
dev_display(ContEllipse)
set_tposition(WindowID,Row,Column)
write_string(WindowID,'Circle'+NumCirCles)
ResultText :='Cricle'+NumCirCles+':radius='+Radius
else
NumLines :=NumLines+1
fit_line_contour_xld (SingleSegment, 'tukey', -1, 0, 5, 2, RowBegin, ColBegin, RowEnd, ColEnd, Nr, Nc, Dist)
gen_contour_polygon_xld (Line, [RowBegin,RowEnd], [ColBegin,ColEnd])
distance_pp(RowBegin,ColBegin,RowEnd,ColEnd,Length)
dev_set_color('yellow')
dev_display(Line)
set_tposition(WindowID,(RowBegin + RowEnd)/2,(ColBegin +ColEnd)/2)
write_string(WindowID,'Line'+NumLines)
ResultText :='Line' + NumLines + ':Length=' + Length
endif
set_tposition(WindowID,300 +i*15,230)
write_string(WindowID,ResultText)
endfor
例子 Close garp in a contour Example: solution_guide/basics/close_contour_gaps.hdev
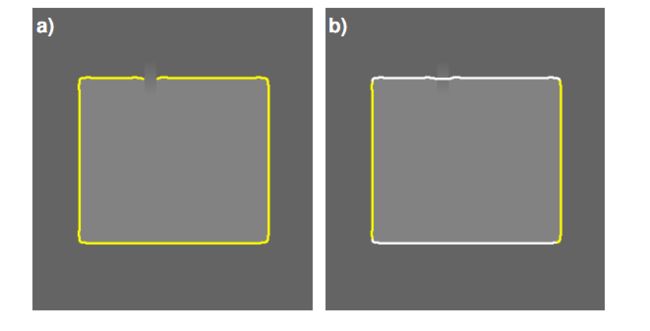
dev_update_window('off')
dev_close_window()
*人為生成的一張圖片,背景是是教深的灰度值,前景相對背景亮一點
*而且其中一部分做了中值處理。
gen_rectangle1 (Rectangle, 30, 20, 100, 100)
region_to_bin (Rectangle, BinImage, 130, 100, 120, 130)
rectangle1_domain(BinImage,ImageReduced,20,48,40,52)
mean_image(ImageReduced,SmoothedImage,15,15)
paint_gray(SmoothedImage,BinImage,Image)
*現在來找前景輪廓
*low = 22
*hight =30
*這兩個值是梯度值,既邊緣的梯度。本例中前景和背景的灰度差事30,既hight=30大於該值的
*邊緣一直邊緣,low=22 小於改值的邊緣舍去,在此之間的邊緣則看情況。
edges_sub_pix(Image,Edges,'lanser2',1.1,22,30)
*把輪廓分成 線段
segment_contours_xld (Edges, ContoursSplit, 'lines', 5, 4, 2)
*連接共線的 線段,達到封閉缺口的目的
union_collinear_contours_xld (ContoursSplit, UnionContours, 10, 1, 2, 0.1, 'attr_keep')
sort_contours_xld (UnionContours, SortedContours, 'upper_left', 'true', 'column')
dev_display(Image)
*依次顯示線段 左上角 從左到右
count_obj(SortedContours,NumObjects)
Colors :=['yellow','white','white','yellow']
NumColors :=|Colors|
for i:=1 to NumColors by 1
select_obj(SortedContours,Line,i)
Color :=Colors[(i-1)%NumColors]
dev_set_color(Color)
dev_display(Line)
endfor
例子 航拍圖像中的公路提取
Example: hdevelop/Applications/Object-Recognition-2D/roads.hdev

