android Tabhost控件的使用
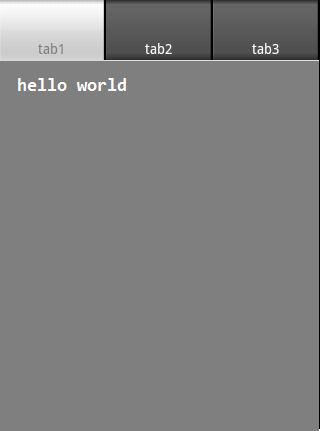
首先看一下效果图:
使用TabHost有两种方法,一种是继承TabActivity;一种是不继承TabActivity;在这里我要讲解的是继承TabActivity的;首先我们得写好main.xml布局文件,在写这个布局文件时要注意,使用TabHost一定要有TabWidget、FramLayout这两个控件,并且TabWidget必须使用系统ID @android:id/tabs;FrameLayout作为标签内容的基本框架,也必须使用系统ID @android:id/tabcontent;而TabHost可以自定义ID,这是为了在系统初始化时能够使用,否则会报错!
布局文件main.xml如下:<?xml version="1.0" encoding="utf-8"?>
<LinearLayout xmlns:android="http://schemas.android.com/apk/res/android"
android:layout_width="fill_parent"
android:layout_height="fill_parent"
android:orientation="vertical" >
<TabHost
android:id="@android:id/tabhost"
android:layout_width="fill_parent"
android:layout_height="fill_parent" >
<LinearLayout
android:layout_width="fill_parent"
android:layout_height="fill_parent"
android:orientation="vertical" >
<TabWidget
android:id="@android:id/tabs"
android:layout_width="fill_parent"
android:layout_height="wrap_content"
>
</TabWidget>
<FrameLayout
android:id="@android:id/tabcontent"
android:layout_width="fill_parent"
android:layout_height="fill_parent" >
<LinearLayout
android:id="@+id/tab1"
android:layout_width="fill_parent"
android:layout_height="fill_parent" >
</LinearLayout>
</FrameLayout>
</LinearLayout>
</TabHost>
</LinearLayout>
布局文件弄好之后,我们就需要开发用户界面。首先,我们让它继承TabActivity;之后我们可以通过getTabHost()方法得到一个TabHost对象;得到TabHost对象之后,我们就可以使用该对象来添加上面顶部的标签。在这里我们用getTabWidget()方法取TabWidget对象。通过该对象使用getChildAt(int i)来取得每个标签,取得每个标签之后,我们就可以使用下面代码来设置标签内容中的位置了:
for(int i=0;i<mTabWidget.getChildCount();i++){
//设置选项卡的宽度
mTabWidget.getChildAt(i).getLayoutParams().height=50;
//设置选项卡的高度
mTabWidget.getChildAt(i).getLayoutParams().width=60;
}
设置好这些之后,我想单击它时,会跳转到别的界面去。在这里我们使用setContent(new Intent(this,cls))进行跳转,跳转之后,可以在目的activity中设计响应的界面。
代码如下:
package com.xxx;


import android.app.TabActivity;
import android.content.Intent;
import android.os.Bundle;
import android.view.Window;
import android.widget.TabHost;
import android.widget.TabWidget;

public class xxxActivity extends TabActivity {
	TabHost mtabhost;
	TabWidget mtabwidget;

    /** Called when the activity is first created. */
    @Override
    public void onCreate(Bundle savedInstanceState) {
        super.onCreate(savedInstanceState);
        requestWindowFeature(Window.FEATURE_NO_TITLE);
        setContentView(R.layout.main);

        mtabhost = getTabHost();
        mtabwidget = mtabhost.getTabWidget();

        mtabhost.addTab(mtabhost.newTabSpec("tab1")
                .setIndicator("main")
                .setContent(new Intent(this,PlaysActivity.class)));
        mtabhost.addTab(mtabhost.newTabSpec("tab2")
                .setIndicator("help")
                .setContent(new Intent(this,HelpActivity.class)));
    }
}
另一种实现tabhost的方法:
效果图:
创建布局文件
- <?xml version="1.0" encoding="UTF-8"?>
- <LinearLayout xmlns:android="http://schemas.android.com/apk/res/android"
- android:layout_width="fill_parent" android:layout_height="fill_parent"
- android:orientation="vertical">
- <TabHost android:id="@android:id/tabhost" android:layout_width="fill_parent"
- android:layout_height="fill_parent">
- <FrameLayout android:id="@android:id/tabcontent"
- android:layout_width="fill_parent" android:layout_height="fill_parent"
- android:paddingBottom="50dp">
- </FrameLayout>
- <RelativeLayout android:layout_width="fill_parent"
- android:layout_height="fill_parent">
- <TabWidget android:id="@android:id/tabs"
- android:layout_width="fill_parent" android:layout_height="wrap_content"
- android:layout_alignParentBottom="true" />
- </RelativeLayout>
- </TabHost>
- </LinearLayout>
最外层的LinerLayout的作用是为了解决布局出现的问题,因为在调试的时候时候出现分页所显示activity,但是不显示tab的标签也就是说红色的部分。有的时候显示标签但是不显示分页的activity,因此添加了LinearLayout进行区别。在中间Relativelayout的作用是实现了TabHost的底部显示,如果想实现顶部显示,去掉这个标签,且将FrameLayout放在TabWidget下面即可。代码如下:
- <?xml version="1.0" encoding="UTF-8"?>
- <LinearLayout xmlns:android="http://schemas.android.com/apk/res/android"
- android:layout_width="fill_parent" android:layout_height="fill_parent"
- android:orientation="vertical">
- <TabHost android:id="@android:id/tabhost" android:layout_width="fill_parent"
- android:layout_height="fill_parent">
- <TabWidget android:id="@android:id/tabs"
- android:layout_width="fill_parent" android:layout_height="wrap_content"
- />
- <FrameLayout android:id="@android:id/tabcontent"
- android:layout_width="fill_parent" android:layout_height="fill_parent"
- android:paddingBottom="50dp">
- </FrameLayout>
- </TabHost>
- </LinearLayout>
http://blog.csdn.net/ch_984326013/article/details/6602602
http://www.cnblogs.com/salam/archive/2010/10/07/1845036.html
http://blog.csdn.net/notenlife/article/details/7290631

