为ListBox的SelectedItem添加动画(附源码)
在这篇文章中,我将演示如何使用Expression Blend在ListBox中对选定的项目添加一个翻转动画。
首先,首先创建一个Windows Phone 7应用程序项目,添加一个ListBox和一些ListBoxItems。 代码如下:
<ListBox Height="200"  VerticalAlignment="Top">
    <ListBoxItem Content="ListBoxItem1"/>
    <ListBoxItem Content="ListBoxItem2"/>
    <ListBoxItem Content="ListBoxItem3"/>
    <ListBoxItem Content="ListBoxItem4"/>
</ListBox>
在这里我不得不感谢一直支持我的卤面网版主,是他让我提起兴趣写了这么一篇文章,再次感谢卤面网,一个非常不错的wp7开发论坛,后面我也将再次向大家发布几篇高质量文章,请大家到卤面上找我吧,呵呵
进入正题:
Expression Blend
下一步是在Expression Blend中打开项目。我们的最终目标是给选定的ListBoxItem加动画翻转效果。
创建一个样本ListBoxItem样式
我们要做的第一件事是检查ListBoxItem控件可用的VisualStates。要做到这一点,先选择一个项目,按鼠标右键并选择“编辑模板” - >“编辑副本“选项,就像接下来的屏幕截图一样:
可用的VisualStates
现在,您可以在ControlTemplate,通过添加/删除项或加入新动画在VisualStates中完全定制其外观。在不同的状态之间切换时,你还可以添加一些过渡和渐变动画控制。对有关VisualStateManager的信息,你可以看看MSDN相关文档。
在我们的例子中,我们可以选择的可用状态是:
1.SelectedUnfocused
2.Unselected
3。Selected
修改选定的VisualState
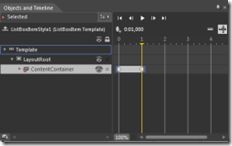
我们将修改选定状态。要做到这一点,只要按下鼠标左按钮在选定的状态和将出现一个新窗口:“Objecst and TimeLine”
注:如果由于某种原因你没有看到“Objecst and TimeLine”窗口,然后去blend菜单,并选择:窗口- > Objecst and TimeLine。
我们将增加一个动画关键点
下一步,我们将添加翻转动画。
了解Transforms
比方说,我们希望有一个绕X轴的翻转效果。
我们与动画开始之前,让我们先提供一些Silverlight中有关的元素绘制方式的知识。
您可以使用旋转,缩放,倾斜和移动(平移)等二维(2D)变换处理元素.
Silverlight提供以下的常见的2-D变换操作:
RotateTransform - 以指定的角度旋转元素。
ScaleTransform - 以指定的ScaleX和ScaleY拉伸元素。
SkewTransform - 倾斜变换。
TranslateTransform可 - 移动(转换)
你可以使用3-D效果,即使用所谓的“Perspective Transforms”给任何UIElement。
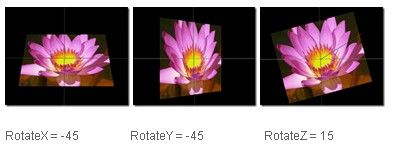
PlaneProjection类用于创建对象的角度变换(3-D效果)。
注:视角转换不是个完整的3-D引擎,但是,它们可以被用来制造一定的3d效果
下面的插图演示了使用这些属性的效果。
翻转动画
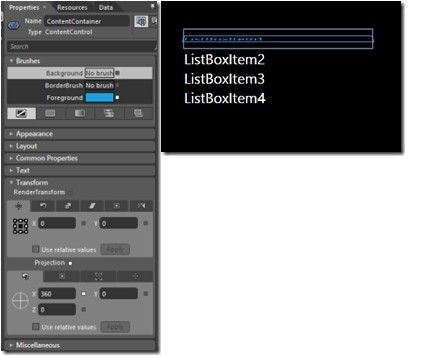
接下来去“属性”窗口中,选择变换部分。下面是我们将添加翻转效果的地方。
因此,为了有一个绕X轴的翻转效果,你需要做的仅仅是改变旋转角度为360和确认CernerofRotationX和CenterOfRotationY设置为0.5(这是默认值,你不需要改变任何东西)。最后,在“Objecst and TimeLine”窗口中选择播放按钮,你可以看到翻转动画:
<Style x:Key="ListBoxItemStyle1" TargetType="ListBoxItem">
    <Setter Property="Background" Value="Transparent"/>
    <Setter Property="BorderThickness" Value="0"/>
    <Setter Property="BorderBrush" Value="Transparent"/>
    <Setter Property="Padding" Value="0"/>
    <Setter Property="HorizontalContentAlignment" Value="Left"/>
    <Setter Property="VerticalContentAlignment" Value="Top"/>
    <Setter Property="Template">
        <Setter.Value>
            <ControlTemplate TargetType="ListBoxItem">
                <Border x:Name="LayoutRoot" BorderBrush="{TemplateBinding BorderBrush}"
                   BorderThickness="{TemplateBinding BorderThickness}"
                   Background="{TemplateBinding Background}" HorizontalAlignment="{TemplateBinding HorizontalAlignment}"
                   VerticalAlignment="{TemplateBinding VerticalAlignment}">
                    <VisualStateManager.VisualStateGroups>
                        <VisualStateGroup x:Name="CommonStates">
                            <VisualState x:Name="Normal"/>
                            <VisualState x:Name="MouseOver"/>
                            <VisualState x:Name="Disabled">
                                <Storyboard>
                                    <ObjectAnimationUsingKeyFrames Storyboard.TargetProperty="Background" Storyboard.TargetName="LayoutRoot">
                                        <DiscreteObjectKeyFrame KeyTime="0" Value="{StaticResource TransparentBrush}"/>
                                    </ObjectAnimationUsingKeyFrames>
                                    <DoubleAnimation Duration="0" To=".5" Storyboard.TargetProperty="Opacity" Storyboard.TargetName="ContentContainer"/>
                                </Storyboard>
                            </VisualState>
                        </VisualStateGroup>
                        <VisualStateGroup x:Name="SelectionStates">
                            <VisualState x:Name="Unselected"/>
                            <VisualState x:Name="Selected">
                                <Storyboard>
                                    <ObjectAnimationUsingKeyFrames Storyboard.TargetProperty="Foreground" Storyboard.TargetName="ContentContainer">
                                        <DiscreteObjectKeyFrame KeyTime="0" Value="{StaticResource PhoneAccentBrush}"/>
                                        <DiscreteObjectKeyFrame KeyTime="0:0:1">
                                            <DiscreteObjectKeyFrame.Value>
                                                <SolidColorBrush Color="#FF1BA1E2"/>
                                            </DiscreteObjectKeyFrame.Value>
                                        </DiscreteObjectKeyFrame>
                                    </ObjectAnimationUsingKeyFrames>
                                    <DoubleAnimationUsingKeyFrames Storyboard.TargetProperty="(UIElement.Projection).(PlaneProjection.RotationX)" Storyboard.TargetName="ContentContainer">
                                        <EasingDoubleKeyFrame KeyTime="0" Value="0"/>
                                        <EasingDoubleKeyFrame KeyTime="0:0:1" Value="360"/>
                                    </DoubleAnimationUsingKeyFrames>
                                </Storyboard>
                            </VisualState>
                        </VisualStateGroup>
                    </VisualStateManager.VisualStateGroups>
                    <ContentControl x:Name="ContentContainer" ContentTemplate="{TemplateBinding ContentTemplate}" Content="{TemplateBinding Content}"
                      Foreground="{TemplateBinding Foreground}" HorizontalContentAlignment="{TemplateBinding HorizontalContentAlignment}"
                      Margin="{TemplateBinding Padding}" VerticalContentAlignment="{TemplateBinding VerticalContentAlignment}">
                        <ContentControl.Projection>
                            <PlaneProjection/>
                        </ContentControl.Projection>
                    </ContentControl>
                </Border>
            </ControlTemplate>
        </Setter.Value>
    </Setter>
</Style>
为ListBox的ItemContainerStyle创建的样式,代码如下:
<ListBox x:Name="list" ItemContainerStyle="{StaticResource ListBoxItemStyle1}" FontSize="40">
</ListBox>
this.list.ItemsSource = new List<string> { "ListItem1", "ListItem2", "ListItem3", "ListItem4" };
我希望,这些文章对大家有帮助的。完整的源代码可以在这里找到:
源代码请猛击这里


