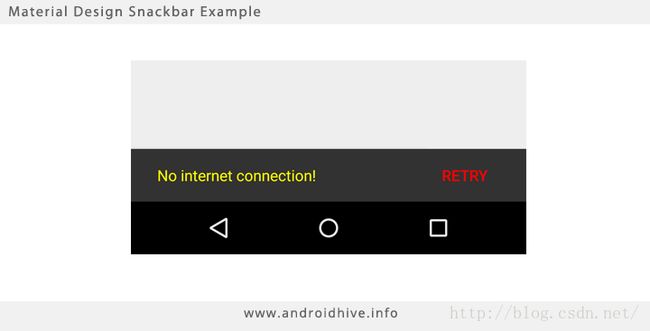
Android Material Design Snackbar Example
http://www.androidhive.info/2015/09/android-material-design-snackbar-example/
Snackbar 是 Material Design 引入的一个很有用的组件,Snackbars 和 Toast 非常的相似,这两者最大的区别是 Snackbars 可以响应用户的交互事件。Snackbars 会显示在屏幕的底部,而且可以被擦除掉 。本章将会简单的介绍一下它的基本用法 。
1. Simple Snackbar
首先让我们来看一下 Snackbar 的基本代码
Snackbar snackbar = Snackbar
.make(coordinatorLayout,
"Welcome to AndroidHive"
, Snackbar.LENGTH_LONG);
snackbar.show();
它的 make() 方法接收三个参数,第一个是一个 view 对象,第二个是一个代表 message 的字符串,第三个是用于指定 message 显示的时间长度的 duration 。通常以
CoordinatorLayout 对象作为 view 对象传递给它是最好的,因为它可以为 Snackbar 套上一些特性,如滑动擦除、显示和隐藏时自动移动其它的 widgets(如移动 FloatingActionButton)。在后面的 demo 中你就可以看到 。
2. Snackbar with Action Callback
我们可以通过 setAction() 方法给 Snackbar 添加事件监听器,以响应用户的操作 。示例代码如下
Snackbar snackbar = Snackbar
.make(coordinatorLayout,
"Message is deleted"
, Snackbar.LENGTH_LONG)
.setAction(
"UNDO"
,
new
View.OnClickListener() {
@Override
public
void
onClick(View view) {
Snackbar snackbar1 = Snackbar.make(coordinatorLayout,
"Message is restored!"
, Snackbar.LENGTH_SHORT);
snackbar1.show();
}
});
snackbar.show();

3. Customizing the Snackbar View
默认的 Snackbar 的 text 的颜色是白色的,背景色为
#323232 ,当然在显示的时候,我们可以改变这些属性,示例代码如下
Snackbar snackbar = Snackbar
.make(coordinatorLayout,
"No internet connection!"
, Snackbar.LENGTH_LONG)
.setAction(
"RETRY"
,
new
View.OnClickListener() {
@Override
public
void
onClick(View view) {
}
});
// Changing message text color
snackbar.setActionTextColor(Color.RED);
// Changing action button text color
View sbView = snackbar.getView();
TextView textView = (TextView) sbView.findViewById(android.support.design.R.id.snackbar_text);
textView.setTextColor(Color.YELLOW);
snackbar.show();
4. Creating New Project
接下来我们就来创建一个 Project,看看在具体如何使用,这部分很简单
Now we’ll create a simple app to sea the snackbar in action when the app is having a CoordinatorLayout and a FloatingActionButton.
1. In Android Studio, go to File ⇒ New Project and fill all the details required to create a new project.
2. Open build.gradle and add design support library dependency.
com.android.support:design:23.0.1
dependencies {
compile fileTree(dir:
'libs'
, include: [
'*.jar'
])
compile
'com.android.support:appcompat-v7:23.0.1'
compile
'com.android.support:design:23.0.1'
}
3. Optionally you can apply the material design theme by following the steps mentioned here.
4. Open the layout file your main activity activity_main.xml and below code. Here you can see I have added the CoordinatorLayout and FloatingActionButton.
<
android.support.design.widget.CoordinatorLayout
xmlns:android
=
"http://schemas.android.com/apk/res/android"
xmlns:app
=
"http://schemas.android.com/apk/res-auto"
xmlns:tools
=
"http://schemas.android.com/tools"
android:id
=
"@+id/coordinatorLayout"
android:layout_width
=
"match_parent"
android:layout_height
=
"match_parent"
tools:context
=
".MainActivity"
>
<
android.support.design.widget.AppBarLayout
android:layout_width
=
"match_parent"
android:layout_height
=
"wrap_content"
android:theme
=
"@style/ThemeOverlay.AppCompat.Dark.ActionBar"
>
<
android.support.v7.widget.Toolbar
android:id
=
"@+id/toolbar"
android:layout_width
=
"match_parent"
android:layout_height
=
"?attr/actionBarSize"
android:background
=
"?attr/colorPrimary"
app:layout_scrollFlags
=
"scroll|enterAlways"
app:popupTheme
=
"@style/ThemeOverlay.AppCompat.Light"
/>
</
android.support.design.widget.AppBarLayout
>
<
LinearLayout
android:layout_width
=
"fill_parent"
android:layout_height
=
"wrap_content"
android:orientation
=
"vertical"
android:paddingLeft
=
"20dp"
android:paddingRight
=
"20dp"
app:layout_behavior
=
"@string/appbar_scrolling_view_behavior"
>
<
Button
android:id
=
"@+id/btnSimpleSnackbar"
android:layout_width
=
"fill_parent"
android:layout_height
=
"wrap_content"
android:layout_marginTop
=
"30dp"
android:text
=
"Simple Snackbar"
/>
<
Button
android:id
=
"@+id/btnActionCallback"
android:layout_width
=
"fill_parent"
android:layout_height
=
"wrap_content"
android:layout_marginTop
=
"10dp"
android:text
=
"With Action Callback"
/>
<
Button
android:id
=
"@+id/btnCustomSnackbar"
android:layout_width
=
"fill_parent"
android:layout_height
=
"wrap_content"
android:layout_marginTop
=
"10dp"
android:text
=
"Custom Color"
/>
</
LinearLayout
>
<
android.support.design.widget.FloatingActionButton
android:id
=
"@+id/fab"
android:layout_width
=
"wrap_content"
android:layout_height
=
"wrap_content"
android:layout_gravity
=
"end|bottom"
android:layout_margin
=
"16dp"
android:src
=
"@android:drawable/ic_dialog_email"
/>
</
android.support.design.widget.CoordinatorLayout
>
5
. Now open
MainActivity.java
and make the changes as mentioned below. This activity contains three button click listeners to show the different ways of implementing the snackbar covering the scenarios explained above.
MainActivity.java
import
android.graphics.Color;
import
android.os.Bundle;
import
android.support.design.widget.CoordinatorLayout;
import
android.support.design.widget.FloatingActionButton;
import
android.support.design.widget.Snackbar;
import
android.support.v7.app.AppCompatActivity;
import
android.support.v7.widget.Toolbar;
import
android.view.View;
import
android.widget.Button;
import
android.widget.TextView;
public
class
MainActivity
extends
AppCompatActivity {
private
Toolbar mToolbar;
private
CoordinatorLayout coordinatorLayout;
private
Button btnSimpleSnackbar, btnActionCallback, btnCustomView;
private
FloatingActionButton fab;
@Override
protected
void
onCreate(Bundle savedInstanceState) {
super
.onCreate(savedInstanceState);
setContentView(R.layout.activity_main);
coordinatorLayout = (CoordinatorLayout) findViewById(R.id
.coordinatorLayout);
fab = (FloatingActionButton) findViewById(R.id.fab);
mToolbar = (Toolbar) findViewById(R.id.toolbar);
setSupportActionBar(mToolbar);
btnSimpleSnackbar = (Button) findViewById(R.id.btnSimpleSnackbar);
btnActionCallback = (Button) findViewById(R.id.btnActionCallback);
btnCustomView = (Button) findViewById(R.id.btnCustomSnackbar);
btnSimpleSnackbar.setOnClickListener(
new
View.OnClickListener() {
@Override
public
void
onClick(View view) {
Snackbar snackbar = Snackbar
.make(coordinatorLayout,
"Welcome to AndroidHive"
, Snackbar.LENGTH_LONG);
snackbar.show();
}
});
btnActionCallback.setOnClickListener(
new
View.OnClickListener() {
@Override
public
void
onClick(View view) {
Snackbar snackbar = Snackbar
.make(coordinatorLayout,
"Message is deleted"
, Snackbar.LENGTH_LONG)
.setAction(
"UNDO"
,
new
View.OnClickListener() {
@Override
public
void
onClick(View view) {
Snackbar snackbar1 = Snackbar.make(coordinatorLayout,
"Message is restored!"
, Snackbar.LENGTH_SHORT);
snackbar1.show();
}
});
snackbar.show();
}
});
btnCustomView.setOnClickListener(
new
View.OnClickListener() {
@Override
public
void
onClick(View view) {
Snackbar snackbar = Snackbar
.make(coordinatorLayout,
"No internet connection!"
, Snackbar.LENGTH_LONG)
.setAction(
"RETRY"
,
new
View.OnClickListener() {
@Override
public
void
onClick(View view) {
}
});
// Changing message text color
snackbar.setActionTextColor(Color.RED);
// Changing action button text color
View sbView = snackbar.getView();
TextView textView = (TextView) sbView.findViewById(android.support.design.R.id.snackbar_text);
textView.setTextColor(Color.YELLOW);
snackbar.show();
}
});
}
}
Run and test the app.
Demo 下载


