通向架构师的道路(第二十一天)万能框架spring(三)之SSH
一、前言
我们有了Spring+JdbcTemplate和Spring+iBatis并结合maven的基础,搭建一个SSX这样的框架现在就和玩一样的简单了,今天我们将搭建一个使用Struts1.3,Srping3, Hibernate3的SSH1的开发框架,大家跟着我一步步走,会发觉在程序跑通后自己再动手搭建一遍这个框架,只需要30分钟。
二、SSH框架
仔细看这个框架,稍微有点不一样了。
1) Spring3是通过一个hibernate template来和hibernate的dao层结合起来并且管理起hibernate的相关事务的。因此我们自己写了一个BaseHibernateDaoSupport来用spring统一管理hibernate的事务。
2) Hibernate和Spring的结合非常方便,我们只需要写一个hibernate.xml就可以了,datasource.xml中把原先的iBatis的相关配置全部去掉它,什么都不需要加事务还是维持原有的配置不变即可,对于我们来说需要改动的是dao层,还有把service层稍微做些小调整(一两句话的调整,非常简单),可能是我看到过的最简单的一种SSX的结合方式,远比iBatis和spring的结合要easy多了。
3) Hibernate3开始可以使用jpa或者还是传统的hbm.xml文件这样的描述方式,在此我们坚持使用JPA的Annotation方式来声明我们的model而不是使用*.hbm.xml这样的方式。
注意:所有的包(package name)都要从原来的org.sky.ssi变成org.sky.ssh喽?
三、搭建SSH框架
3.1建立工程
我们还是使用maven来建立我们的工程,我们工程的名字叫myssh。
3.2 maven库设置
嘿嘿嘿嘿,不需要任何设置,直接把beta工程中的pom.xml文件拷贝入myssh工程中就可以用了,里面相关的spring,struts, hibernate的包我都已经事先配合了。
如果你是个图完美的的,你可以把pom.xml文件中的iBatis相关的jar给去除。
3.3 开始配置Hibernate与spring结合
打开/src/main/resources/spring/datasource下的datasource.xml,把所有的关于iBatis的设置全部去除,把org.sky.ssi这样的包名全部改成org.sky.ssh。
我们在myssh工程中需要增加一个工具类,一个xml和几个用到的hibernate的model的映射,下面来看。
src/main/resources/spring/hibernate/hibernate.xml文件
我们在src/main/resources/spring目录下增加一个目录叫hibernate,在这个hibernate目录下我们创建一个hibernate.xml文件。
其内容如下:
| <?xml version="1.0" encoding="UTF-8"?> <beans xmlns="http://www.springframework.org/schema/beans" xmlns:p="http://www.springframework.org/schema/p" xmlns:xsi="http://www.w3.org/2001/XMLSchema-instance" xsi:schemaLocation=" http://www.springframework.org/schema/beans http://www.springframework.org/schema/beans/spring-beans-3.0.xsd http://www.springframework.org/schema/beans http://www.springframework.org/dtd/spring-beans.dtd "> <bean id="hibernateSessionFactory" class="org.springframework.orm.hibernate3.annotation.AnnotationSessionFactoryBean"> <property name="packagesToScan" value="org.sky.ssh.dao.impl.*.*" /> <property name="dataSource"> <ref bean="dataSource" /> </property> <property name="annotatedClasses"> <list> <value>org.sky.ssh.model.TLogin</value> <value>org.sky.ssh.model.TStudent</value> </list> </property> <property name="hibernateProperties"> <props> <prop key="hibernate.dialect">org.hibernate.dialect.Oracle9Dialect</prop> <prop key="hibernate.show_sql">true</prop> <prop key="hibernate.generate_statistics">true</prop> <prop key="hibernate.connection.release_mode">auto</prop> <prop key="hibernate.autoReconnect">true</prop> <prop key="hibernate.hbm2ddl.auto">update</prop> <prop key="hibernate.connection.autocommit">true</prop> </props> </property> </bean> </beans> |
<property name="packagesToScan"value="org.sky.ssh.dao.impl.*.*" />
这句就是代表所有的hibernate的sessionFactory自动被注入到我们的myssh工程的dao层中去,即在dao层中我们只要通过BaseHibernateDaoSupport.getSession()就可以进行相关的hibernate的数据库操作了.
我们还注意到了在src/main/resources/spring/hibernate/hibernate.xml文件中有这样的hibernate的model的映射:
| <property name="annotatedClasses"> <list> <value>org.sky.ssh.model.TLogin</value> <value>org.sky.ssh.model.TStudent</value> </list> </property> |
这就是基于annotation的jpa的hibernate的model层的写法,这边的几个<value>括起来的东西就是一个个java的.class,这些java文件都是基于jpa的annotation写法。
当然,如果表结构简单,你可以直接手写这些java类,但是如果一个表结构很复杂,几十个字段主键还有组合主键这样的形式存在,那么手写这个jpa就会变得有点困难。
一般我们在开发项目时都是通过先建表,再建类的,对吧?
因此在这里我们其实是可以借助相关的工具通过数据库表来生成我们的hibernate的这些model类的。
利用eclipse从表逆向生成java的jpa(hibernate)类
准备工做
1. 必须要有eclipse3.7及升级后的database, jpa feature,如:eclipse wtp版
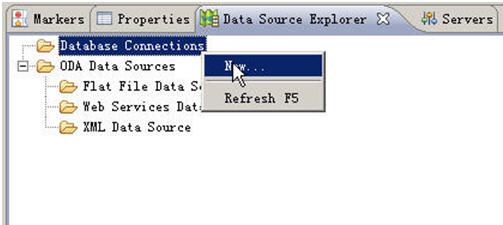
2. 建立数据源
根据下面操作,请切换到j2ee视图,然后先打开datasource explorer窗口

下一步
填入自定义的oracledriver名
点JARList这个tab(需要加载一个oracle的driver,即ojdbc6.jar)
可以去oracleclient端安装的路径的jdbc\lib中找到该JAR,注意上图中两个红圈处标出的路径与jar名
点OK返回下面这个对话框
点OK,NEXT, FINISH完成
看,这边一下子把所有的schema都列出来了,但是我们知道oracle的schema就是username,因此我们用bookstore(这个只是示例,这边因该用你连接数据库的username)的schema只需要显示bookstore的相关数据库object就够我们用了。

在上面的对话框中把Disablefilter放开,然后在Startswith the characters填入你的oracle用户名(schema名),必须大写。
点OK
返回后右键点connection选Refresh,看,是不是只列出来就是你要的东西了(相当于pl/sql里从all objects切换成my objects)

这个东西还可以在没有安装oracle客户端的情况下,拿ECLIPSE来当oracle的客户端用。
建立JPA(Hibernate)工程
在hibernate3里我们把hibernate的annoation方式称为全注解即JPA,因此我们不需要使用hibernate3以前的那种xml文件的配置的方式。
新建JPA工程

这边我们使用的工程名为myssh_model
工程名起名规范,比如说你的工程叫MyProject,那么你的HIBERNATE是ForMyProject工程的,因此你的hibernate即JPA工程就应该叫MyProject_model
根据上图勾选后NEXT,NEXT到下面这一步(千万不要手快然后直接去点那个FINISH按钮啊,我们还没完呢)

保持所有的CLASS的主键为none,我们在后面为每个表分别指定主键的形势,因为有些主键是用的是sequence,有的主键是要通过界面手输进来的,不是sequence,有的主键甚至是复合主键。
别忘了把package填上,注意package的命名规范(规则)养成良好习惯
点NEXT
下面为每个CLASS指定主键的生成方式。
对于T_LOGIN表来说我们的PK让它保持为默认。
对于T_STUDENT表来说,我们的主键是用一个oracle的 sequence来生成的,这个oracle的sequence命为:
因此当你为一个jpa指定了sequence的PK时,在做插入动作时,该表的PK会自动从在这一步指定的sequence中去读取nextval值,相当于执行了一步:select SEQ_STUDENT_NO.nextval from dual;这样的操作.

编译通过后,我们就可以把这些java拷入我们需要用到hibernate工程的project里了,拷进去后别忘了改一处地方:
以下是我原有工程中有一个jpa,因此我在spring/hibernate/hibernate.xml文件中需要把一个jpa纳入spring的管理,但现在我拷进去一堆jpa都要纳入spring管理,怎么办?就是把这个文件打开,找到
<property name=”annotatedClasses”>处
然后看到<List><value>了吗?自己把一个个JPA加进去吧,然后就可以去爽了。
| <property name="annotatedClasses"> <list> <value>org.sky.ssh.model.TLogin</value> <value>org.sky.ssh.model.TStudent</value> </list> </property> |
org.sky.ssh.dao.BaseHibernateDaoSupport.java文件
| package org.sky.ssh.dao;
import javax.annotation.Resource; import org.hibernate.SessionFactory;
import org.springframework.orm.hibernate3.support.HibernateDaoSupport; public class BaseHibernateDaoSupport extends HibernateDaoSupport { @Resource(name = "hibernateSessionFactory") public void setSF(SessionFactory sessionFactory) { super.setSessionFactory(sessionFactory); } } |
四、SSH框架的使用
我们现在可以开始使用我们的SSH框架了。
4.1修改DAO层代码
org.sky.ssh.dao.LoginDAO
| package org.sky.ssh.dao;
public interface LoginDAO { public long validLogin(String loginId, String loginPwd) throws Exception; } |
org.sky.ssh.dao.impl.LoginDAOImpl
| package org.sky.ssh.dao.impl;
import org.sky.ssh.dao.BaseHibernateDaoSupport; import org.sky.ssh.dao.LoginDAO; import org.springframework.stereotype.Repository; import org.hibernate.Query;
@Repository public class LoginDAOImpl extends BaseHibernateDaoSupport implements LoginDAO {
public long validLogin(String loginId, String loginPwd) throws Exception { Long count = new Long(0); String sql = "select count(tl.loginId) from TLogin as tl where tl.loginId=:loginId and tl.loginPwd=:loginPwd "; Query query = super.getSession().createQuery(sql); query.setString("loginId", loginId); query.setString("loginPwd", loginPwd); count = (Long) query.list().get(0); return count; }
} |
org.sky.ssh.dao.StudentDAO
| package org.sky.ssh.dao;
import org.sky.ssh.model.TStudent; import org.sky.ssh.dbo.StudentDBO; import org.sky.ssh.student.form.*; import java.util.*;
public interface StudentDAO {
public List<TStudent> getAllStudent() throws Exception;
public void addStudent(String studentName) throws Exception;
public void delStudent(TStudent std) throws Exception; } |
org.sky.ssh.dao.impl.StudentDAOImpl
| package org.sky.ssh.dao.impl;
import java.util.ArrayList; import java.util.List;
import org.hibernate.Query; import org.sky.ssh.dao.BaseHibernateDaoSupport; import org.sky.ssh.dao.StudentDAO; import org.sky.ssh.model.TStudent; import org.springframework.stereotype.Repository;
@Repository public class StudentDAOImpl extends BaseHibernateDaoSupport implements StudentDAO {
public List<TStudent> getAllStudent() throws Exception { List<TStudent> stdList = new ArrayList<TStudent>(); String sql = "from TStudent as s"; Query query = super.getSession().createQuery(sql); stdList = query.list(); return stdList; }
public void addStudent(String studentName) throws Exception { TStudent std = new TStudent(); std.setStudentName(studentName); this.getHibernateTemplate().save(std); }
public void delStudent(TStudent std) throws Exception { this.getHibernateTemplate().delete(std); } } |
对Service层的接口作相应的调整,把原来在iBatis中使用Map传值的地方改一下即可,对吧?
Hibernate的DAO是我看到过的最简单的DAO写法,连脑子都不需要多动。
4.2启动我们的框架
确保我们的StudentServiceImpl类中有如下语句:
| public void delStudent(String[] stdNo) throws Exception { for (String s : stdNo) { TStudent std = new TStudent(); std.setStudentNo(Long.parseLong(s)); studentDAO.delStudent(std); throw new Exception("force system to throw a exception"); } } |
在eclipse中启动tomcat
在IE中输入:http://localhost:8080/myssh/,页面自动跑到登录界面
输入alpha/aaaaaa登录成功后我们增加两个用户:test2与test3

在主界面上勾选test2与test3点删除按钮。
页面出错

看数据库层面

数据记录还在,说明我们的springservice层与hibernatedao层已经结合成功。
在StudentServiceImpl类中将:throw new Exception("force system to throw a exception");这句注释掉.

重新启动tomcat后登录并勾选test2与test3,然后点删除按钮.

删除成功。
查看数据库层记录

数据删除也成功了,结束今天的教程。
五、附录
Hibernate的dialect大全
| DB2 |
org.hibernate.dialect.DB2Dialect |
| DB2 AS/400 |
org.hibernate.dialect.DB2400Dialect |
| DB2 OS390 |
org.hibernate.dialect.DB2390Dialect |
| PostgreSQL |
org.hibernate.dialect.PostgreSQLDialect |
| MySQL |
org.hibernate.dialect.MySQLDialect |
| MySQL with InnoDB |
org.hibernate.dialect.MySQLInnoDBDialect |
| MySQL with MyISAM |
org.hibernate.dialect.MySQLMyISAMDialect |
| Oracle (any version) |
org.hibernate.dialect.OracleDialect |
| Oracle 9i/10g |
org.hibernate.dialect.Oracle9Dialect |
| Sybase |
org.hibernate.dialect.SybaseDialect |
| Sybase Anywhere |
org.hibernate.dialect.SybaseAnywhereDialect |
| Microsoft SQL Server |
org.hibernate.dialect.SQLServerDialect |
| SAP DB |
org.hibernate.dialect.SAPDBDialect |
| Informix |
org.hibernate.dialect.InformixDialect |
| HypersonicSQL |
org.hibernate.dialect.HSQLDialect |
| Ingres |
org.hibernate.dialect.IngresDialect |
| Progress |
org.hibernate.dialect.ProgressDialect |
| Mckoi SQL |
org.hibernate.dialect.MckoiDialect |
| Interbase |
org.hibernate.dialect.InterbaseDialect |
| Pointbase |
org.hibernate.dialect.PointbaseDialect |
| FrontBase |
org.hibernate.dialect.FrontbaseDialect |
| Firebird |
org.hibernate.dialect.FirebirdDialect |


