Lighttpd整合PHP,Zend
转自杨哥blog:http://hi.baidu.com/naruto6006/blog/item/df34f95d0159624efbf2c0ea.html
前面安装完了lighttpd,实现了自启动和虚拟主机等简单的配置,下面简要的介绍下lighttpd同php,zend的整合,以及url重定向,访问控制等配置,这个lighttpd能够显示的功能还是蛮丰富的,只是在配置上需要花点功夫去研究…
1: 使用FastCGI整合PHP与lighttpd
[root@server1 ~]# cd /usr/local/src/tarbag/
[root@server1 tarbag]# wget http://cn2.php.net/get/php-5.2.13.tar.bz2/from/cn.php.net/mirror
[root@server1 tarbag]# tar -jxvf php-5.2.13.tar.bz2 -C ../software/
[root@server1 tarbag]# cd ../software/php-5.2.13/
[root@server1 php-5.2.13]# ./configure --prefix=/usr/local/php5 --with-config-file-path=/usr/local/php5 --with-bz2 --with-curl --with-curlwrappers --enable-ftp --enable-sockets --disable-ipv6 --with-gd --with-jpeg-dir=/usr/local --with-png-dir=/usr/local --with-freetype-dir=/usr/local --enable-gd-native-ttf --with-iconv-dir=/usr/local --enable-mbstring --enable-calendar --with-gettext --with-libxml-dir=/usr/local --with-zlib --enable-zend-multibyte --with-pdo-mysql=/usr/local/mysql --with-mysqli=/usr/local/mysql/bin/mysql_config --with-mysql=/usr/local/mysql --enable-dom --with-ldap --enable-xml --enable-fastcgi --enable-force-cgi-redirect
[root@server1 php-5.2.13]# make && make install
[root@server1 php-5.2.13]# sapi/cgi/php-cgi -v
PHP 5.2.13 (cgi-fcgi) (built: Jun 13 2010 16:34:54)
Copyright (c) 1997-2010 The PHP Group
Zend Engine v2.2.0, Copyright (c) 1998-2010 Zend Technologies
[root@server1 php-5.2.13]# mkdir /usr/local/lighttpd/fcgi //创建fcgi目录,然后把php-cgi复制到该目录下
[root@server1 php-5.2.13]# cp sapi/cgi/php-cgi /usr/local/lighttpd/fcgi/
[root@server1 php-5.2.13]# vi /usr/local/lighttpd/etc/lighttpd.conf //修改主配置文件FastCGI模块配置如下
#### fastcgi module
## read fastcgi.txt for more info
## for PHP don't forget to set cgi.fix_pathinfo = 1 in the php.ini
fastcgi.server = ( ".php" =>
( "localhost" =>
(
"socket" => "/tmp/php-fastcgi.socket",
"bin-path" => "/usr/local/lighttpd/fcgi/php-cgi"
)
)
)
[root@server1 php-5.2.13]# cp php.ini-dist /usr/local/php5/php.ini //修改php配置文件如下
[root@server1 php-5.2.13]# grep 'cgi.fix_pathinfo=1' /usr/local/php5/php.ini
cgi.fix_pathinfo=1
[root@server1 php-5.2.13]# /usr/local/lighttpd/sbin/lighttpd -t -f /usr/local/lighttpd/etc/lighttpd.conf //测试配置文件语法
Syntax OK
[root@server1 php-5.2.13]# service lighttpd restart
停止 lighttpd:[确定]
启动 lighttpd:[确定]
[root@server1 php-5.2.13]# ps -ef |grep lighttpd |grep -v 'grep'
daemon 23049 1 0 10:56 ? 00:00:00 /usr/local/lighttpd/sbin/lighttpd -f /usr/local/lighttpd/etc/lighttpd.conf
daemon 23050 23049 0 10:56 ? 00:00:00 /usr/local/lighttpd/fcgi/php-cgi
daemon 23053 23050 0 10:56 ? 00:00:00 /usr/local/lighttpd/fcgi/php-cgi
daemon 23054 23049 0 10:56 ? 00:00:00 /usr/local/lighttpd/fcgi/php-cgi
daemon 23056 23054 0 10:56 ? 00:00:00 /usr/local/lighttpd/fcgi/php-cgi
daemon 23057 23049 0 10:56 ? 00:00:00 /usr/local/lighttpd/fcgi/php-cgi
daemon 23059 23057 0 10:56 ? 00:00:00 /usr/local/lighttpd/fcgi/php-cgi
daemon 23060 23049 0 10:56 ? 00:00:00 /usr/local/lighttpd/fcgi/php-cgi
daemon 23062 23060 0 10:56 ? 00:00:00 /usr/local/lighttpd/fcgi/php-cgi
2:php同zend的整合
[root@server1 php-5.2.13]# cd /usr/local/src/tarbag/
[root@server1 tarbag]# wget http://downloads.zend.com/optimizer/3.3.9/ZendOptimizer-3.3.9-linux-glibc23-i386.tar.gz
[root@server1 tarbag]# tar -zxvf ZendOptimizer-3.3.9-linux-glibc23-i386.tar.gz -C ../software/
[root@server1 tarbag]# mv ../software/ZendOptimizer-3.3.9-linux-glibc23-i386/ /usr/local/Zend
[root@server1 ~]# grep 'zend_extension' /usr/local/php5/php.ini //在php配置文件中加载zend模块
zend_extension=/usr/local/Zend/data/5_2_x_comp/ZendOptimizer.so
[root@server1 ~]# /usr/local/php5/bin/php -m |grep -i zend
[Zend Modules]
Zend Optimizer
3:修改记录日志格式,开启文件和目录索引,过滤文件类型
[root@server1 ~]# grep -E 'accesslog|accesslog.format|errorlog' /usr/local/lighttpd/etc/lighttpd.conf //自定义日志格式和日志存放位置
# at least mod_access and mod_accesslog should be loaded
"mod_accesslog" )
server.errorlog = "/www/log/lighttpd/error.log"
#### accesslog module
accesslog.filename = "/www/log/lighttpd/access.log"
accesslog.format = "%{X-Forwarded-For}i %v %u %t /"%r/" %s %b /"%{User-Agent}i/" /"%{Referer}i/""
server.errorlog = "/www/log/lighttpd/web1.yang.com-error.log"
accesslog.filename = "/www/log/lighttpd/web1.yang.com-access.log"
server.errorlog = "/www/log/lighttpd/web2.yang.com-error.log"
accesslog.filename = "/www/log/lighttpd/web2.yang.com-access.log"
[root@server1 ~]# grep 'dir-list' /usr/local/lighttpd/etc/lighttpd.conf
dir-listing.activate = "enable" //当不存在首页文件时,显示目录和文件,默认为disable
dir-listing.encoding = "utf-8" //以UTF-8的格式显示文件和目录
[root@server1 ~]# grep -E 'exe|mp3+' /usr/local/lighttpd/etc/lighttpd.conf
".mp3" => "audio/mpeg",
url.access-deny = ( "~", ".inc", ".exe", ".mp3" ) //拒绝访问exe和MP3后缀的文件,这个在Apache中使用filesmatch来实现,但在lighttpd中开启了目录浏览后,这两个格式的文件还是可以查看到,只是不能下载,Apache则直接浏览不到

客户端测试
[root@oracle ~]# wget http://192.168.122.10/WPS2009.12012.exe
--2010-06-17 11:51:25-- http://192.168.122.10/WPS2009.12012.exe
Connecting to 192.168.122.10:80... 已连接。
已发出 HTTP 请求,正在等待回应... 403 Forbidden
2010-06-17 11:51:25 错误 403:Forbidden。
4:url重定向与文件过期设定
[root@server1 ~]# grep -B 3 'baidu.com' /usr/local/lighttpd/etc/lighttpd.conf //将web1网站下的test目录重定向到baidu.com
server.document-root = "/www/vhosts/web1"
server.errorlog = "/www/log/lighttpd/web1.yang.com-error.log"
accesslog.filename = "/www/log/lighttpd/web1.yang.com-access.log"
url.redirect = ( "/test" => "http://www.baidu.com/$1" )
[root@server1 ~]# tail -f /www/log/lighttpd/web1.yang.com-access.log
- web1.yang.com - [17/Jun/2010:14:00:42 +0800] "GET /test HTTP/1.1" 301 0 "Mozilla/5.0 (X11; U; Linux i686; zh-CN; rv:1.9.0.12) Gecko/2009070811 Red Hat/3.0.12-1.el5_3 Firefox/3.0.12" "-"
[root@server1 ~]# grep -A 3 -B 10 'expire.url' /usr/local/lighttpd/etc/lighttpd.conf |grep -v '^#' |uniq //设定image1,image2目录下文件的过期时间分别为1,2分钟,这个在作为CDN源头服务器的时候通常需要设置
server.document-root = "/www/htdocs/"
server.errorlog = "/www/log/lighttpd/error.log"
index-file.names = ( "index.php", "index.html",
"index.htm", "default.htm" )
expire.url = (
"/image1/" => "access 1 minutes",
"/image2/" => "access 2 minutes"
)
--
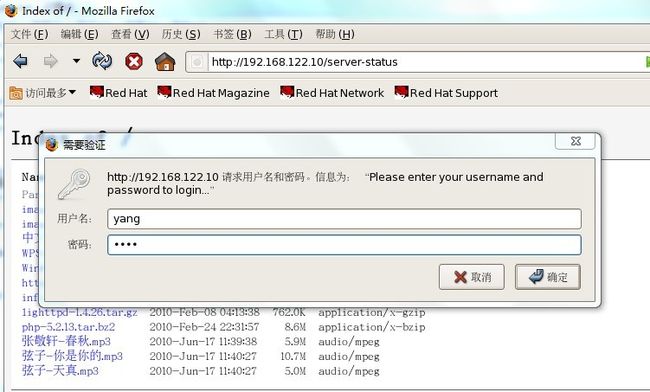
5: 用户级访问控制,针对主机级的访问控制如何实现,还有待研究
[root@server1 ~]# grep -A 15 'auth.backend' /usr/local/lighttpd/etc/lighttpd.conf |grep -v '^#'
auth.backend = "plain" //明文方式进行密码验证
auth.backend.plain.userfile = "/usr/local/lighttpd/etc/.lighttpd.user" //验证文件
auth.require = ( "/server-status" => //验证的对象
(
"method" => "basic", //采取明文认证方式
"realm" => "Please enter your username and password to login...", //消息框提示内容
"require" => "valid-user" //允许所有合法的用户
),
"/server-config" =>
(
"method" => "basic",
"realm" => "Please enter your username and password to login...",
"require" => "valid-user"
)
)
[root@server1 ~]# echo "yang:yang" > /usr/local/lighttpd/etc/.lighttpd.user
[root@server1 ~]# chown -R daemon.daemon /usr/local/lighttpd/
[root@server1 ~]# chmod 400 /usr/local/lighttpd/etc/.lighttpd.user

