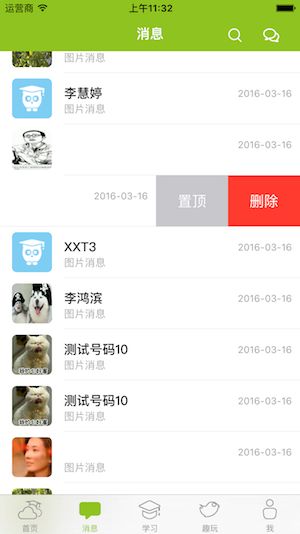
本人用过的三方库
1、使用HMSegmentedControl实现分段控件
HMSegmentedControl 是 UISegmentedControl 的替代品,模仿了 Google Currents 使用的效果。
HMSegmentedControl
A drop-in replacement for UISegmentedControl mimicking the style of the segmented control used in Google Currents and various other Google products.
Features
- Supports both text and images
- Font and all colors are customizable
- Supports selection indicator both on top and bottom
- Supports blocks
- Works with ARC and iOS >= 5
Installation
CocoaPods
The easiest way of installing HMSegmentedControl is via CocoaPods.
pod 'HMSegmentedControl', '~> 1.1.0' Cocoa-whaa?
If you haven't heard about CocoaPods (seriously, where were you?!), it's a dependency manager for Xcode projects that provides very simple installation of libraries. Here's how to get started.
Install CocoaPods if not already available:
$ [sudo] gem install cocoapods
$ pod setup
Change to the directory of your Xcode project, and Create and Edit your Podfile and add HMSegmentedControl:
$ cd /path/to/MyProject
$ touch Podfile
$ edit Podfile
platform :ios, '5.0'
pod 'HMSegmentedControl', '~> 1.2.0'
Install into your project:
$ pod install
Open your project in Xcode from the .xcworkspace file (not the usual project file)
$ open MyProject.xcworkspace
Old-fashioned way
- Add
HMSegmentedControl.handHMSegmentedControl.mto your project. - Add
QuartzCore.frameworkto your linked frameworks. #import "HMSegmentedControl.h"where you want to add the control.
Usage
The code below will create a segmented control with the default looks:
- HMSegmentedControl *segmented = [[HMSegmentedControl alloc] initWithSectionTitles:@[@"已收公告",@"已发公告"]];
- segmented.autoresizingMask = UIViewAutoresizingFlexibleRightMargin | UIViewAutoresizingFlexibleWidth;
- segmented.frame = CGRectMake(self.view.bounds.size.width/2-100, 4, 200, 40);
- segmented.backgroundColor = [UIColor clearColor];
- segmented.selectionIndicatorHeight = 3.0f;
- segmented.font = [UIFont fontWithName:@"STHeitiSC-Light" size:19.0f];
- segmented.textColor = WHRGB(255, 175, 185);
- segmented.selectedTextColor = [UIColor whiteColor];
- segmented.selectionIndicatorColor = [UIColor whiteColor];
- segmented.selectionStyle = HMSegmentedControlSelectionStyleFullWidthStripe;
- segmented.selectionIndicatorLocation = HMSegmentedControlSelectionIndicatorLocationDown;
- [segmented addTarget:self action:@selector(segmentedControlChangedValue:) forControlEvents:UIControlEventValueChanged];
- self.segmentedControl = segmented;
- [self.navigationController.navigationBar addSubview:segmented];
重要例子2:
//
//  ViewController.m
//  分段控件三方库
//
//点击每个不同的segument,转到那个按钮相应的view

#import "ViewController.h"
#import "HMSegmentedControl.h"

CGFloat segmengHight = 35;

#define  YBSCREEN    [UIScreen mainScreen].bounds.size
@interface ViewController ()<UIScrollViewDelegate>
@property (nonatomic,strong) UIScrollView *scrollView;
@end

@implementation ViewController

- (void)viewDidLoad {
    [super viewDidLoad];
    // Do any additional setup after loading the view, typically from a nib.
     CGRect r = [ UIScreen mainScreen ].bounds;

    HMSegmentedControl *segmented = [[HMSegmentedControl alloc] initWithSectionTitles:@[@"已收公告",@"已发公告",@"要发公告"]];
    segmented.autoresizingMask = UIViewAutoresizingFlexibleRightMargin | UIViewAutoresizingFlexibleWidth;
    segmented.frame = CGRectMake(0, 66, self.view.frame.size.width, 35);
    segmented.backgroundColor = [UIColor yellowColor];
    segmented.selectionIndicatorHeight = 3.0f;
    segmented.selectionIndicatorColor = [UIColor whiteColor];
    segmented.selectionStyle = HMSegmentedControlSelectionStyleFullWidthStripe;
    segmented.selectionIndicatorLocation = HMSegmentedControlSelectionIndicatorLocationDown;
    __weak typeof(self) weakSelf = self;
    self.scrollView.backgroundColor = [UIColor redColor];
    //当点击segment,就是点击其他的按钮时,就会通过下方的block,在不同的按钮里实现不同的方法
    [segmented setIndexChangeBlock:^(NSInteger index) {
        //这个方法是scrollView在点击segment按钮后所显示的页面
        [weakSelf.scrollView scrollRectToVisible:CGRectMake(self.view.frame.size.width * index, 0, self.view.frame.size.width, 200) animated:YES];
    }];


    [self.view addSubview:segmented];


    self.scrollView = [[UIScrollView alloc] initWithFrame:CGRectMake(0, 66 + segmengHight, YBSCREEN.width, r.size.height - 66 - segmengHight)];
    self.scrollView.backgroundColor = [UIColor colorWithRed:0.7 green:0.7 blue:0.7 alpha:1];
    self.scrollView.pagingEnabled = YES;
    self.scrollView.showsHorizontalScrollIndicator = NO;
    self.scrollView.contentSize = CGSizeMake(YBSCREEN.width*3, 640 - 66 - segmengHight);
    self.scrollView.delegate = self;
    [self.scrollView scrollRectToVisible:CGRectMake(0, 0, YBSCREEN.width, _scrollView.frame.size.height) animated:NO];//这句可加可不加
    [self.view addSubview:self.scrollView];

    for (int i= 0; i<3; i++) {
        UIView *view = [[UIView alloc]initWithFrame:CGRectMake(i*YBSCREEN.width, 0, YBSCREEN.width, r.size.height - 66 - segmengHight)];
        if (i == 1) {
            view.backgroundColor = [UIColor redColor];
        }else if (i == 2)
        {
            view.backgroundColor = [UIColor yellowColor];
        }else
        {
            view.backgroundColor = [UIColor blueColor];
        }
        [self.scrollView addSubview:view];
    }
}


@end
正在跳转界面(过程截屏):
2、SSZipArchive使用详解
下载SSZipArchive,点击我。或者自己在这里下载。
SSZipArchive功能:
- 解压zip文件
- 解压密码保护的zip文件
- 创建zip文件
- 追加到zip文件
- 压缩文件
- 使用一个名字来压缩NSData
使用前:
- 把SSZipArchive文件添加到项目中
- 在target中添加libz.dylib
- // 解压
- NSString *zipPath = @"被解压的文件路径";
- NSString *destinationPath = @"解压到的目录";
- [SSZipArchive unzipFileAtPath:zipPath toDestination:destinationPath];
- // 压缩
- NSString *zippedPath = @"压缩文件路径";
- NSArray *inputPaths = [NSArray arrayWithObjects:
- [[NSBundle mainBundle] pathForResource:@"photo1" ofType:@"jpg"],
- [[NSBundle mainBundle] pathForResource:@"photo2" ofType:@"jpg"]
- nil nil];
- [SSZipArchive createZipFileAtPath:zippedPath withFilesAtPaths:inputPaths];
2、
SWTableViewCell——一个和iOS 7的系统Mail类似,使用起来简单的UITableViewCell子类
- 关键字:系统Mail,iOS7,
- 代码类库:视图动画(ViewAnimation)
- GitHub链接:https://github.com/CEWendel/SWTableViewCell

功能
右边的工具按钮
用户向左滑动可以调出工具按钮,在Table View Cell的右边显示。这种和iOS的系统Mail和Reminders类似。

左边的工具按钮
如果用户向右边滑动也可以调出工具按钮,在Table View Cell的左边显示。

特点
动态的工具按钮,大小可以调整。如果在一个cell中需要增加更多的按钮,那么其他的按钮会自动缩小提供空间。
按钮的名字和颜色可以自己调整。
在iOS6.1以上系统,包括iOS 7中测试通过。
用法
在tableView:cellForRowAtIndexPath:方法中创建一个SWTableView cell,使用NSMutableArray+SWUtilityButtons 类给它添加任意数量的工具按钮。
|
1
2
3
4
5
6
7
8
9
10
11
12
13
14
15
16
17
18
19
20
21
22
23
24
25
26
27
|
- (UITableViewCell *)tableView:(UITableView *)tableView cellForRowAtIndexPath:(
NSIndexPath
*)indexPath {
static
NSString
*cellIdentifier = @
"Cell"
;
SWTableViewCell *cell = (SWTableViewCell *)[tableView dequeueReusableCellWithIdentifier:cellIdentifier];
if
(cell ==
nil
) {
NSMutableArray
*leftUtilityButtons = [
NSMutableArray
new
];
NSMutableArray
*rightUtilityButtons = [
NSMutableArray
new
];
[leftUtilityButtons addUtilityButtonWithColor:[UIColor colorWithRed:0.07 green:0.75f blue:0.16f alpha:1.0] icon:[UIImage imageNamed:@
"check.png"
]];
[leftUtilityButtons addUtilityButtonWithColor:[UIColor colorWithRed:1.0f green:1.0f blue:0.35f alpha:1.0] icon:[UIImage imageNamed:@
"clock.png"
]];
[leftUtilityButtons addUtilityButtonWithColor:[UIColor colorWithRed:1.0f green:0.231f blue:0.188f alpha:1.0] icon:[UIImage imageNamed:@
"cross.png"
]];
[leftUtilityButtons addUtilityButtonWithColor:[UIColor colorWithRed:0.55f green:0.27f blue:0.07f alpha:1.0] icon:[UIImage imageNamed:@
"list.png"
]];
[rightUtilityButtons addUtilityButtonWithColor:[UIColor colorWithRed:0.78f green:0.78f blue:0.8f alpha:1.0] title:@
"More"
];
[rightUtilityButtons addUtilityButtonWithColor:[UIColor colorWithRed:1.0f green:0.231f blue:0.188 alpha:1.0f] title:@
"Delete"
];
cell = [[SWTableViewCell alloc] initWithStyle:UITableViewCellStyleSubtitle reuseIdentifier:cellIdentifier height:_tableView.rowHeight leftUtilityButtons:leftUtilityButtons rightUtilityButtons:rightUtilityButtons];
cell.delegate =
self
;
}
NSDate
*dateObject = _testArray[indexPath.row];
cell.textLabel.text = [dateObject description];
cell.detailTextLabel.text = @
"Some detail text"
;
return
cell;
}
|
Delegate
开发者可以使用SWTableViewCellDelegate来了解用户点击了哪个按钮。有两种方法:
|
1
2
|
- (
void
)swippableTableViewCell:(SWTableViewCell *)cell didTriggerLeftUtilityButtonWithIndex:(
NSInteger
)index;
- (
void
)swippableTableViewCell:(SWTableViewCell *)cell didTriggerRightUtilityButtonWithIndex:(
NSInteger
)index;
|
index指示用户点击了哪个按钮。
例子
|
1
2
3
4
5
6
7
8
9
10
11
12
13
14
15
16
17
18
19
20
21
22
23
24
25
26
27
28
29
30
31
32
33
34
35
36
37
38
|
#pragma mark - SWTableViewDelegate
- (
void
)swippableTableViewCell:(SWTableViewCell *)cell didTriggerLeftUtilityButtonWithIndex:(
NSInteger
)index {
switch
(index) {
case
0:
NSLog
(@
"check button was pressed"
);
break
;
case
1:
NSLog
(@
"clock button was pressed"
);
break
;
case
2:
NSLog
(@
"cross button was pressed"
);
break
;
case
3:
NSLog
(@
"list button was pressed"
);
default
:
break
;
}
}
- (
void
)swippableTableViewCell:(SWTableViewCell *)cell didTriggerRightUtilityButtonWithIndex:(
NSInteger
)index {
switch
(index) {
case
0:
NSLog
(@
"More button was pressed"
);
break
;
case
1:
{
// Delete button was pressed
NSIndexPath
*cellIndexPath = [
self
.tableView indexPathForCell:cell];
[_testArray removeObjectAtIndex:cellIndexPath.row];
[
self
.tableView deleteRowsAtIndexPaths:@[cellIndexPath] withRowAnimation:UITableViewRowAnimationAutomatic];
break
;
}
default
:
break
;
}
}
|
提示
定制UITableViewCell内容
- 不要使用Storyboards来创建你的定制的UItableViewCell内容。只需要简单的在- (UITableViewCell *)tableView:(UITableView *)tableView cellForRowAtIndexPath:(NSIndexPath *)indexPath中增加view到cell的contentview。
- 获仍然可以取cell object的view或者管理预定义的内容。所以说如果你想要改变cell的imageView 或者是backgroundView,SWTableViewCell,仍然可以按照你希望的变化进行改变。
- 不要在cell中使用accessory view,因为他们的层级处于contentView之上,如果cell消失了的话,他们不会随之消失 。
Seperator Insets
如果在iOS 7中你有一个左边的工具按钮,我推荐你改变TableView 的seperatorInsect,这样可以让seperator扩展到屏幕的长度。
tableView.separatorInset = UIEdgeInsetsMake(0, 0, 0, 0);
联系作者:
Chris Wendel: http://twitter.com/CEWendel
我贼程序中用到的是通过自己的cell继承与SWTableViewCell,实现左滑。


