持久化简单的数据储存在Unity3D 中提供了一个简单有效的方法,如果之前的你做过Android的开发你会发现在Unity3D中持久化数据的储存和Android非常的想象。那么下面MOMO 将用一个简单有效的例子向大家介绍Unity3D中持久化数据。
首先我们须要熟悉一下Unity3D中的PlayerPrefs这个类。这个类中一共帮助我们封装了9个方法,用来数据的储存与读取。
举一个例子
1 |
PlayerPrefs.SetString("key","value"); |
2 |
string str = PlayerPrefs.GetString("key","defaule")); |
我们发现它是以键值对的形式进行储存与读取,每一个Key对应一个Value,储存过后通过Key可以得到之前储存的Value。这里说一下GetString()方法中的第二个参数, 它代表默认值。意思是如果通过第一个参数的Key没有找到对应的Value的话GetString()方法就会返回我们写的第二个参数的默认值。怎么样?很简单吧~ 感觉和Android完全一样哈。
Unity3D默认的字体的 size 只有 16 ,这就意味了放在iPhone4 (960 X 640)上 字体会显示的非常小。字体的来源有很多,大家可以在互联网上下载,或者从自己的电脑中拷贝,在Mac电脑下字体放在 Finder -> 资源库 -> Fonts

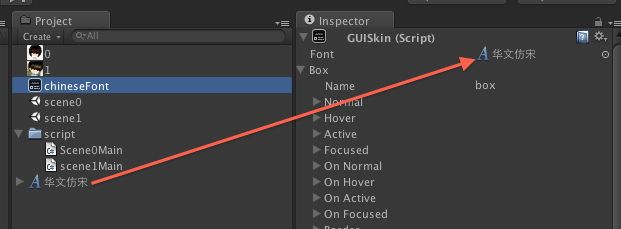
我们可以看见电脑中存在了很多字体,我这里随便选一个,将 华文仿宋.ttf 用鼠标拖动到Project中。
选中: 华文仿宋
FontSize 30 :毫无疑问是字体的大小,这里写30让字体几乎放大1倍。
Character: 设置字体的文字编码 Unicode ASCLL 编码
Style:设置字体的风格,粗体 斜体

点击Cretae ->GUISkin 创建一个GUI的皮肤,将 华文仿宋 拖动到箭头所指向的方向。发现下面存在很多GUI皮肤相关控件设置的,可以在这里设置每一个高级控件~大家可以手动的修改一下看看效果哈。

游戏场景在游戏制作中是一个非常重要的部分,因为任何一款游戏都是由若干的场景组成,Unity3D的游戏场景做的非常贴心。
创建2个游戏场景,一个是scene0 一个是scene1 ,本章的目标是在第一个游戏场景中保存一些基本游戏数据,然后切换到第二个场景中显示第一个场景中保存的数据,实现场景的切换已经数据的储存。
在scene0中创建一个c# 脚本名称为Scene0Main.cs 将它绑定在摄像头中。
Scene0Main.cs
02 |
using System.Collections; |
04 |
public class Scene0Main : MonoBehaviour { |
09 |
publicstring testFloat; |
13 |
publicGUISkin fontSkin; |
15 |
publicTexture Imagetexture; |
20 |
testStr = PlayerPrefs.GetString("testStr","default"); |
21 |
testInt = PlayerPrefs.GetInt("testInt", 0).ToString(); |
22 |
testFloat = PlayerPrefs.GetFloat("testFloat", 0).ToString(); |
37 |
GUI.DrawTexture(newRect((Screen.width - Imagetexture.width) >>1, 10, 120, 120), Imagetexture); |
40 |
testStr = GUI.TextField (newRect(10, 200, 200, 50), testStr, 50); |
41 |
testInt = GUI.TextField (newRect(10, 250, 200, 50), testInt, 50); |
42 |
testFloat = GUI.TextField (newRect(10, 300, 200, 50), testFloat, 50); |
45 |
if(GUI.Button(newRect(220, 200, 150, 100), "commit all")) |
48 |
PlayerPrefs.SetString("testStr", testStr); |
49 |
PlayerPrefs.SetInt("testInt",int.Parse(testInt)); |
50 |
PlayerPrefs.SetFloat("testFloat",float.Parse(testFloat)); |
52 |
Application.LoadLevel("scene1"); |
Scene1Main.cs
02 |
using System.Collections; |
04 |
public class scene1Main : MonoBehaviour { |
08 |
publicstring testFloat; |
10 |
publicGUISkin fontSkin; |
11 |
publicTexture Imagetexture; |
15 |
testStr = PlayerPrefs.GetString("testStr","default"); |
16 |
testInt = PlayerPrefs.GetInt("testInt", 0).ToString(); |
17 |
testFloat = PlayerPrefs.GetFloat("testFloat", 0).ToString(); |
24 |
GUI.DrawTexture(newRect((Screen.width - Imagetexture.width) >>1, 10, 120, 120), Imagetexture); |
27 |
GUI.Label(newRect(10,150,300,50),"testStr = "+ testStr); |
28 |
GUI.Label(newRect(10,200,300,50),"testInt = "+ testInt); |
29 |
GUI.Label(newRect(10,250,300,50),"testFloat = "+ testFloat); |
31 |
if(GUI.Button(newRect(220, 200, 150, 100), "clean all")) |
34 |
PlayerPrefs.DeleteAll(); |
36 |
Application.LoadLevel("scene0"); |
39 |
if(GUI.Button(newRect(220, 320, 150, 100), "only return")) |
42 |
Application.LoadLevel("scene0"); |
File -> Build Settings 点击Add Current添加场景,这一步很重要,如果不添加的话在代码中切换场景会抛异常,盆友们还得注意一下~

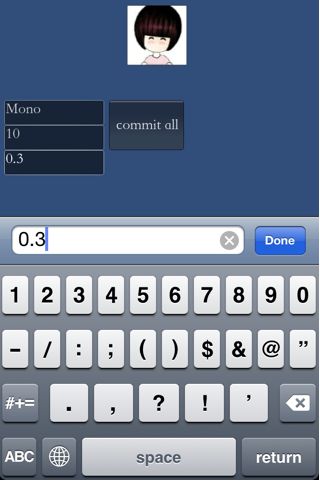
build and run 导出运行项目,如下图所示我分别输入string int float 三种类型的数据,然后点击commit all ,将所有数据全部保存下来,游戏场景切换到scene1场景中。

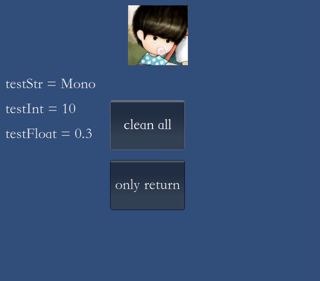
切换到scene1中可以正常的显示scene0中储存的数值,点击clean all 将清空储存的所有信息后返回场景scene0,点击only return 直接返回场景scene0。

另外两个重要的方法
2 |
PlayerPrefs. DeleteKey (“key”); |
5 |
bool b = PlayerPrefs.HasKey(“key”); |
最后欢迎各位盆友可以和MOMO一起讨论Unity3D游戏开发,总的来说这一章还是比较简单的,哇咔咔~~~ 附上Unity3D工程的下载地址,Xcode项目我就不上传了,须要的自己导出。
下载地址:http://download.csdn.net/detail/xys289187120/3806498


