Best Practices for Increasing Website Performance (2)
Losslessly Compressing Images
If you have, for instance, some form of photography showcase, or lots of photographs on the site you are designing then it may not be convenient or practical to serve them all as a sprite. This is where you will have to ‘compress your images’. By properly formatting and compressing images we are able to save many bytes of data.
Often when you save images with tools such as Fireworks or Photoshop the resultant files contain extra data, including color data that may even be unused in the image and even things such as meta data. By compressing images without losing the image’s look or visual quality you can save on data that needs to be downloaded. Yahoo’s smush.it service is incredibly good at doing this job for you. Simply upload the images that you want to ‘smush’ and it will losslessly compress them for you.
Data URIs
Another way to reduce the number of http request that images make is to use as data uris. Data URIS can be described as
We ran a great tutorial on this early this month with the The What, Why and How of Data URIs in Web Design. Head on over to read more about this topic in full. Just a note though that these should be used wisely and sometimes it might not be beneficial or practical to use this method.
Serving Scaled Images
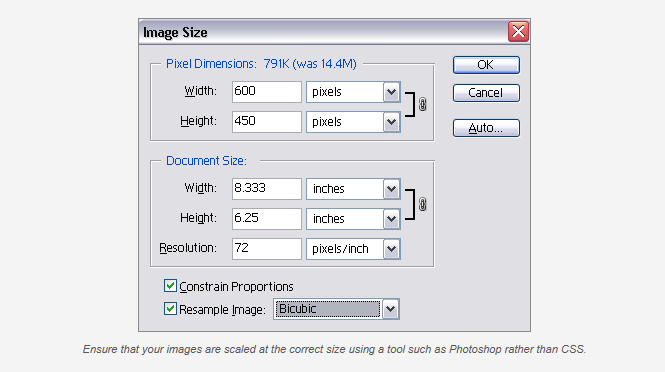
Images should be served at a their original image size where possible. For example, you should not resize your images using CSS unless you are serving several instances of the same image and that image matches at least one that is the original size. Otherwise you should use something such as photoshop to resize your image, this will result in the saving of bytes.
Of course, this doesn’t take into account fluid images (in responsive design) which may well be larger than they’re displayed on a small screen.
You can also physically remove detail.
The example shown above is taken from the dConstruct archive website. In an optimization technique discussed on his blog Jeremy Keith blurred out the non essential parts of each photo. In doing so, he reduced the image data required, slicing the file size almost in two. The loss in detail is negligible, in relation to the performance gains won.
Deferring Parsing of Javascript
In order for a web page to be completely shown to the user, the browser needs to download all its associated files. JavaScript files should not be loaded into the head of your HTML document, but rather near the bottom as (although this doesn’t reduce the total number of bytes that needs to be downloaded by the browser) it displays the web page content before the JavaScript is fully loaded.
If you were to add it to the head of your document the browser would wait until the JavaScript has loaded in its entirety before displaying the page. Your JavaScript files should be included before the closing body tag.
Avoid Making Bad Requests
What is a bad request you might ask? Well for example, a broken link on your site would equate to a bad request. A bad request can be classed as anything that would result in a 404/410 error; any request that results in a dead end.
Content Delivery Networks
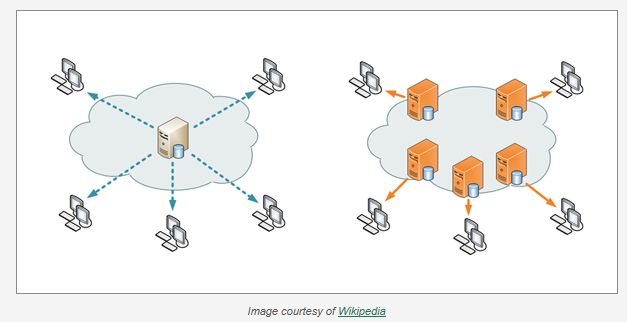
Once you’ve made all the amendments to your site that will give them the best chance of being a ‘speedy site’ then it’s time to look at the server that is hosting it. Traditionally a server will store a copy of your site and then serve it to whichever location the user is viewing it from. The time it takes from the user first requesting the site to the time it takes for the server to respond can vary depending on where the user is located in the world relative to the server.
Content Delivery Networks work a little differently to this. Instead of hosting just one copy of your website they host multiple copies of it on various different servers that are located around the world.
When a user sends a request to these servers they are sent to whichever server is found nearest to their location. This optimizes the speed at which the content is delivered to the end user. This is definitely a bonus but should only be used once you have utilized every other method possible.
Google Page Speed
Google have a neat little tool that allows us to monitor the performance of many of the factors thats we have discussed today. If you haven’t tried out PageSpeed Insights then you should definitely check it out now. What’s more is that they have a whole heap of documentation and examples that will help you monitor and improve your website’s performance. Google describe it as:
"PageSpeed Insights analyzes the content of a web page, then generates suggestions to make that page faster. Reducing page load times can reduce bounce rates and increase conversion rates."
Conclusion
I hope that you’ve learned a few things about optimizing the speed of websites and how you can implement some of the methods into your own projects. By practicing what we’ve discussed you will encourage visitors to come back, remain on your site and enjoy a rewarding browsing experience whilst there.
The bottom line is: by speeding up your sites you’re not just contributing to a better user experience for your users, but a better user experience for the web!
http://webdesign.tutsplus.com/tutorials/workflow-tutorials/best-practices-for-increasing-web-site-performance/


