第一个Hibernate项目及MySQL乱码问题——Hibernate学习笔记01
今天学习了一下Hibernate的配置,看的是尚学堂的视频,不过随着技术的发展,好多东西配置都不一样了,自己研究了下,终于吧第一个项目完成了,虽然只是个HelloWorld等级的,不过好艰难,我把过程说一下,这样大家在学习的时候就能少走点弯路。
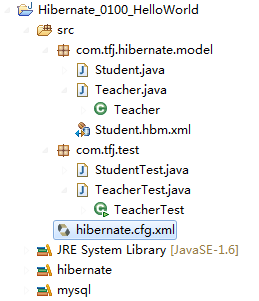
先说一下什么是HIbernate,Hibernate是一个开放源代码的对象关系映射框架,它对JDBC进行了非常轻量级的对象封装,使得Java程序员可以随心所欲的使用对象编程思维来操纵数据库。简单说就是原来我们要存数据的话需要在java文件中写sql语句(想起了学习android开发时候,sql本来就是略懂,写错一点还找不出来,各种烦),用了hibernate后,我们调用一个save()方法,就能把数据存起来了。下面是项目的截图。(因为刚刚开始学习新建的就是java project)。
我们要下载Hibernate, 我下载的是3.6.8版本的,然后由于每次都要导入hibernate的包,我们把它做成一个自己的lib一次就能导入了,我自己做的lib叫hibernate,还有mysql里放的是jdbc的驱动。
hibernate lib里的内容有F:\hibernate-distribution-3.6.8.Final\lib\jpa里面的hibernate-jpa-2.0-api-1.0.1.Final.jar以及F:\hibernate-distribution-3.6.8.Final\lib\required里面的全部6个jar文件,这里还有一个slf4j的api要用的话还得下载slf4j导入slf4j-nop-1.6.1.jar。
在myeclipse里选择Window->Preferences->Java->Build Path->User libraries 选择new 把上面要用到的jar包添加进去取名为hibernate。在新建的项目里右键build path 导进来就可以了。
在F:\hibernate-distribution-3.6.8.Final\documentation\manual\zh-CN\文件夹里有hibernate文档,而且是中文的很好用。
新建一个class叫Student
Student.java
package com.tfj.hibernate.model;

public class Student {
	private int id;
	private String name;
	private int age;
	public int getId() {
		return id;
	}
	public void setId(int id) {
		this.id = id;
	}
	public String getName() {
		return name;
	}
	public void setName(String name) {
		this.name = name;
	}
	public int getAge() {
		return age;
	}
	public void setAge(int age) {
		this.age = age;
	}
}
在hibernate文档里有hibernate的配置文件,我们可以copy一份,命名为hibernate.cfg.xml(由于本身myeclipse里有hibernate项目,这时候会弹出提示窗口,不用管它),编写配置文件。修改配置文件如下(以后要用到的配置以后再说)。
<?xml version='1.0' encoding='utf-8'?>
<!DOCTYPE hibernate-configuration PUBLIC
        "-//Hibernate/Hibernate Configuration DTD 3.0//EN"
        "http://www.hibernate.org/dtd/hibernate-configuration-3.0.dtd">

<hibernate-configuration>

	<session-factory>

		<!-- Database connection settings -->
		<property name="connection.driver_class">com.mysql.jdbc.Driver</property>
		<property name="connection.url">jdbc:mysql://localhost/hibernate?useUnicode=true&characterEncoding=UTF-8</property>
		<property name="connection.username">root</property>
		<property name="connection.password">111111</property>


		<!-- SQL dialect -->
		<property name="dialect">org.hibernate.dialect.MySQLDialect</property>

		<!-- Enable Hibernate's automatic session context management -->

		<!-- Disable the second-level cache -->
		<property name="cache.provider_class">org.hibernate.cache.NoCacheProvider</property>

		<!-- Echo all executed SQL to stdout -->
		<property name="show_sql">true</property>

		<!-- Drop and re-create the database schema on startup -->

		<mapping resource="com/tfj/hibernate/model/Student.hbm.xml" />
		<mapping class="com.tfj.hibernate.model.Teacher"/>

	</session-factory>

</hibernate-configuration>
设置好数据库的账户名,密码,值得注意的是这里有一个配置dialect(方言),与你用什么数据库有关(我的是MySQL),其他数据库的设置方法在hibernate文档里面有。
然后建立数据库名称为hibernate(与配置文件有关),建立表Student,主键i为d,还有name和age两个属性。
接下来要建的是映射文件,就是告诉程序java中变量和数据库中表怎么对应,Student.hbm.xml
Student.hbm.xml
<?xml version="1.0"?>
<!DOCTYPE hibernate-mapping PUBLIC
        "-//Hibernate/Hibernate Mapping DTD 3.0//EN"
        "http://www.hibernate.org/dtd/hibernate-mapping-3.0.dtd">

<hibernate-mapping package="com.tfj.hibernate.model">
	<class name="Student" table="student">
		<id name="id"></id>
		<property name="name"></property>
		<property name="age"></property>
	</class>

</hibernate-mapping>
再建一个测试类
StudentTest.java
package com.tfj.test;

import org.hibernate.Session;
import org.hibernate.SessionFactory;
import org.hibernate.cfg.Configuration;

import com.tfj.hibernate.model.Student;


public class StudentTest {
	public static void main(String args[]){
		Student s = new Student();
		s.setId(4);
		s.setName("s1");
		s.setAge(1);

		Configuration cfg = new Configuration();
		SessionFactory sf = cfg.configure().buildSessionFactory();
		Session session = sf.openSession();
		session.beginTransaction();
		session.save(s);
		session.getTransaction().commit();
		session.close();
		sf.close();


	}
}
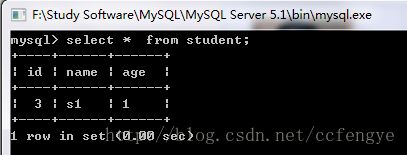
运行后控制台会出现,
到这里还都很顺利,接下来我学习了一下Annotation,遇到了很多麻烦事。
新建了一个teacher.java
teacher.java
package com.tfj.hibernate.model;

import javax.persistence.Entity;
import javax.persistence.Id;

@Entity
public class Teacher {
	private int id;
	private String name;
	private String title;


	public int getId() {
		return id;
	}
	public void setId(int id) {
		this.id = id;
	}
	public String getName() {
		return name;
	}
	public void setName(String name) {
		this.name = name;
	}
	public String getTitle() {
		return title;
	}
	public void setTitle(String title) {
		this.title = title;
	}
}
@Entity说明这是一个实体类,这样我们在表名和类名对应的时候就不用写映射文件了,其他的没有什么区别(不相同的时候也可以用@table定义)。
再看一下测试文件
TeacherTest.java
package com.tfj.test;

import org.hibernate.Session;
import org.hibernate.SessionFactory;


import org.hibernate.cfg.Configuration;


import com.tfj.hibernate.model.Teacher;


public class TeacherTest {
	public static void main(String args[]){
		Teacher t = new Teacher();
		t.setId(7);
		t.setName("ts");
		t.setTitle("高级");

		Configuration cfg = new Configuration();
		SessionFactory sf = cfg.configure().buildSessionFactory();
		Session session = sf.openSession();
		session.beginTransaction();
		session.save(t);
		session.getTransaction().commit();
		session.close();
		sf.close();


	}
}
和视频中不一样的是 AnnotationConfiguration()已经被弃用了,我们现在用 Configuration()就可以了。
测试的时候我其他都正常,但是title中文不显示,显示为乱码。解决这个问题花了好长时间。
简单说一下,1.先把sql里面的my.ini的编码换掉
2.新建数据库时候选择utf8或者gbk
3.在配置文件里加上这样一句话<property name="connection.url">jdbc:mysql://localhost/hibernate?useUnicode=true&characterEncoding=UTF-8</property>
4.这个耽误时间最长了,就是在完成第三步后,如果前连接过数据库,就会出现Could not execute JDBC batch update,要先断开重新连接就正常了。

