定制自己的控件
在实际开发中,经常会碰到系统控件不满足咱们的需求,需要对系统控件做一些修定制修改。这篇文章就分析一下如何去定制自己的控件。
在定制控件之前,我们需要弄清楚控件显示的过程,控件显示的过程大概可以分为以下三步:
1. 调用ViewRootImpl的requestLayout方法;//requestLayout Up to ViewRoot
2. 调用onMeasure计算所有子视图的大小;//measure all children to decide how big are the children?
3. 调用onDraw方法决定绘制的内容;//What to show?
4. 调用onLayout方法去决定视图的位置(注意:onLayout仅在ViewGroup中被调用);// Where are the children?
5、调用dispatchDraw绘制子视图;//draw children
以上步骤的framework实现大家可以参考源码,我们从应用开发的角度来分析,暂时不接触framework代码,在View.java中有段注释,比较清楚的介绍了图像
的绘制过程,如下:
/*
* Draw traversal performs several drawing steps which must be executed
* in the appropriate order:
*
* 1. Draw the background
* 2. If necessary, save the canvas' layers to prepare for fading
* 3. Draw view's content
* 4. Draw children
* 5. If necessary, draw the fading edges and restore layers
* 6. Draw decorations (scrollbars for instance)
*/
ok,从上面三个步骤,我们可以发现,如果你想改变视图的大小,override onMeasure方法即可,如果您想决定显示的内容可以override onDraw方法,
如果您想修改显示的位置,可以override onLayout方法。而如果您想绘制子视图则可override dispatchDraw,这里大家可以思考一个问题,为什么不派生
onDraw方法呢?答案请参考链接http://blog.csdn.net/czh0766/article/details/5790295。
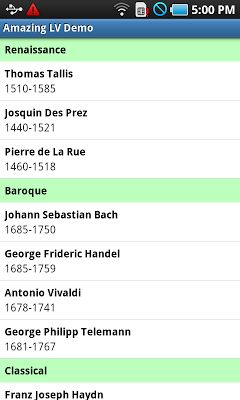
ok,知识储备已经充分了,下面实战吧,我有个需求,自定义一个listview,满足该listview有一个头始终显示头,如下图所示:
图片来源:https://code.google.com/p/android-amazing-listview/
这张图就显示了一个有head的Listview,那么怎么定制这个Listview呢,下面我们就来分析一下AmaingListview的实现方法,您可以进入上面的链接下载代码。在listview向上
或向下滑动时,head会固定住不会移动,当往上滑动listview时,如果两个head相邻,下面的head会将上面上面的head往上顶,直至消失,从相邻到消失有一个绘制过程。
这个过程就是要确定在哪儿绘制,绘制什么的过程,我们需要override onLayout方法,override onMeasure方法,下面是AmazingListView.java中的代码:
    @Override
    protected void onMeasure(int widthMeasureSpec, int heightMeasureSpec) {
        super.onMeasure(widthMeasureSpec, heightMeasureSpec);
        if (mHeaderView != null) {
            measureChild(mHeaderView, widthMeasureSpec, heightMeasureSpec);
            mHeaderViewWidth = mHeaderView.getMeasuredWidth();
            mHeaderViewHeight = mHeaderView.getMeasuredHeight();
        }
    }

    @Override
    protected void onLayout(boolean changed, int left, int top, int right, int bottom) {
        super.onLayout(changed, left, top, right, bottom);
        if (mHeaderView != null) {
            mHeaderView.layout(0, 0, mHeaderViewWidth, mHeaderViewHeight);
            configureHeaderView(getFirstVisiblePosition());
        }
    }
根据前面的描述,onMeasure方法用来决定子视图的大小,通过AmazingListView绘制headview之前需要调用setPinnedHeaderView方法来设置
mHeaderView,代码如下:
    public void setPinnedHeaderView(View view) {
        mHeaderView = view;

        // Disable vertical fading when the pinned header is present
        // TODO change ListView to allow separate measures for top and bottom fading edge;
        // in this particular case we would like to disable the top, but not the bottom edge.
        if (mHeaderView != null) {
            setFadingEdgeLength(0);
        }
        requestLayout();
    }
自定义的headerview一般为TextView,可以参考如下文件:
<?xml version="1.0" encoding="utf-8"?>
<TextView xmlns:android="http://schemas.android.com/apk/res/android"
    android:id="@+id/header"
    android:layout_width="fill_parent"
    android:layout_height="wrap_content"
    android:background="#bfb"
    android:padding="6dp"
    android:text="Header"
    android:textColor="#000"
    android:textStyle="bold" />
其宽度会fill_parent。所以上述的onMeasure方法就是用来获得当前headview的宽度和高度,因为我们需要把headview固定在相对于listview左上角
开始的位置,所以需要覆写onLayout方法,如下:
protected void onLayout(boolean changed, int left, int top, int right, int bottom) {
        super.onLayout(changed, left, top, right, bottom);
        if (mHeaderView != null) {
            mHeaderView.layout(0, 0, mHeaderViewWidth, mHeaderViewHeight);
            configureHeaderView(getFirstVisiblePosition());
        }
    }
在listview滑动时,都会调用onlayout方法,
mHeaderView.layout(0, 0, mHeaderViewWidth, mHeaderViewHeight);保证了headview的位置是固定的。
AmazingListview中比较难理解的就是configureHeaderView方法了,其实这就是前面说到的两个headview之间”顶“的操作,需要在adapter中
来决定行为,如下:
public int getPinnedHeaderState(int position) {
    	if (position < 0 || getCount() == 0) {
    		return PINNED_HEADER_GONE;
    	}

    	// The header should get pushed up if the top item shown
    	// is the last item in a section for a particular letter.
    	int section = getSectionForPosition(position);
    	int nextSectionPosition = getPositionForSection(section + 1);
    	if (nextSectionPosition != -1 && position == nextSectionPosition - 1) {
    		return PINNED_HEADER_PUSHED_UP;
    	}

    	return PINNED_HEADER_VISIBLE;
    }
// The header should get pushed up if the top item shown
    	// is the last item in a section for a particular letter.
这应该不难理解,因为head把view中的item分成了若干的section,发生顶的操作是最上面的一个item是当前section的最后一个item,即:position == nextSectionPosition - 1。在“顶的过程中”,headerview要发生向上的偏移,即y轴的起点变为负值,负值的大小有第一个元素的y坐标值和headview的差值来决定。画一个草图,不难推出计算公式。
ok,这是一个比较典型的自定义视图的例子,可以按照这个思路,您也可以自定义视图,比如目前Android的edittext不支持字体大小的自动缩放,即auto resize,您可以根据上述描述的方法,定制一个可以根据输入的内容自动调整字体大小的控件。您还可以定制各种layout,来满足自己的布局需求,等等。后续我可以发布一些我自己定制的控件,和大家一起讨论。
