C#创建和使用ActiveX组件
|
|
|||
一.Visual C#和Active X组件:
此时可能有些朋友会说,既然能够被Visual C#直接使用只能是托管代码文件,那在Visual C#中提供的可直接通过引用调用ActiveX又是怎么回事?的确Visual C#提供了引用ActiveX组件的操作,这种操作有效的利用了很多以前资源,使得这些资源并没有随着微软推出.Net平台而由于平台的差异被"抛弃",但这种在Visual C#中引入ActiveX组件的操作其实并不被微软公司所倡导,也不符合微软推出.Net的最终目的。这是因为微软之所以推出.Net是为了实现跨平台,为了实现"Write Once and Run Anywhere",写一遍代码,可以在任何平台上运行的目的。如果程序中使用了Active X组件,这也就从另一方面决定了此程序只能在Windows平台上使用,也就无法实现微软的"Write Once and Run Anywhere"最终目标了。
再者Visual C#提供的引用ActiveX组件的操作,其实Active X组件被加入Visual C#的"工具箱"时,Visual Stuio .Net其实对ActiveX组件进行了很多操作,而这些操作又都被Visual C#隐藏了,使用者往往并不完全清楚。这些操作的作用就是把非托管的ActiveX组件转换成托管的组件,这些操作统称"互操作",细心的程序员可能就会发现,当往程序窗体中拖入ActiveX组件后,源程序所在目录的"Bin"目录中就会新增若干个"Dll"文件,这些文件就是Active X组件进行互操作转换后生成的。此时在Visual C#使用的并不是ActiveX组件,而是由ActiveX组件进行互操作得到可供.Net平台使用的、功能和原先ActiveX组件相同的类库了。
既然在Visual C#中不能直接使用ActiveX组件,那种看似在Visual C#中使用的ActiveX组件其实使用的是经过了互操作后转换的类库。那么Visual C#是否能够生成Active X组件?本文就来探讨一下Visual C#中生成ActiveX组件的实现方法。制作的方法就是首先通过Visual C#创建一个Windows组件,然后把其接口以COM形式发布即可。
二.本文中介绍的程序设计及运行环境:
(1).微软视窗2000 服务器版。
(2).Visual Studio .Net 2003企业结构版,.Net Framework SDK 4322。
三.使用Visual C#创建Windows组件:
以下是使用Visual C#创建一个Windows组件的实现步骤:
1.启动Visual Studio .Net。
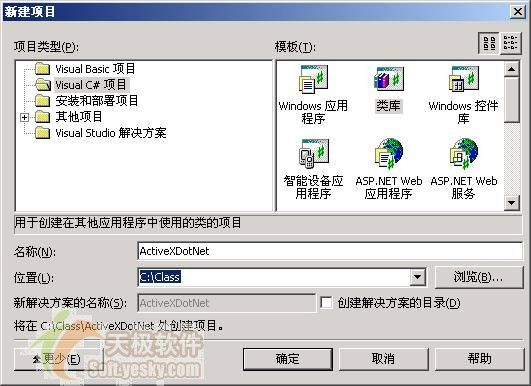
2.选择菜单【文件】|【新建】|【项目】后,弹出【新建项目】对话框。
3.将【项目类型】设置为【Visual C#项目】。
4.将【模板】设置为【类库】。
5.在【名称】文本框中输入【ActiveXDotNet】。
6.在【位置】的文本框中输入【C:/Class】,然后单击【确定】按钮,则Visual C#则在"C:/Class"目录中创建"ActiveXDotNet"文件夹,里面存放的是ActiveXDotNet项目文件,具体如图01所示:
7.选择【解决方案资源管理器】窗口,并从中上传Class1.cs文件,因为此文件在本程序中已经没有用途了。
9. 把Visual Studio .Net的当前窗口切换到【MyControl.cs(设计)】窗口,并从【工具箱】中的【Windows窗体组件】选项卡中往设计窗体中按顺序拖入下列组件:
一个GroupBox组件,并向此组件中再拖入,
一个TextBox组件和一个Lable组件。
10. 把Visual Studio .Net的当前窗口切换到【MyControl.cs】代码编辑窗口,并用下列代码替换MyControl.cs中的InitializeComponent过程,下列代码是初始化上述加入的组件:
| private void InitializeComponent ( ) { this.groupBox1 = new System.Windows.Forms.GroupBox ( ) ; this.txtUserText = new System.Windows.Forms.TextBox ( ) ; this.label1 = new System.Windows.Forms.Label ( ) ; this.groupBox1.SuspendLayout ( ) ; this.SuspendLayout ( ) ; this.groupBox1.Controls.Add ( this.txtUserText ) ; this.groupBox1.Controls.Add ( this.label1 ) ; this.groupBox1.Location = new System.Drawing.Point ( 8 , 8 ) ; this.groupBox1.Name = "groupBox1" ; this.groupBox1.Size = new System.Drawing.Size ( 272 , 56 ) ; this.groupBox1.TabIndex = 0 ; this.groupBox1.TabStop = false ; this.groupBox1.Text = "Visual Studio .Net创建的Active X组件" ; this.txtUserText.Enabled = false ; this.txtUserText.Location = new System.Drawing.Point ( 84 , 20 ) ; this.txtUserText.Name = "txtUserText" ; this.txtUserText.Size = new System.Drawing.Size ( 180 , 21 ) ; this.txtUserText.TabIndex = 1 ; this.txtUserText.Text = "" ; this.label1.Location = new System.Drawing.Point ( 8 , 24 ) ; this.label1.Name = "label1" ; this.label1.Size = new System.Drawing.Size ( 66 , 16 ) ; this.label1.TabIndex = 0 ; this.label1.Text = "输入信息:" ; this.Controls.Add ( this.groupBox1 ) ; this.Name = "MyControl" ; this.Size = new System.Drawing.Size ( 288 , 72 ) ; this.groupBox1.ResumeLayout ( false ) ; this.ResumeLayout ( false ) ; } |
至此【ActiveXDotNet】项目创建的Active X组件的界面就基本完成了,具体如图03所示:
11. 在MyControl.cs中的【MyControl 的摘要说明】代码区中添加下列代码,以下代码是定义一个公用的接口,此接口是告诉COM/COM+,这儿有一个公用的属性可以进行读写操作:
| public interface AxMyControl { String UserText { set ; get ; } } |
12. 在MyControl.cs的【MyControl】class代码区中添加下列代码,以下代码是首先定义一个私有的字符串,用此字符串来保存从Web测试页面中传递来的数值定义一个公用属性,在接下来的Web测试页面中,将通过这个属性来传递数值,此属性是可读写:
| private String mStr_UserText ; public String UserText { get { return mStr_UserText ; } set { mStr_UserText = value ; //修改组件的数值 txtUserText.Text = value ; } } |
13. 保存上面的修改步骤,至此我们就利用Visual C#创建了一个名称为MyControl的class,这也就是用Visual C#封装的、酷似Active X组件的组件。
14. 单击快捷键【Ctrl+F5】,则Visual C#会自动完成编译,并在"C:/Class/ActiveXDotNet/bin/Debug"目录生成一个名称为"ActiveXDotNet.dll"文件,这就是产生的组件。
以下是经过上述步骤产生的MyControl.cs的全部代码:
| using System ; using System.Collections ; using System.ComponentModel ; using System.Drawing ; using System.Data ; using System.Windows.Forms ; namespace ActiveXDotNet { public interface AxMyControl { String UserText { set ; get ; } } /// <summary> /// MyControl 的摘要说明。 /// </summary> public class MyControl : System.Windows.Forms.UserControl , AxMyControl { /// <summary> /// 必需的设计器变量。 /// </summary> private System.ComponentModel.Container components = null ; private System.Windows.Forms.GroupBox groupBox1 ; private System.Windows.Forms.Label label1 ; private System.Windows.Forms.TextBox txtUserText ; private String mStr_UserText ; public String UserText { get { return mStr_UserText ; } set { mStr_UserText = value ; //修改组件的数值 txtUserText.Text = value ; } } public MyControl ( ) { // 该调用是 Windows.Forms 窗体设计器所必需的。 InitializeComponent ( ) ; // TODO: 在 InitializeComponent 调用后添加任何初始化 } /// <summary> /// 清理所有正在使用的资源。 /// </summary> protected override void Dispose ( bool disposing ) { if ( disposing ) { if ( components != null ) { components.Dispose ( ) ; } } base.Dispose ( disposing ) ; } #region 组件设计器生成的代码 /// <summary> /// 设计器支持所需的方法 - 不要使用代码编辑器 /// 修改此方法的内容。 /// </summary> private void InitializeComponent ( ) { this.groupBox1 = new System.Windows.Forms.GroupBox ( ) ; this.txtUserText = new System.Windows.Forms.TextBox ( ) ; this.label1 = new System.Windows.Forms.Label ( ) ; this.groupBox1.SuspendLayout ( ) ; this.SuspendLayout ( ) ; this.groupBox1.Controls.Add ( this.txtUserText ) ; this.groupBox1.Controls.Add ( this.label1 ) ; this.groupBox1.Location = new System.Drawing.Point ( 8 , 8 ) ; this.groupBox1.Name = "groupBox1" ; this.groupBox1.Size = new System.Drawing.Size ( 272 , 56 ) ; this.groupBox1.TabIndex = 0 ; this.groupBox1.TabStop = false ; this.groupBox1.Text = "Visual C#创建的Active X组件" ; this.txtUserText.Enabled = false ; this.txtUserText.Location = new System.Drawing.Point ( 84 , 20 ) ; this.txtUserText.Name = "txtUserText" ; this.txtUserText.Size = new System.Drawing.Size ( 180 , 21 ) ; this.txtUserText.TabIndex = 1 ; this.txtUserText.Text = "" ; this.label1.Location = new System.Drawing.Point ( 8 , 24 ) ; this.label1.Name = "label1" ; this.label1.Size = new System.Drawing.Size ( 66 , 16 ) ; this.label1.TabIndex = 0 ; this.label1.Text = "输入信息:" ; this.Controls.Add ( this.groupBox1 ) ; this.Name = "MyControl" ; this.Size = new System.Drawing.Size ( 288 , 72 ) ; this.groupBox1.ResumeLayout ( false ) ; this.ResumeLayout ( false ) ; } #endregion } } |
8.选择【项目】|【添加组件】后,弹出【添加新项】对话框,在此对话框中设定【模板】为"组件类",设定【名称】值为"MyControl.cs"后,单击【打开】按钮。则在项目文件中新增一个名称"MyControl.cs"的文件。具体如图02所示:
9. 把Visual Studio .Net的当前窗口切换到【MyControl.cs(设计)】窗口,并从【工具箱】中的【Windows窗体组件】选项卡中往设计窗体中按顺序拖入下列组件:
一个GroupBox组件,并向此组件中再拖入,
一个TextBox组件和一个Lable组件。
10. 把Visual Studio .Net的当前窗口切换到【MyControl.cs】代码编辑窗口,并用下列代码替换MyControl.cs中的InitializeComponent过程,下列代码是初始化上述加入的组件:
| private void InitializeComponent ( ) { this.groupBox1 = new System.Windows.Forms.GroupBox ( ) ; this.txtUserText = new System.Windows.Forms.TextBox ( ) ; this.label1 = new System.Windows.Forms.Label ( ) ; this.groupBox1.SuspendLayout ( ) ; this.SuspendLayout ( ) ; this.groupBox1.Controls.Add ( this.txtUserText ) ; this.groupBox1.Controls.Add ( this.label1 ) ; this.groupBox1.Location = new System.Drawing.Point ( 8 , 8 ) ; this.groupBox1.Name = "groupBox1" ; this.groupBox1.Size = new System.Drawing.Size ( 272 , 56 ) ; this.groupBox1.TabIndex = 0 ; this.groupBox1.TabStop = false ; this.groupBox1.Text = "Visual Studio .Net创建的Active X组件" ; this.txtUserText.Enabled = false ; this.txtUserText.Location = new System.Drawing.Point ( 84 , 20 ) ; this.txtUserText.Name = "txtUserText" ; this.txtUserText.Size = new System.Drawing.Size ( 180 , 21 ) ; this.txtUserText.TabIndex = 1 ; this.txtUserText.Text = "" ; this.label1.Location = new System.Drawing.Point ( 8 , 24 ) ; this.label1.Name = "label1" ; this.label1.Size = new System.Drawing.Size ( 66 , 16 ) ; this.label1.TabIndex = 0 ; this.label1.Text = "输入信息:" ; this.Controls.Add ( this.groupBox1 ) ; this.Name = "MyControl" ; this.Size = new System.Drawing.Size ( 288 , 72 ) ; this.groupBox1.ResumeLayout ( false ) ; this.ResumeLayout ( false ) ; } |
至此【ActiveXDotNet】项目创建的Active X组件的界面就基本完成了,具体如图03所示:
11. 在MyControl.cs中的【MyControl 的摘要说明】代码区中添加下列代码,以下代码是定义一个公用的接口,此接口是告诉COM/COM+,这儿有一个公用的属性可以进行读写操作:
| public interface AxMyControl { String UserText { set ; get ; } } |
12. 在MyControl.cs的【MyControl】class代码区中添加下列代码,以下代码是首先定义一个私有的字符串,用此字符串来保存从Web测试页面中传递来的数值定义一个公用属性,在接下来的Web测试页面中,将通过这个属性来传递数值,此属性是可读写:
| private String mStr_UserText ; public String UserText { get { return mStr_UserText ; } set { mStr_UserText = value ; //修改组件的数值 txtUserText.Text = value ; } } |
13. 保存上面的修改步骤,至此我们就利用Visual C#创建了一个名称为MyControl的class,这也就是用Visual C#封装的、酷似Active X组件的组件。
14. 单击快捷键【Ctrl+F5】,则Visual C#会自动完成编译,并在"C:/Class/ActiveXDotNet/bin/Debug"目录生成一个名称为"ActiveXDotNet.dll"文件,这就是产生的组件。
以下是经过上述步骤产生的MyControl.cs的全部代码:
| using System ; using System.Collections ; using System.ComponentModel ; using System.Drawing ; using System.Data ; using System.Windows.Forms ; namespace ActiveXDotNet { public interface AxMyControl { String UserText { set ; get ; } } /// <summary> /// MyControl 的摘要说明。 /// </summary> public class MyControl : System.Windows.Forms.UserControl , AxMyControl { /// <summary> /// 必需的设计器变量。 /// </summary> private System.ComponentModel.Container components = null ; private System.Windows.Forms.GroupBox groupBox1 ; private System.Windows.Forms.Label label1 ; private System.Windows.Forms.TextBox txtUserText ; private String mStr_UserText ; public String UserText { get { return mStr_UserText ; } set { mStr_UserText = value ; //修改组件的数值 txtUserText.Text = value ; } } public MyControl ( ) { // 该调用是 Windows.Forms 窗体设计器所必需的。 InitializeComponent ( ) ; // TODO: 在 InitializeComponent 调用后添加任何初始化 } /// <summary> /// 清理所有正在使用的资源。 /// </summary> protected override void Dispose ( bool disposing ) { if ( disposing ) { if ( components != null ) { components.Dispose ( ) ; } } base.Dispose ( disposing ) ; } #region 组件设计器生成的代码 /// <summary> /// 设计器支持所需的方法 - 不要使用代码编辑器 /// 修改此方法的内容。 /// </summary> private void InitializeComponent ( ) { this.groupBox1 = new System.Windows.Forms.GroupBox ( ) ; this.txtUserText = new System.Windows.Forms.TextBox ( ) ; this.label1 = new System.Windows.Forms.Label ( ) ; this.groupBox1.SuspendLayout ( ) ; this.SuspendLayout ( ) ; this.groupBox1.Controls.Add ( this.txtUserText ) ; this.groupBox1.Controls.Add ( this.label1 ) ; this.groupBox1.Location = new System.Drawing.Point ( 8 , 8 ) ; this.groupBox1.Name = "groupBox1" ; this.groupBox1.Size = new System.Drawing.Size ( 272 , 56 ) ; this.groupBox1.TabIndex = 0 ; this.groupBox1.TabStop = false ; this.groupBox1.Text = "Visual C#创建的Active X组件" ; this.txtUserText.Enabled = false ; this.txtUserText.Location = new System.Drawing.Point ( 84 , 20 ) ; this.txtUserText.Name = "txtUserText" ; this.txtUserText.Size = new System.Drawing.Size ( 180 , 21 ) ; this.txtUserText.TabIndex = 1 ; this.txtUserText.Text = "" ; this.label1.Location = new System.Drawing.Point ( 8 , 24 ) ; this.label1.Name = "label1" ; this.label1.Size = new System.Drawing.Size ( 66 , 16 ) ; this.label1.TabIndex = 0 ; this.label1.Text = "输入信息:" ; this.Controls.Add ( this.groupBox1 ) ; this.Name = "MyControl" ; this.Size = new System.Drawing.Size ( 288 , 72 ) ; this.groupBox1.ResumeLayout ( false ) ; this.ResumeLayout ( false ) ; } #endregion } } |
四.Visual C#中使用刚封装的Active X组件:
以下步骤就是通过Web页面的方式来测试上面创建组件:
1. 创建一个名称为test.htm文件,MyControl就是放在此Web页面中加以测试的,此文件的内容如下:
| <html> <body color = white> <hr> <font face = arial size = 1> <OBJECT id = "MyControl1" name = "MyControl1" classid = "ActiveXDotNet.dll#ActiveXDotNet.MyControl" width = 288 height = 72 > </OBJECT> </font> <form name = "frm" id = "frm" > <input type = "text" name = "txt" value = "请输入数据:" ><input type = button value = "确定" onClick = "doScript ( ) ; "> </form> <hr> </body> <script language = "javascript"> function doScript ( ) { MyControl1.UserText = frm.txt.value ; } </script> </html> |
2. 把产生的"test.htm"和"ActiveXDotNet.dll"文件全部都拷贝到机器的虚拟目录下,一般来说虚拟目录是"C:/Inetpub/wwwroot"。
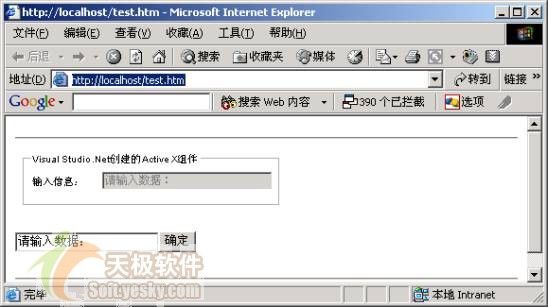
3. 打开浏览器,在浏览器的地址栏中输入"http://localhost/test.htm"后,单击"转到"按钮,则会得到如下的运行界面:
至此Visual C#产生的Active X组件和测试这个组件的全部工作就完成了。
五.总结:
虽然本文介绍的方法的确能够方便的解决Web页面中很多棘手的问题,本文介绍用Visual C#产生的组件的在实用性上的确非常的类似Active X组件,但从本质上说,本文产生的组件并不是真正意义上的Active X组件。如要使用本文所创建的组件,必须在Web页面所在机器上安装.Net框架,客户端访问Web页面时,也不会真正下载本文介绍的组件,从而也不需要设定计算机的安全级别就能够访问使用此组件的Web页面。可见本文产生的组件其实质也是一个托管的代码文件。它只是巧妙的用定义接口的方式来告诉COM/COM+对象,本组件有一个可供访问的公用属性,通过对此属性的读写操作,完成类似Active X组件的工作。进入讨论组讨论。


