iOS 逆向之ARM汇编
最近对iOS逆向工程很感兴趣。
目前iOS逆向的书籍有: 《Hacking and Securing IOS Applications》, 《iOS Hacker's Handbook》中文书籍有《iOS应用逆向工程:分析与实战》
中文博客有: 程序员念茜的《iOS安全攻防系列》 英文博客有:Prateek Gianchandani的iOS 安全系列博客
这些资料中都涉及到有ARM汇编,但都只是很泛地用到,并没有对iOS上的ARM汇编进行比较详细的讲解。因此,经过一系列的学习对iOS下的ARM有了一定的理解。在此打算用几篇博文记录下来,备忘之,分享之, 限于本人水平有限,如有错误请不吝赐教。
我们先讲一些ARM汇编的基础知识。(我们以ARMV7为例,最新iPhone5s上的64位暂不讨论)
基础知识部分:
首先你介绍一下寄存器:
R0-R3:用于函数参数及返回值的传递
R4-R6, R8, R10-R11:没有特殊规定,就是普通的通用寄存器
R7:栈帧指针(Frame Pointer).指向前一个保存的栈帧(stack frame)和链接寄存器(link register, lr)在栈上的地址。
R9:操作系统保留
R12:又叫IP(intra-procedure scratch ), 要说清楚要费点笔墨,参见http://blog.csdn.net/gooogleman/article/details/3529413
R13:又叫SP(stack pointer),是栈顶指针
R14:又叫LR(link register),存放函数的返回地址。
R15:又叫PC(program counter),指向当前指令地址。
CPSR:当前程序状态寄存器(Current Program State Register),在用户状态下存放像condition标志中断禁用等标志的。
在其它系统状态中断状等状态下与CPSR对应还有一个SPSR,在这里不详述了。
另外还有VFP(向量浮点运算)相关的寄存器,在此我们略过,感兴趣的可以从后面的参考链接去查看。
基本的指令:
add 加指令
sub 减指令
str 把寄存器内容存到栈上去
ldr 把栈上内容载入一寄存器中
.w是一个可选的指令宽度说明符。它不会影响为此指令的行为,它只是确保生成 32 位指令。Infocenter.arm.com的详细信息
bl 执行函数调用,并把使lr指向调用者(caller)的下一条指令,即函数的返回地址
blx 同上,但是在ARM和thumb指令集间切换。
bx bx lr返回调用函数(caller)。
接下来是函数调用的一些规则。
一. 在iOS中你需要使用BLX,BX这些指令来调用函数,不能使用MOV指令(具体意义下面会说)
二. ARM使用一个栈来来维护函数的调用及返回。ARM中栈是向下生长(由高地址向低地址生长的)。
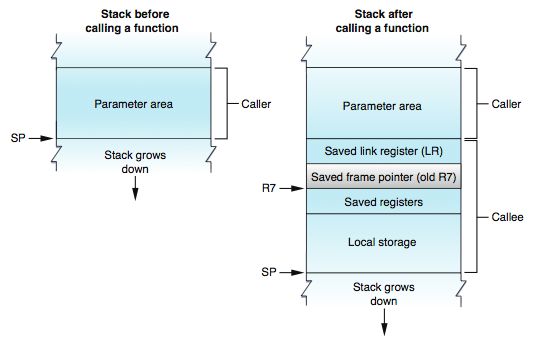
函数调用前后栈的布局如图一(引用的苹果iOS ABI Reference):
图(一)
SP(stack pointer)指向栈顶(栈低在高地址)。栈帧(stack frame)其实就是通过R7及存在栈上的旧R7来标识的栈上的一块一块的存储空间。栈帧包括:
- 参数区域(parameter area),存放调用函数传递的参数。对于32位ARM,前4个参数通过r0-r3传递,多余的参数通过栈来传递,就是存放在这个区域的。
- 链接区域(linkage area),存放调用者(caller)的下一条指令。
- 栈帧指针存放区域(saved frame pointer),存放调用函数的栈帧的底部,标识着调用者(caller)栈帧的结束及被调用函数(callee)的栈帧开始。
- 局部变量存储区(local storage area)。用于存被调函数(callee)的局部变量及在被调用函数(callee)结束后反回调用函数(call)之前需要恢复的寄存器内容。
- 寄存器存储区(saved registers area)。Apple的文档中是这样说的。但我认为这个区域和local storage area相邻且干的事也是存放需要恢复的寄存器内容,因此我觉得要不就把这个区域在概念上不区分出来,要不就把存放需要恢复的寄存器这项功能从local storage area中分出来。 当然这些都只是概念上的,其实实质上是没有区别的。
接下来看看在调用子函数开始及结尾时所要做的事情。(官方叫序言和结语, prologs and epilogs)
调用开始:
- LR入栈
- R7入栈
- R7 = SP地址。在经过前面两条入栈指令后,SP指向的地址向下移动,再把SP赋值给R7, 标志着caller栈帧的结束及callee的栈帧的开始
- 将callee会修改且在返回caller时需要恢复的寄存器入栈。
- 分配栈空间给子程序使用。由于栈是从高地址向低地址生长,所以通常使用sub sp, #size来分配。
调用结尾:
- 释放栈空间。add sp, #size指令。
- 恢复所保存的寄存器。
- 恢复R7
- 将之前存放的LR从栈上弹出到PC,这样函数就返回了。
-----------------------------------------------------------华丽的分割线-------------------------------------------------------------
实战部分(一):
用XCode创建一个Test工程,新建一个.c文件,添加如下函数:
|
1
2
3
4
5
6
7
|
#include <stdio.h>
int
func(
int
a,
int
b,
int
c,
int
d,
int
e,
int
f)
{
int
g = a + b + c + d + e + f;
return
g;
}
|
查看汇编语言:
在XCode左上角选中targe 在真机下编译,这样产生的才是ARM汇编,不然在模拟器下生成的是x86汇编。
点击 XCode => Product => Perform Action => Assemble file.c 生成汇编代码。
代码很多,有很多"."开头的".section", ".loc"等,这些是汇编器需要的,我们不用去管。把这些"."开头的及注释增掉后,代码如下:
|
1
2
3
4
5
6
7
8
9
10
11
12
13
14
|
_func:
.cfi_startproc
Lfunc_begin0:
add r0, r1
Ltmp0:
ldr.w r12, [sp]
add r0, r2
ldr.w r9, [sp, #4]
add r0, r3
add r0, r12
add r0, r9
bx lr
Ltmp2:
Lfunc_end0:
|
_func:表示接下来是func函数的内容。Lfunc_begin0及Lfunc_end0标识函数定义的起止。函数起止一般是"xxx_beginx:"及"xxx_endx:"
下面来一行行代码解释:
- add r0, r1 将参数a和参数b相加再把结果赋值给r0
- ldr.w r12, [sp] 把最的一个参数f从栈上装载到r12寄存器
- add r0, r2 把参数c累加到r0上
- ldr.w r9, [sp, #4] 把参数e从栈上装载到r9寄存器
- add r0, r3 累加d累加到r0
- add r0, r12 累加参数f到r0
- add r0, r9 累加参数e到r0
至此,全部的a到f 共6个值全部累加到r0寄存器上。前面说了r0是存放返回值的。
bx lr: 返回调用函数。
-----------------------------------------------------------华丽的分割线-------------------------------------------------------------
实战部分(二):
为了让大家看清楚函数调用时栈上的变化,下面以一个有三个函数,两个调用的C代码的汇编代码为例讲解一下。
上代码:
|
1
2
3
4
5
6
7
8
9
10
11
12
13
14
15
16
17
18
19
|
#include <stdio.h>
__attribute__((
noinline
))
int
addFunction(
int
a,
int
b,
int
c,
int
d,
int
e,
int
f) {
int
r = a + b + c + d + e + f;
return
r;
}
__attribute__((
noinline
))
int
fooFunction(
int
a,
int
b,
int
c,
int
d,
int
f) {
int
r = addFunction(a, b, c, d, f, 66);
return
r;
}
int
initFunction()
{
int
r = fooFunction(11, 22, 33, 44, 55);
return
r;
}
|
由于我们是要看函数调用及栈的变化的,所以在这里我们加上__attribute__((noinline))防止编译器把函数内联(如果你不懂内联,请google之)。
在XCode左上角选中targe 在真机下编译,这样产生的才是ARM汇编,不然在模拟器下生成的是x86汇编。
点击 XCode => Product => Perform Action => Assemble file.c 生成汇编代码, 如下:
为了能更符合我们人的思考方式,我们从调用函数讲起。
initFunction:
|
1
2
3
4
5
6
7
8
9
10
11
12
13
14
15
16
17
18
19
|
_initFunction:
.cfi_startproc
Lfunc_begin2:
@ BB#0:
push {r7, lr}
mov r7, sp
sub sp, #4
movs r0, #55
movs r1, #22
Ltmp6:
str r0, [sp]
movs r0, #11
movs r2, #33
movs r3, #44
bl _fooFunction
add sp, #4
pop {r7, pc}
Ltmp7:
Lfunc_end2:
|
还是一行行的解释:
- push {r7, lr} 就是前面基础知识部分说的函数调用的序言(prologs)部分的1, 2两条,将lr, r7 存到栈上去
- mov r7, sp 序言(prolog)之3。
- sub sp, #4 在栈上分配一个4字节空间用来存放局部变量, 即参数。前面我们说过,r0-r3可以传递4个参数,但超过的只能通过栈来传递。
- movs r0, #55 把立即数55存入r0
- movs r1, #22 把22存入r1
- str r0, [sp] 把r0的值存入栈指针sp指向的内存。即栈上存了参数55
- 接下来三条指令 moves r0, #11 moves r2, #33 moves r3, #44 把相应的立即数存入指定的寄存器。 到目前为止,r0-r3分别存放了11, 22, 33,44共4个立即数参数,栈上存放了55这一个参数。
- bl _fooFunction 调用fooFunction, 调用后跳转到fooFunction中的情况下面再分析。
- add sp, #44 栈指针向上移动4个字节,回收第3个指令 sub sp, #4分配的空间。
- pop {r7, pc} 恢复第一条指令push {r7, lr}到栈中的值, 把之前的lr值赋给pc。注意:在进入initFunction的时候lr是调用initFunction的函数的下一条指令,所以现在把当时的lr中的值赋给pc程序计数器,这样执行lr指向的这一条指令,函数就反回了。
指令1,2, 3是函数序言(prologs),指令9, 10是结语(epilogs)。这基本上是一个套路,看多了自然就知道了,都不用停下来一条条分析。
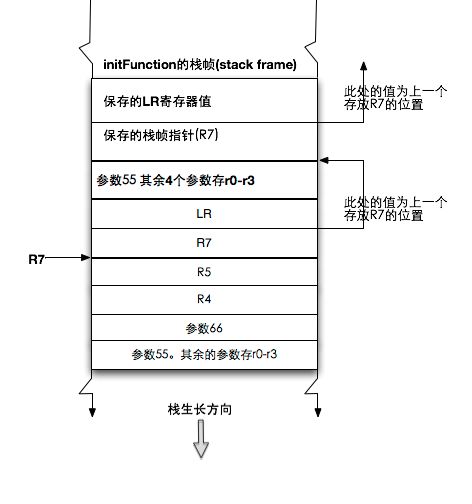
为了方便和栈的变化联系起来,我们画出指令8, bl __fooFunction时的栈布局如图二:
图(二)
在上面的initFunction调用第8条指令bl _fooFunction之后,进入fooFunction, 其它汇编如下:
fooFunction:
|
1
2
3
4
5
6
7
8
9
10
11
12
13
|
_fooFunction:
.cfi_startproc
Lfunc_begin1:
push {r4, r5, r7, lr}
add r7, sp, #8
sub sp, #8
ldr r4, [r7, #8]
movs r5, #66
strd r4, r5, [sp]
bl _addFunction
add sp, #8
pop {r4, r5, r7, pc}
Lfunc_end1:
|
一样,我们一行行来看:
- push {r4, r5, r7, lr} 你应该发现了,这次和initFunction不同,我们除把r4, r5也push到栈上去了,这是因为我们下面会用到r4, r5,所以我们先把r4,r5存到栈上,这样我们在退出fooFunction返回initFunction的时候好恢复r4, r5的值。push到栈上的顺序是lr, r7, r4, r5。
- add r7, sp, #8 在initFunction中我们没有push r4, r5所以sp指向的位置正好是新的r7的值,但是这里我们把r4, r5也push到栈上了,现在sp指向栈上的r4的位置,而栈是向下生长的,所以我们把sp + #8个字节就是存放旧r7的位置。
- sub sp, #8 在栈上分配8个字节。
- ldr r4, [r7, #8] r7加8个字节,在栈上的位置正好是在initFunction中我们存放的参数55的位置。因此,这里是把55赋值给r4
- movs r5, #66 立即数赋值,不解释了
- strd r4, r5, [sp] 把r4, r5中的值存到栈上。我们在initFunction中已经把11,22,33,44这4个参数存放到了r0-r3,现在55,66我们存放在栈上
- bl _addFunction 参数已经准备好了,因此现在调用addFunction。
- add sp, #8 回收栈空间
- pop {r4, r5, r7, pc} 这最后两条指令和 initFunction类似,只是多了个恢复r4,r5。不过也是一个指令就完事。
在指令bl _addFunction 调用addFunction后,栈的布局如图(三):
图(三)
上面的fooFunction第7条指令bl _addFunction之后,进入addFunction。汇编代码如下:
addFunction:
|
1
2
3
4
5
6
7
8
9
10
11
12
|
_addFunction:
.cfi_startproc
Lfunc_begin0:
add r0, r1
ldr.w r12, [sp]
add r0, r2
ldr.w r9, [sp, #4]
add r0, r3
add r0, r12
add r0, r9
bx lr
Lfunc_end0:
|
逐行解释之:
- add r0, r1 r0 += r1
- ldr.w r12, [sp] 把sp指向的内容load到r12寄存器。从图(三)我们知道sp指向66,因此r12存的66
- add r0, r2 r0 += r2
- ldr.w r9, [sp, #4] 从图(三) sp加4个字节存的是55, r9存的55
- add r0, r3 r0 += r3
- add r0, r12 r0 += r12
- add r0, r9 r0 += r9。 至此r0-r4存的11,22,33,44,及栈上存的55,66想加存到了r0上。
- bx lr 返回。
大家应该有注意到因为addFunction没有调用其它的函数,序言和结语与initFunction和fooFunction不一样。因为我们不调用其它函数,就不会有bl, blx这样的指令,所以不会个性lr, 所以我们没有push lr。
在这里我们用了r9, r12为什么不需要保存与恢复,我还没大搞明白,大侠们若能赐教,将不胜感激。
iOS ABI Reference上是这样说的:
关于R9:
In iOS 2.x, register R9 is reserved for operating system use and must not be used by application code. Failure to do so can result in application crashes or aberrant behavior. However, in iOS 3.0 and later, register R9 can be used as a volatile scratch register. These guidelines differ from the general usage provided for by the AAPCS document.
关于R12
R12 is the intra-procedure scratch register, also known as IP. It is used by the dynamic linker and is volatile across all function calls. However, it can be used as a scratch register between function calls.
这是C函数的汇编。下篇讲obj-c函数的汇编,包括objc block。
参考:http://infocenter.arm.com/help/topic/com.arm.doc.qrc0001l/QRC0001_UAL.pdf
http://simplemachines.it/doc/arm_inst.pdf
iOS ABI Reference


