GeekOS project1 -- 载入可执行文件
这次的项目内容是载入可执行文件。
首先按照project0的做法,先修改Makefile,然后make depend, make,再修改.bochsrc,最后运行,竟然发现运行失败,连TODO都没有看到,如图:

错误提示说,文件系统没有挂载。看看本次项目的过程就知道原因了。首先项目分两块编译,一个是内核,用来等待你填写解析ELF格式部分的代码,而另一部分,就是在src/project1/src/user目录下的a.c文件,该文件编译后会得到一个目标文件a.exe(ELF格式),并且放入diskc.img磁盘映像中,而编译后可以看到磁盘映像是被正确生成了的:
$ ls
Makefile  bochs.out  common  depend.mak  diskc.img  fd.img  geekos  libc  tools  user
那么就说明,该磁盘影响没有被Bochs模拟器找到,所以我们需要修改Bochs的配置文件。
man bochsrc可以查看.bochsrc的格式,经过一番研究,得到如下.bochsrc:
vgaromimage: file=/usr/share/vgabios/vgabios.bin
romimage: file=/usr/share/bochs/BIOS-bochs-latest
megs: 8
boot: a
#gdbstub: enabled=1, port=1234, text_base=0, data_base=0, bss_base=0
floppya: 1_44=fd.img, status=inserted
ata0: enabled=1, ioaddr1=0x1f0, ioaddr2=0x3f0, irq=14
ata0-master: type=disk, path=diskc.img, mode=flat, cylinders=40, heads=8, spt=64, translation=none


log: ./bochs.out
keyboard_serial_delay: 200
vga_update_interval: 300000
mouse: enabled=0
private_colormap: enabled=0
i440fxsupport: enabled=0
简单地说就是把diskc.img硬盘镜像挂在ata0上。
接下来要分析ELF格式了,ELF格式文档下载地址为:
http://www.x86.org/ftp/manuals/tools/elf.pdf
你可以一边看文档的描述,一边用一个16进制编辑器打开生成的a.exe分析比较。UNIX环境下有很多好的16进制编辑器,比如hexdump后less,也可以用ghex2,当然传统的文本编辑器也自带16进制编辑器功能,比如emacs的hexl-mode,方法是用emacs打开文件,M-x hexl-mode <RET>:
也可以使用Vim的xxd,用vim打开文件后输入:%!xxd:

首先观察,我们这次分析ELF格式的目标,是获取什么信息。我们要填写的函数为:
int Parse_ELF_Executable(char *exeFileData, ulong_t exeFileLength,
    struct Exe_Format *exeFormat)
其中exeFileData是一个指向a.exe内容开头的指针,exeFileLength则是该文件的长度,而exeFormat则为指向struct Exe_Format结构体的指针,该结构体在/include/geekos/elf.h中有定义:
/*
 * A struct concisely representing all information needed to
 * load an execute an executable.
 */
struct Exe_Format {
    struct Exe_Segment segmentList[EXE_MAX_SEGMENTS]; /* Definition of segments */
    int numSegments;		/* Number of segments contained in the executable */
    ulong_t entryAddr;	 	/* Code entry point address */
};
其中entry为代码入口的指针地址,numSegments为Segment的数量,上面有一个struct Exe_Segment类型的数组,保存了每个Segment的信息,数组的长度为3,因为我们只需要文件中的代码Segment和数据Segment。struct Exe_Segment的定义为:
/*
 * A segment of an executable.
 * It specifies a region of the executable file to be loaded
 * into memory.
 */
struct Exe_Segment {
    ulong_t offsetInFile;	 /* Offset of segment in executable file */
    ulong_t lengthInFile;	 /* Length of segment data in executable file */
    ulong_t startAddress;	 /* Start address of segment in user memory */
    ulong_t sizeInMemory;	 /* Size of segment in memory */
    int protFlags;		 /* VM protection flags; combination of VM_READ,VM_WRITE,VM_EXEC */
};
offsetInFile为该Segment在可执行文件中的偏移(相对于文件开头的距离),lengthInFIle为该Segment的长度,startAddress为该Segment在内存中的地址,sizeInMemory为该Segment在内存中的长度。protFlag先不管。总之,我们需要分析文件获取并填写的信息就是上面这些。
再看看ELF的文档,关于ELF Header文件头部分是这么描述的:
#define EI_NIDENT 16
typedef struct {
	unsigned char  e_ident[EI_NIDENT];
	Elf32_Half     e_type;
	Elf32_Half     e_machine;
	Elf32_Word     e_version;
	Elf32_Addr     e_entry;
	Elf32_Off      e_phoff;
	Elf32_Off      e_shoff;
	Elf32_Word     e_flags;
	Elf32_Half     e_ehsize;
	Elf32_Half     e_phentsize;
	Elf32_Half     e_phnum;
	Elf32_Half     e_shentsize;
	Elf32_Half     e_shnum;
	Elf32_Half     e_shstrndx;
 } Elf32_Ehdr;
关于Elf32_Half等类型的定义是这样的:
Figure 1-2. 32-Bit Data Types
Elf32_Addr 44 Unsigned program address
Elf32_Half 22 Unsigned medium integer
Elf32_Off 44 Unsigned file offset
Elf32_Sword 44 Signed large integer
Elf32_Word 44 Unsigned large integer
unsigned char 11 Unsigned small integer
其中e_phnum代表"e_phnum This member holds the number of entries in the program header table."也就是Segment的数目,Program Header就是Segment,从该结构体上看,e_phnum的偏移为:
1*16+2*2+4*1+4*1+4*2+4*1+2*2 = 0x2C为了测试能否读出Segment的数量,我们首先在Parse_ELF_Executable函数下填写一些测试代码。
int Parse_ELF_Executable(char *exeFileData, ulong_t exeFileLength,
    struct Exe_Format *exeFormat)
{
	char *exeFileData_p = exeFileData;
	exeFileData_p += 0x2C;
	Print("Segment number = %d\n", *((unsigned short*)exeFileData_p));
	while(1);
	return 0;
}
运行结果如图:

为了验证这个数字是否正确,我们还可以用readelf读取ELF文件头:
$ readelf a.exe -h
ELF Header:
  Magic:   7f 45 4c 46 01 01 01 00 00 00 00 00 00 00 00 00
  Class:                             ELF32
  Data:                              2's complement, little endian
  Version:                           1 (current)
  OS/ABI:                            UNIX - System V
  ABI Version:                       0
  Type:                              EXEC (Executable file)
  Machine:                           Intel 80386
  Version:                           0x1
  Entry point address:               0x1000
  Start of program headers:          52 (bytes into file)
  Start of section headers:          4404 (bytes into file)
  Flags:                             0x0
  Size of this header:               52 (bytes)
  Size of program headers:           32 (bytes)
  Number of program headers:         3
  Size of section headers:           40 (bytes)
  Number of section headers:         7
  Section header string table index: 4
可以看到readelf显示的结果和我们的程序读取到的结果一样,证明已经正确读出了Segment的数量。
有了上面这一步,接下来的工作就简单了,只需要从偏移为e_phoff的地址读取e_phnum个大小为e_phentsize的数据,并从中提取出offsetInFile,lengthInFile, startAddress,sizeInMemory,当然最后还别忘了填写numSegments、 entryAddr。
最终Parse_ELF_Executable函数为:
int Parse_ELF_Executable(char *exeFileData, ulong_t exeFileLength,
    struct Exe_Format *exeFormat)
{
	char *p; /* pointer of current position */
	int i; /* for iterate segments */
	/* segment number */
	p = exeFileData + 0x2C;
	exeFormat->numSegments = *((unsigned short*)p);
	/* code entry point addr*/
	p = exeFileData + 0x18;
	exeFormat->entryAddr = *((unsigned int*)p);
	/* program header offset */
	unsigned int phoff;
	p = exeFileData + 0x1C;
	phoff = *((unsigned int*)p);
	p = exeFileData + phoff;
	/* fill segments */
	for (i = 0; i < exeFormat->numSegments; i++) {
		unsigned int p_type, p_offset, p_vaddr, p_paddr, p_filesz, p_memsz, p_flags, p_align;
		p_type = *((unsigned int*)p);p += 4;
		p_offset = *((unsigned int*)p);p += 4;
		p_vaddr = *((unsigned int*)p);p += 4;
		p_paddr = *((unsigned int*)p);p += 4;
		p_filesz = *((unsigned int*)p);p += 4;
		p_memsz = *((unsigned int*)p);p += 4;
		p_flags = *((unsigned int*)p);p += 4;
		p_align = *((unsigned int*)p);p += 4;
		exeFormat->segmentList[i].offsetInFile = p_offset; /* Offset of segment in executable file */
		exeFormat->segmentList[i].lengthInFile = p_filesz; /* Length of segment data in executable file */
		exeFormat->segmentList[i].startAddress = p_vaddr; /* Start address of segment in user memory */
		exeFormat->segmentList[i].sizeInMemory = p_memsz; /* Size of segment in memory */
		exeFormat->segmentList[i].protFlags = 0; /* VM protection flags; combination of VM_READ,VM_WRITE,VM_EXEC */
	}
	return 0;
}
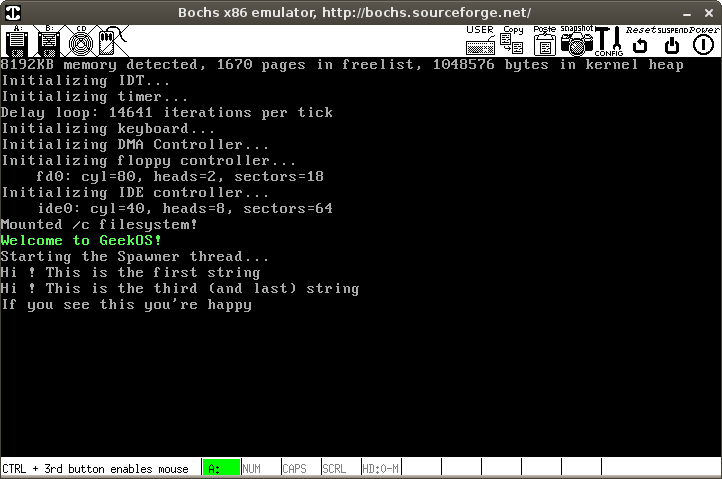
运行结果为:
现在结果虽然显示出来了,但是发现a.c源文件中的第二个字符串没有打印出来,a.c的源文件如下:
void ELF_Print(char* msg);
 15
 16
 17 char  s1[40] = "Hi ! This is the first string\n";
 18
 19 int main(int argc, char** argv)
 20 {
 21    char  s2[40] = "Hi ! This is the second string\n";
 22
 23    ELF_Print(s1);
 24    ELF_Print(s2);
 25
 26    return 0;
 27 }
好像是只有在main函数外定义的字符串才能被打印显示,如果有谁知道原因的话请告诉我,谢谢。
到这里project1就基本完成了。

