第一章 编写第一个angular应用程序
一个简单的reddit应用程序
在这一章,我们编写一个能够提交一篇文章(包含URL以及标题)并且可以对帖子进行投票的应用程序。
你可以认为这个应用程序是Reddit.com或者Product Hunt的原型。
在这个简单的应用程序中,我们将会学习到angular2包含的一个必须的部分:
- 编写一个自定义组件
- 从表单接受用户输入
- 在视图上渲染一个对象列表
- 拦截用户点击事件并响应它们
学完这章,你可以掌握怎么去搭建一个基本的angular 2应用程序。
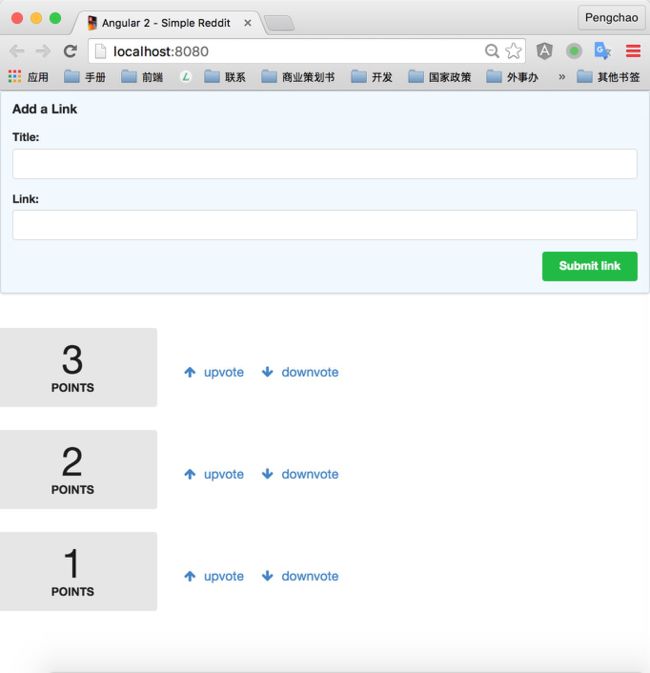
下面是我们App的截图:
首先,用户可以提交一个新的链接,之后可以对该文章进行添加投票或者减少投票。每一个链接都有一个分数并且我们可以找到我们感兴趣的链接进行投票。
在这个项目乃至整本书中,我们使用Typescript。Typescript是ES6的超集,它增加了类型信息。在本章,我们不会深入讨论Typescript,但是如果你了解ES5或者ES6,你不会感觉到任何问题。我们将会在下一章深入学习Typescript,所以,如果你有任务语法方面的问题,不用担心。
开始
Typescript
为了使用 Typescript,你需要安装node.js,这里有很多种方式去安装node.js,所以请参阅Node.js的网站的详细信息。
:fa-info-circle:难道我必须使用Typescript吗?在angular2中,你可以使用Typescript,但是不是必须的。但是ng2使用Typescript进行编写,所以每一个人都必须了解。在这本书中,我们使用Typescript,因为他跟ng2结合起来更加简单。意思就是说,这个不是必须的。
一旦你安装了node.js,接下来就是安装Typescript。保证你安装的版本在1.7或者以上。为了安装他,请运行下面的命令:
$ npm install -g typescriptnpm是作为node.js的一部分安装的,如果在你系统中没有npm,请确认你安装node.js的时候已经安装了npm。
Windows用户:在本书中,我们使用linux/mac系统里面的命令行工具。在windows中,我们强烈建议你安装Cygwin作为运行命令行的工具。
示例应用程序
既然环境已经准备好了,让我们开始编写第一个应用程序。打开本书的代码并且解压缩它,在你的终端里面,使用cd进入first_app/angular2-reddit-base目录。
$ cd first_app/angular2-reddit-base如果你熟悉cd,它代表的是change directory(改变目录),如果你使用的是mac,可以试一下下面的步骤:
- 打开/Applications/Utilities/Terminal.app
- 键入cd
- 在finder中,拖动first_app/angular2-reddit-base目录到你的终端;
- 键入Enter键,你就可以进入指定的目录了。
让我们使用下面的命令安装所有的依赖:
$ npm install在根目录下面,创建一个新的index.html并且增加下面的基本结构:
<!doctype html>
<html>
  <head>
<title>Angular 2 - Simple Reddit</title> </head>
<body>
  </body>
</html>
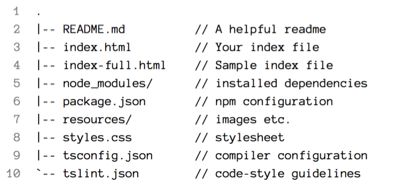
你的angular2-reddit-base目录看起来像下面这样:
ng2本身就是一个js文件。所以你需要添加一个script标签到index.html,但是ng2有一些自己的依赖。
Ng2的依赖
为了使用ng2,你可以不需要理解这些依赖,但是你必须包含它们,如果你对它们没有兴趣,你可以跳过这一部分,但是记住,必须包含它们。
为了运行ng2,需要依赖下面的四个库:
- es6-shim
- zone.js
- reflect-metadata
- SystemJS
为了包含它们,将下面的内容包含在你的head标签里面。
<script src="node_modules/es6-shim/es6-shim.js"> </script>
<script src="node_modules/zone.js/dist/zone.js"> </script>
<script src="node_modules/reflect-metadata/Reflect.js"> </script>
<script src="node_modules/systemjs/dist/system.src.js"> </script>
:fa-info-circle:注意,我们是直接从node_modules目录加载这些.js文件的。当你运行npm install的时候,该目录就会被创建。如果没有该目录,确保你运行npm install是在angular2-reddit-base目录下面运行的。
ES6 Shim
ES6 shim 提供垫片使传统的JavaScript引擎表现得尽可能的ECMAScript 6。不是新版本的Safari、Chrome等严格要求,但它是旧版本的IE的要求.
Zones
在ng2的开发过程中,Angular团队为我们带来了一个新的库 – zone.js。zone.js的设计灵感来源于Dart语言,它描述JavaScript执行过程的上下文,可以在异步任务之间进行持久性传递,它类似于Java中的TLS(thread-local storage: 线程本地存储)技术,zone.js则是将TLS引入到JavaScript语言中的实现框架。
在本文开篇提到zone.js为JavaScript提供了执行上下文,可以在异步任务之间进行持久性传递。该是zone.js上场的时候了。zone.js采用猴子补丁(Monkey-patched)的暴力方式将JavaScript中的异步任务都包裹了一层,使得这些异步任务都将运行在zone的上下文中。每一个异步的任务在zone.js都被当做为一个Task,并在Task的基础上zone.js为开发者提供了执行前后的钩子函数(hook)。这些钩子函数包括:
- onZoneCreated:产生一个新的zone对象时的钩子函数。
- zone.fork也会产生一个继承至基类zone的新zone,形成一个独立的zone上下文;
- beforeTask:zone Task执行前的钩子函数;
- afterTask:zone Task执行完成后的钩子函数;
- onError:zone运行Task时候的异常钩子函数;
并且zone.js对JavaScript中的大多数异步事件都做了包裹封装,它们包括:
- zone.alert;
- zone.prompt;
- zone.requestAnimationFrame、
- zone.webkitRequestAnimationFrame、
- zone.mozRequestAnimationFrame;
- zone.addEventListener;
- zone.addEventListener、zone.removeEventListener;
- zone.setTimeout、zone.clearTimeout、zone.setImmediate;
- zone.setInterval、zone.clearInterval
以及对promise、geolocation定位信息、websocket等也进行了包裹封装,你可以在这里找到它们https://github.com/angular/zone.js/tree/master/lib/patch。
Reflect Metadata
angular2是使用Typescript写的,而Typescript又提供了annotation,使得可以向代码中添加元数据。严格意义上说,反射元数据包是一个让我们可以使用注解的polyfill。
SystemJS
systemjs 是一个最小系统加载工具,用来创建插件来处理可替代的场景加载过程,包括加载 CSS 场景和图片,主要运行在浏览器和 NodeJS 中。它是 ES6 浏览器加载程序的的扩展,将应用在本地浏览器中。通常创建的插件名称是模块本身,要是没有特意指定用途,则默认插件名是模块的扩展名称。
加载所有的依赖
现在我们加载了所有的依赖,我们的index.html看起来应该是下面这样。
<!doctype html>
<html>
  <head>
<title>Angular 2 - Simple Reddit</title>
<!-- Libraries -->
<script src="node_modules/es6-shim/es6-shim.js"></script>
<script src="node_modules/systemjs/dist/system.src.js"></script> <script src="node_modules/rxjs/bundles/Rx.js"></script>
<script src="node_modules/angular2/bundles/angular2.dev.js"></script>
  </head>
  <body>
  </body>
</html>
添加CSS
我们也需要添加一写CSS样式去美化我们的应用,让我们包含两个CSS样式。
<!doctype html>
<html>
  <head>
    <title>Angular 2 - Simple Reddit</title>
    <!-- Libraries -->
    <script src="node_modules/es6-shim/es6-shim.js"></script>
    <script src="node_modules/zone.js/dist/zone.js"></script>
    <script src="node_modules/reflect-metadata/Reflect.js"></script>
    <script src="node_modules/systemjs/dist/system.src.js"></script>
    <!-- Stylesheet -->
    <link rel="stylesheet" type="text/css" href="resources/vendor/semantic.min.css">
    <link rel="stylesheet" type="text/css" href="styles.css">
  </head>
  <body>
  </body>
</html>
我们的第一个Typescript文件
让我们创建我们的第一个Typescript文件,创建一个app.ts的文件在相同的目录。并且添加下面的代码:
// your code goes here
import { bootstrap } from "@angular/platform-browser-dynamic";
import { Component } from "@angular/core";
@Component({
  selector: 'hello-world',
  template: `
  <div>
    Hello world
  </div>
`
})
class HelloWorld { }
bootstrap(HelloWorld);
这个代码第一眼看起来可能有点怪异,但是别担心。我们将会一步一步解释它。
Typescript是一个具有类型的Javascript,为了在浏览器中使用angular,我们需要告诉Typescript编译器我们发现了哪些类型文件。那个reference标明了一些类型文件的路径。
import语句定义了我们代码中需要使用的模块,这里我们import了两个模块:Component和bootstrap.
我们从”@angular/core”导入Component,那个”@angular/core”告诉我们应用程序去哪里寻找模块。
我们从”@angular/platform-browser-dynamic”导入bootstrap。
注意,import的格式为 import {thing} from wherever,在{thing}部分,我们叫着解构。解构是es6提供的功能,我们在下一章会讲到。import特别像java中的import或者Ruby中的require.我们从特定模块中拉取这些依赖使得它在本文件中可用。
构造一个组件
angular2最伟大的创意背后就是组件。
在我们的angular应用程序中,我们写的HTML标签使得我们的程序编程交互式的程序。但是浏览器中的标签是很少的,比如:select,form,video等,如果我们希望教给浏览器一个新的标签?比如我们希望一个标签去显示天气或者我们希望一个标签代表去创建一个登陆面板?
这个注意的背后就是组件,它教给浏览器一个新的功能,对应一个新的标签。
:fa-info-circle:如果你有ng1的背景,那么组件就是directive的新版本。
让我们创建第一个组件。当我们创建完这个组件,我们可以在html中像下面这样使用它:
<hello-world></hello-world>那么我们怎么去定义一个组件呢?一个简单的组件包含两部分:
1.一个Component注解
2. 定义组件的类
让我们花点时间研究下。
如果你之前使用javascript编写过程序,那么下面的代码看起来有点怪异:
@Component({

        //...
})
这是什么?如果你有java的背景,那么你对这个东西比较熟悉,它是一个注解。
注解就是将元数据加入你的代码中。当我们使用@Component在一个HelloWorld类上面时,我们正在装饰那个HelloWorld类使其成为一个组件。
我们想通过在Html中用标签代表我们的组件怎么弄?为了实现这个功能,我们用hello-world配置@Component中的selector。
@Component({
  selector: 'hello-world'
})
如果你熟悉css/xpath/jquery选择器,那么你会知道有很多种方式去配置一个选择器。
angular增加了它自己独特的混合选择器,我们将在后面的章节中讲到。现在,我们只需要知道,这个就是定义了一个新的标签。
selector属性标志了这个组件在html中怎么使用。如果你有任何的标签在html中,它将会被编译为该组件类。
增加一个模板
我们通过template选项增加一个模板
@Component({
    selector:'hello-world',
    template:`
    <div>
        Hello world
    </div>
`
})
注意我们在两个反引号之间定义了我们的模板字符串。这个是ES6的新特性,它允许我们使用多行字符串。使用反引号编写多行字符串使得我们将模板直接放入代码中变得很方便。
启动我们的应用程序
文件中的最后一行 bootstrap(HelloWorld);将会启动我们的应用程序,其中参数预示了我们的应用程序的主组件是HelloWorld。一旦应用程序启动,HelloWorld组件将在index.html中的的地方被渲染。
加载应用程序
为了运行我们的应用程序,我们需要做下面两件事
- 需要告诉Html文档去导入我们的app文件
- 需要使用组件
添加下面的代码到body标签里面。
<script src="resources/systemjs.config.js"></script>
    <script> System.import('app.js') .then(null, console.error.bind(console)); </script>
我们增加了两个script标签去配置我们的system.js加载器。
- 我们加载resources/systemjs.config.js,这个文件告诉System.js怎么去加载库或者文件
- 导入我们的app.js
下面这一行很重要:
System.import('app.js')它告诉system.js,我们希望加载app.js作为我们的程序入口。这里有一个问题,我们根本没有app.js(我们只有app.ts,它是一个Typescript文件)。
运行应用程序
编译Typescript代码到.js
显然,我们的应用程序是使用Typescript编写的,我们使用一个叫着app.ts的文件。接下来我们需要将他编译为Javascript文件,让浏览器可以理解它。
为了完成这个任务,我们需要运行Typescript的编译器工具,它叫着tsc:
tsc如果没有得到什么错误信息,它表示编译已经成功了。
ls app.js
# app.js should exist
如果你运行没有带参数的tsc,它会像下面这样做:
- 寻找当期文件夹(或者是用-p选项标志的文件夹),从中查找tsconfig.json
- 在这个目录里面编译所有的.ts文件
但是如果你标明了文件名称,tsc不会去读取tsconfig.json,为了更加正确的表一,你也可以标志更多的选项。
Typescript需要类型定义文件去知道更加确认的类型。在这本书中,我们会讨论更多的类型或者类型文件,但是现在,我们只需要知道,文件@angular/platform-browser-dynamic被加载时因为我们在tsconfig.json中标明了它。
使用npm
如果你的tsc命令像上面一样工作了,你也可以使用npm命令去编译这些文件,在例子中的package.json文件里,我们定义了一个快捷键。
试着去运行:
npm run tsc // compiles TypeScript code once and exits
npm run tsc:w // watches for changes and compiles on change
宿主应用程序
最后一步就是测试我们的应用程序,我们需要去运行一个本地服务器作为我们应用程序的宿主。
如果你刚才运行了npm install,你已经安装了一个本地服务器,为了去运行它,只需要执行下面的命令:
npm run serve然后打开你的浏览器输入http://localhost:8080
如果所有的事情都是正确的,那么你会看到下面的内容:
每一次变化都编译
在我们编写代码的过程中有很多的变化。代替每次编号都重新运行一次tsc命令,我们可以添加–watch选项来提供效率。它告诉tsc,编译ts文件并且检查它们的变化,当变化的时候,自动编译这些文件。
tsc --watch实际上,我们通常会创建一个简单的命令,它们能做下面两件事情:
- 重新编译变化的文件
- 重新加载
npm run go现在,你只管编写你的代码,在浏览器中会自动反映那些变化。
增加数据到组件中
现在,我们的组件渲染了一个静态的字符,意味着我们的组件并不有趣。
我们介绍我们组件的一个name属性,这是一种针对不同输入重复利用我们的组件的方式,像下面这样修改:
// your code goes here
import {Component} from "@angular/core"
import {bootstrap} from "@angular/platform-browser-dynamic"

@Component({
    selector:'hello-world',
    template:`
    <div>
        Hello {name}
    </div>
    `
})
class HelloWorld {
    name:string;
    constructor() {
        this.name = "pengchao.wang";
    }
}

bootstrap(HelloWorld);
这里有三个变化
1. name属性
在HelloWorld类中增加了一个name属性,注意跟ES5语法的区别,当我们输入name:string的时候,我们希望name属性代表的是一个字符串。类型是被Typescript带来的。
2. 一个构造器(constructor)
在HelloWorld类中,我们定义了一个constructor构造器,当我们创建一个新的类实例的时候这个函数被调用,在我们的构造器中,我们通过this.name使用我们的name属性。
当我们写:
constructor(){ this.name="pengchao.wang" }它的意思是当这个类创建新实例的时候,将name属性设置成pengchao.wang
3. 模板变量
在模板中,我们增加了一个新的语法:{{name}},这个被称为模板标签(template-tags)。在模板标签里面的任何内容都会作为一个表达式展开,因为模板绑定到组件,所以name会被展开成this.name,在这里例子中是pengchao.wang.
试试
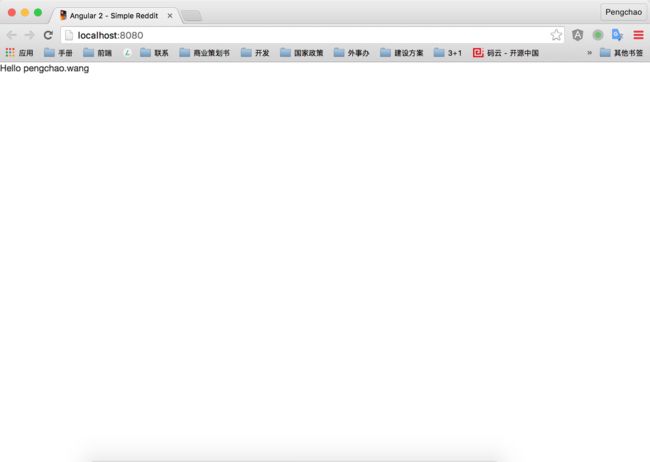
当做了这些变化之后,重新加载页面,会得到Hello pengchao.wang.
数组
现在,我们可以实现Hello单个人,但是当多个人的时候怎么做?
如果你使用过ng1,你可以使用ng-repeat指令,在ng2中,那个指令叫ngFor,这个语法有点不一样。
让我们像下面一样修改我们的app.ts.
// your code goes here
import {Component} from "@angular/core"
import {bootstrap} from "@angular/platform-browser-dynamic"

@Component({
    selector:'hello-world',
    template:`
    <ul>
        <li *ngFor="let name of names">Hello {{ name }}</li>
    </ul>
    `
})
class HelloWorld {
    names:string[];
    constructor() {
        this.names = ['Ari', 'Carlos', 'Felipe', 'Nate'];
    }
}

bootstrap(HelloWorld);
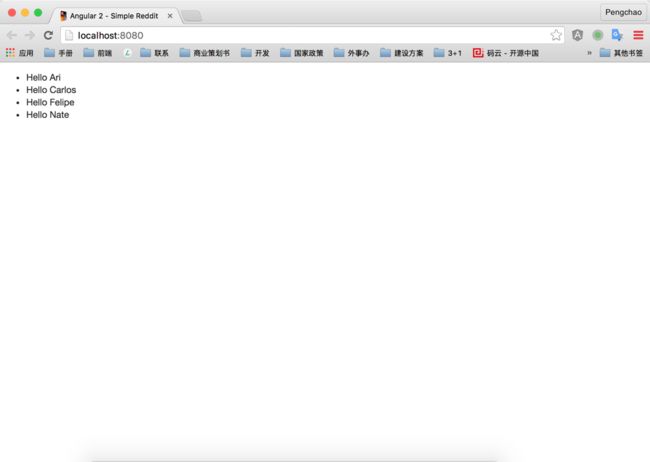
第一个需要指出的是string[],它表示names属性是一个string的数组,也可以使用Array来表示。
*ngFor表示我们这个属性是一个NgFor的指令,你可以认为NgFor就是for循环的包装,我们会为每一个item创建一个Dom元素。
‘let name of names’表示迭代names,每次将其值设置到name中。
扩展我们的应用程序
既然知道怎么去创建基本的组件,让我们回过头来看我们的Reddit.在我们开始编写代码之前,仔细看看我们的应用程序,把它分解成逻辑组件。
在这个应用程序中,我们创建两个组件:
- 整过应用程序,它包含用户提交新文章的表单。
- 每篇新文章
应用程序组件
让我们开始编写应用程序顶层组件,这是一个组件,包含1.存储文章列表,2.包含新文章的提交表单。我们会将我们的HelloWorld组件整体替换成RedditApp组件,如下:
// your code goes here
import {Component} from "@angular/core"
import {bootstrap} from "@angular/platform-browser-dynamic"

@Component({
    selector:'reddit',
    template:`
    <form class="ui large form segment">
        <h3 class="ui header">Add a Link</h3>
        <div class="field">
            <label for="title">Title:</label> <input name="title">
        </div>
        <div class="field">
            <label for="link">Link:</label>
        <input name="link">
      </div>
</form>
    `
})
/** * RedditApp */
class RedditApp {
    constructor() {

    }
}

bootstrap(RedditApp);
我们定义了一个选择器为reddit的RedditApp组件,在index.html中使用替换。再次加载的时候如下所示:
增加交互
现在我们有了表单,但是不能提交数据。让我们增加一个提交按钮来增加一些交互。
// your code goes here
import  {Component} from "@angular/core"
import {bootstrap} from "@angular/platform-browser-dynamic"

@Component({
    selector: 'reddit',
    template: `
    <form class="ui large form segment">
        <h3 class="ui header">Add a Link</h3>
        <div class="field">
            <label for="title">Title:</label>
            <input name="title" #newtitle>
        </div>
        <div class="field">
            <label for="link">Link:</label>
        <input name="link" #newlink>
      </div>
      <button (click)="addArticle(newtitle, newlink)"
              class="ui positive right floated button">
        Submit link
      </button>
</form>
    `
})
/** * RedditApp */
class RedditApp {
    constructor() {

    }
    addArticle(title: HTMLInputElement, link: HTMLInputElement): void {
        console.log(`Adding article title: ${title.value} and link: ${link.value}`);
    }
}

bootstrap(RedditApp);
这里有四个不同
- 创建了一个用来提交的按钮
- 创建了一个addArticle的函数,当提交按钮被点击的时候被调用
- 增加了(click)属性给按钮,它的意思是当按钮被点击时调用addArticle
- 给input增加了newtitle、newlink属性
让我们以相反的顺序来覆盖每一个步骤。
绑定input到值
注意第一个input标签:
<input name="title" #newtitle>这时一个新的语法。它的意思是告诉angular去绑定这个input标签到变量newtitle。这种#newtitle的语法叫解决(resolve),他的意思是这个newtitle变量代表了这个input的view.newtitle是一个对象,代表了一个input的Dom元素(严格上来说是HtmlInputElement)。因为newtitle是一个变量,所以我们要通过newtitle.value获取他的值。#newlink也是一样的。
绑定行为到事件
在我们的按钮中,我们增加了(click)属性。它定义了当按钮被点击的时候什么应该发生。当click事件发生,我们就调用addArticle.这个函数的两个参数:newtitle和newlink从哪里来呢?
1.addArticle是来自于我们的组件RedditApp的函数
2. newtitle来自于resolve(#newtitle)
3. newlink来自于resolve(#newlink)
所有的放在一起就是:
<button (click)="addArticle(newtitle, newlink)" class="ui positive right floated button">
Submit link
</button>
定义一个行为逻辑
在我们的组件类中定义了一个行为逻辑:
    addArticle(title: HTMLInputElement, link: HTMLInputElement): void {
        console.log(`Adding article title: ${title.value} and link: ${link.value}`);
    }
试试
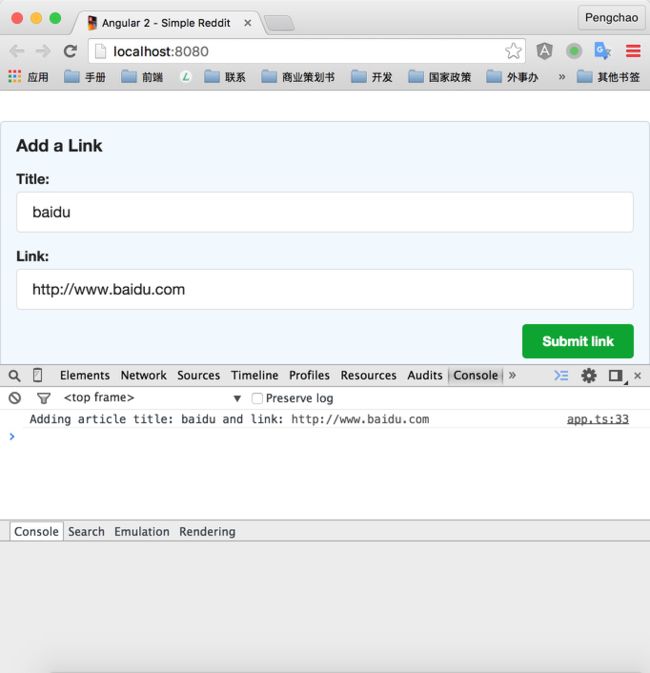
现在,点击提交按钮,你可以看到控制台有输出:
增加一个Article组件
现在我们有了一个表单提交新的文章,但是没有任何地方显示该文章。如果每一篇文章提交后都可以在页面上显示出来就好了。
让我们创建一个新的组件去展示已经提交的文章。
我们可以在相同的文件中插入下面的组件代码:
@Component({ selector: 'reddit-article', host: { class: 'row' }, template: ` <div class="four wide column center aligned votes"> <div class="ui statistic"> <div class="value"> {{ votes }} </div> <div class="label"> Points </div> </div> </div> <div class="twelve wide column"> <a class="ui large header" href="{{ link }}"> {{ title }} </a> <ul class="ui big horizontal list voters"> <li class="item"> <a href (click)="voteUp()"> <i class="arrow up icon"></i> upvote </a> </li> <li class="item"> <a href (click)="voteDown()"> <i class="arrow down icon"></i> downvote </a> </li> </ul> </div> ` }) class ArticleComponent { votes: number; title: string; link: string; constructor() { this.title = 'Angular 2'; this.link = 'http://angular.io'; this.votes = 10; } voteUp() { this.votes } voteDown() { this.votes } }注意,这个组件有三部分:
- 描述组件属性的注解@Component
- 描述组件视图的template选项
- 创建一个组件类(ArticleComponent)用来存储我们的组件逻辑
让我们深入讨论着三部分:
创建一个reddit-article组件
@Component({
selector: 'reddit-article',
host: {
class: 'row'
},首先,我们使用@Component定义了一个新的组件,selector选项说明该组件的标签为reddit-article。所以应该像下面这样使用这个组件:
<reddit-article> </reddit-article>当页面渲染的时候这个标签会保留下来。
我们希望每一个文字就是一行,也就是css的row。
在angular2中,一个组件的host表示这个组件关联的元素。你会注意到,在这个组件中,我们传递了选项:host:{class:row},这个就是告诉angular那个host元素(reddit-article)我们希望设置他的class属性为row。
创建一个reddit-article模板
第二,我们使用template选项定义了一个模板。
template: ` <div class="four wide column center aligned votes"> <div class="ui statistic"> <div class="value"> {{ votes }} </div> <div class="label"> Points </div> </div> </div> <div class="twelve wide column"> <a class="ui large header" href="{{ link }}"> {{ title }} </a> <ul class="ui big horizontal list voters"> <li class="item"> <a href (click)="voteUp()"> <i class="arrow up icon"></i> upvote </a> </li> <li class="item"> <a href (click)="voteDown()"> <i class="arrow down icon"></i> downvote </a> </li> </ul> </div> `这里有许多标签,具体就不解释了。
创建一个reddit-article组件定义类ArticleComponent
class ArticleComponent {
    votes: number;
    title: string;
    link: string;
    constructor() {
        this.title = 'Angular 2';
        this.link = 'http://angular.io';
        this.votes = 10;
    }
    voteUp() {
        this.votes++;
    }
    voteDown() {
        this.votes--;
    }
}
使用组件
为了使用该组件去显示数据,我们必须在某个地方放置我们的reddit-article标签。
在这里,我们希望RedditApp组件渲染这个新组件,因此,我们在form表单后面添加这个组件,修改如下:
 <form class="ui large form segment">
        <h3 class="ui header">Add a Link</h3>
        <div class="field">
            <label for="title">Title:</label>
            <input name="title" #newtitle>
        </div>
        <div class="field">
            <label for="link">Link:</label>
            <input name="link" #newlink>
        </div>
        <button (click)="addArticle(newtitle, newlink)" class="ui positive right floated button">
             Submit link
        </button>
    </form>
    <div class="ui grid posts">
        <reddit-article>
        </reddit-article>
    </div>
如果我们打开浏览器,你会发现标签根本没有编译,是什么问题呢?
当遇到这种问题的时候,我们需要打开浏览器,然后开启开发者工具,并且审查我们的元素,可以看到我们的标签已经在我们的页面中了,但是它没有被编译进标记里面,这时为什么呢?
这个是因为RedditApp不知道reddit-article的存在。为了告诉RedditApp,我们需要增加一个directives属性到我们的组件中:
@Component({
    selector: 'reddit',
    directives:[ArticleComponent],
    template: `
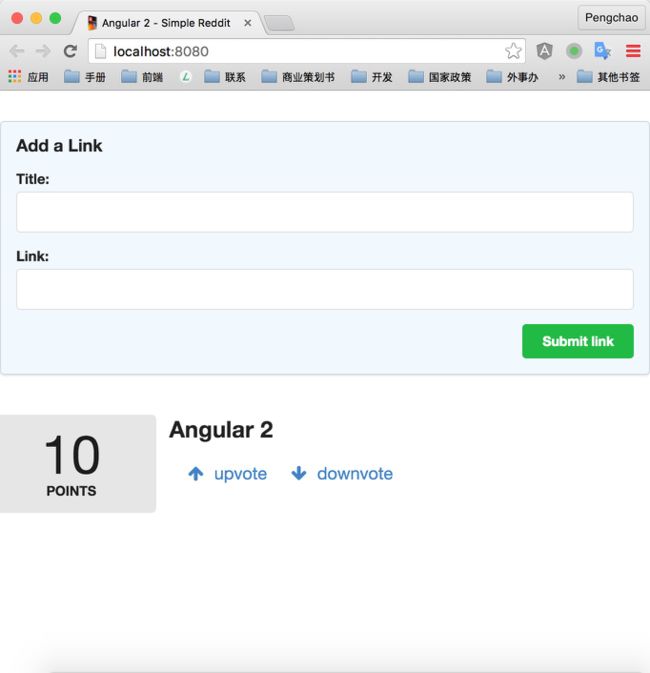
好,我们现在打开我们的浏览器,就可以看到下面这个界面了:
如果你试着去点解voteup votedown链接,你会发现,页面会异常的重载。
这时因为javascript会默认冒泡click事件给他的所有父组件。因为click事件会冒泡,所以父组件会去打开一个空连接页面,也就是重新加载当前页面。为了解决这个问题,我们可以使用返回false的形式去阻止事件的冒泡。像下面这样:
voteUp() :boolean{
        this.votes++;
        return false;
    }
    voteDown() :boolean{
        this.votes--;
        return false;
    }
再次点击,你会发现票数增加或者减少了,但是页面没有刷新。
渲染多行
现在,在页面中只有一个文章,不能渲染更多的文章,除非我们复制粘贴更多的标签。即使我们这样做了,但是所有的文章内容都一样也不是很有趣。
创建一个Article类
写angular的一个好的方式就是将数据与组件分离,所以我们创建一个Article类去代表一篇文章,增加下面的代码到ArticleComponent组件的前面:
class Article {
    title: string;
    link: string;
    votes: number;
    constructor(title: string, link: string, votes?: number) {
        this.title = title;
        this.link = link;
        this.votes = votes || 0;
    }
}
这里,我们创建了一个代表文章的类Article。既然这是一个POJO类,不是一个组件。在MVC中,这个就是一个Model。
每篇文章都有一个title/link和票数综合votes。当创建一个新文章时,我们需要title和link,votes默认为0.
现在,让我们使用Article类修改ArticleComponent代码,使用存储Article的实例去代替存储每一个属性。
class ArticleComponent {
    article:Article;
    constructor() {
        this.article = new Article('Angular 2', 'http://angular.io', 10);
    }
    voteUp(): boolean {
        this.article.votes++;
        return false;
    }
    voteDown(): boolean {
        this.article.votes--;
        return false;
    }
}
我们也需要去修改模板里面的变量,将{{votes}}修改为{{article.votes}},其他类似,如下:
template: ` <div class="four wide column center aligned votes"> <div class="ui statistic"> <div class="value"> {{ article.votes }} </div> <div class="label"> Points </div> </div> </div> <div class="twelve wide column"> <a class="ui large header" href="{{ article.link }}"> {{ title }} </a> <ul class="ui big horizontal list voters"> <li class="item"> <a href (click)="voteUp()"> <i class="arrow up icon"></i> upvote </a> </li> <li class="item"> <a href (click)="voteDown()"> <i class="arrow down icon"></i> downvote </a> </li> </ul> </div> ` 重新加载,应该页面没有任何变化。
这是一个比较好的方式,但是我们在组件中直接修改了Article类的内部属性,对于Article来说,ArticleComponent知道的太多了。应该将增加与减少直接放在Article类里面去。
class Article {
    title: string;
    link: string;
    votes: number;
    constructor(title: string, link: string, votes?: number) {
        this.title = title;
        this.link = link;
        this.votes = votes || 0;
    }

    voteUp():void{
        this.votes++;
    }
    voteDown():void{
        this.votes--;
    }
}
然后,在组件中直接调用函数:
class ArticleComponent {
    article:Article;
    constructor() {
        this.article = new Article('Angular 2', 'http://angular.io', 10);
    }
    voteUp(): boolean {
        this.article.voteUp();
        return false;
    }
    voteDown(): boolean {
        this.article.voteDown();
        return false;
    }
}
刷新浏览器,你会发现没有任何变化,但是我们的代码更加清晰了。
存储多个文章
让我们在RedditApp中存储一个文字列表,修改如下:
class RedditApp {
    articles: Article[];
    constructor() {
        this.articles = [
            new Article('Angular 2', 'http://angular.io', 3),
            new Article('Fullstack', 'http://fullstack.io', 2),
            new Article('Angular Homepage', 'http://angular.io', 1),
        ];
    }
    addArticle(title: HTMLInputElement, link: HTMLInputElement): void {
        console.log(`Adding article title: ${title.value} and link: ${link.value}`);
    }
}
使用input配置ArticleComponent
现在我们已经有了一个文章的列表,但是我们怎么传递给我们的ArticleComponent组件呢?
现在我们介绍Component的一个新属性,叫inputs。我们可以使用该属性,去配置一个组件,让其父元素传递东西给它。
很明显,我们定义了ArticleComponent组件类如下:
class ArticleComponent {
    article: Article;
    constructor() {
        this.article = new Article('Angular 2', 'http://angular.io', 10);
    }
    voteUp(): boolean {
        this.article.voteUp();
        return false;
    }
    voteDown(): boolean {
        this.article.voteDown();
        return false;
    }
}
问题是article是硬编码在里面的。这使得该组件只有封装性,没有重用性。
我们怎么样去配置我们希望显示的文章呢?假如说我们有两个文章,article1和article2,如果我们可以通过像给ArticleComponent组件传递参数一样传递给他就好了。像下面这样:
<reddit-article [article]="article1"></reddit-article> <reddit-article [article]="article2"></reddit-article>angular允许我们去这样做,通过设置Component的inputs选项。
@Component({
selector: 'reddit-article', inputs: ['article'],
// ... same
})
class ArticleComponent {
article: Article; //...
现在,如果我们有一个叫着myArticle的文章,我们可以像下面这样将该文章传递给ArticleComponent组件:
<reddit-article [article]="myArticle"></reddit-article>注意这里的语法:我们在括号中的名字[article]与组件中的属性是一样的。
然后,这时很重要的,在组件中的this.article实例将会被设置为myArticle,你可以认为myArticle是被作为参数传递给组件的。
记住,inputs是一个数组,所以你可以传递很多输入参数进去,下面使我们完整的reddit-article组件的代码:
@Component({ selector: 'reddit-article', inputs:['article'], host: { class: 'row' }, template: ` <div class="four wide column center aligned votes"> <div class="ui statistic"> <div class="value"> {{ article.votes }} </div> <div class="label"> Points </div> </div> </div> <div class="twelve wide column"> <a class="ui large header" href="{{ article.link }}"> {{ title }} </a> <ul class="ui big horizontal list voters"> <li class="item"> <a href (click)="voteUp()"> <i class="arrow up icon"></i> upvote </a> </li> <li class="item"> <a href (click)="voteDown()"> <i class="arrow down icon"></i> downvote </a> </li> </ul> </div> ` }) class ArticleComponent { article: Article; constructor() { this.article = new Article('Angular 2', 'http://angular.io', 10); } voteUp(): boolean { this.article.voteUp(); return false; } voteDown(): boolean { this.article.voteDown(); return false; } }渲染文章列表
在前面,我们在RedditApp里面存储了一个文章列表,现在,让我们渲染所有的文章。为了做这件事,我们使用*ngFor去迭代渲染,代码如下:
    <div class="ui grid posts">
        <reddit-article *ngFor="let article of articles" [article]="article">
        </reddit-article>
    </div>
为了标志article作为输入,使用[inputName]=”inputValue”表达式。
如果你刷新你浏览器,你可以看到所有的文章都被渲染了。
增加一个新的文章
现在,我们需要改变addArticle的行为,不是打印出内容,而是增加一篇文章,改变如下:
addArticle(title: HTMLInputElement, link: HTMLInputElement): void {
        console.log(`Adding article title: ${title.value} and link: ${link.value}`);
        this.articles.push(new Article(title.value, link.value, 0));
        title.value = '';
        link.value = '';
    }
当点击提交按钮的时候,会增加一篇文章,而且你会看到。
最后修正
显示文章的域
作为一个很好的修正,我们给link添加一个提示,于是用户点击链接的时候回跳转到的URL的域,添加domain方法到Article类中。
    domain(): string {
        try {
            const link: string = this.link.split('//')[1];
            return link.split('/')[0];
        } catch (err) {
            return null;
        }
    }
并且将其添加到ArticleComponent的template中。
<!-- right here --> <div class="meta">({{ article.domain() }})</div> <ul class="ui big horizontal list voters"> <li class="item">现在,我们刷新浏览器,可以看到每个Url的domain。
基于票数重排序
如果你点击voteup votedown,可以看到,列表并没有什么变化,如果我们希望看到最高排名一直是在上面。
我们存储文章列表,但是列表并没有排序,解决这个问题的一个简单办法就是在RedditApp中添加一个排序函数,返回排序后的文章列表。
    sortedArticles(): Article[] {
        return this.articles.sort((a: Article, b: Article) => b.votes - a.votes); }
现在,ngFor迭代的内容就变成了sortedArticles()。如下:
<div class="ui grid posts">
        <reddit-article *ngFor="let article of sortedArticles()" [article]="article">
        </reddit-article>
    </div>
所有的代码
// your code goes here
import {Component} from "@angular/core"
import {bootstrap} from "@angular/platform-browser-dynamic"

class Article {
    title: string;
    link: string;
    votes: number;
    constructor(title: string, link: string, votes?: number) {
        this.title = title;
        this.link = link;
        this.votes = votes || 0;
    }

    voteUp(): void {
        this.votes++;
    }
    voteDown(): void {
        this.votes--;
    }
    domain(): string {
        try {
            const link: string = this.link.split('//')[1];
            return link.split('/')[0];
        } catch (err) {
            return null;
        }
    }
}

@Component({
    selector: 'reddit-article',
    inputs: ['article'],
    host: {
        class: 'row'
    },
    template: `
    <div class="four wide column center aligned votes">
        <div class="ui statistic">
            <div class="value"> {{ article.votes }}
            </div>
            <div class="label">
                Points
            </div>
        </div>
    </div>
    <div class="twelve wide column">
        <a class="ui large header" href="{{ article.link }}"> {{ title }}
        </a>
        <!-- right here -->
        <div class="meta">({{ article.domain() }})</div>
        <ul class="ui big horizontal list voters">
            <li class="item">
                <a href (click)="voteUp()">
                    <i class="arrow up icon"></i> upvote
                </a>
            </li>
            <li class="item">
                <a href (click)="voteDown()">
                    <i class="arrow down icon"></i>
                        downvote
                </a>
            </li>
        </ul>
    </div>
` })
class ArticleComponent {
    article: Article;
    constructor() {
        this.article = new Article('Angular 2', 'http://angular.io', 10);
    }
    voteUp(): boolean {
        this.article.voteUp();
        return false;
    }
    voteDown(): boolean {
        this.article.voteDown();
        return false;
    }
}

@Component({
    selector: 'reddit',
    directives: [ArticleComponent],
    template: `
    <form class="ui large form segment">
        <h3 class="ui header">Add a Link</h3>
        <div class="field">
            <label for="title">Title:</label>
            <input name="title" #newtitle>
        </div>
        <div class="field">
            <label for="link">Link:</label>
            <input name="link" #newlink>
        </div>
        <button (click)="addArticle(newtitle, newlink)"
              class="ui positive right floated button">
             Submit link
        </button>
    </form>
    <div class="ui grid posts">
        <reddit-article *ngFor="let article of sortedArticles()" [article]="article">
        </reddit-article>
    </div>
    `
})
/** * RedditApp */
class RedditApp {
    articles: Article[];
    constructor() {
        this.articles = [
            new Article('Angular 2', 'http://angular.io', 3),
            new Article('Fullstack', 'http://fullstack.io', 2),
            new Article('Angular Homepage', 'http://angular.io', 1),
        ];
    }
    addArticle(title: HTMLInputElement, link: HTMLInputElement): void {
        console.log(`Adding article title: ${title.value} and link: ${link.value}`);
        this.articles.push(new Article(title.value, link.value, 0));
        title.value = '';
        link.value = '';
    }

    sortedArticles(): Article[] {
        return this.articles.sort((a: Article, b: Article) => b.votes - a.votes);
    }
}

bootstrap(RedditApp);
总结
我们创建了第一个程序,它不是太糟糕,不是吗?这里有更多的内容需要去学习,比如:理解数据流、AJax请求、内建组件、路由、操作DOM等。
但是现在,回顾我们前面做的,编写一个angular应用程序,只需要做下面的几步:
- 将应用程序分解为组件
- 创建视图
- 定义模型
- 显示模型
- 增加交互
