001-Zabbix-网络设备监控(cisco)
做zabbix监控测试已经进行一段时间了,越测试越发现zabbix的强大,今日开始增加网络设备监控的测试,测试结果与cacti对比后,有很大提升的准备弃掉前者。
因为网络设备没有办法安装代理客户端,监控网络使用SNMP协议
1.网络设备开启SNMP
C2950-24-Server#conf t
Enter configuration commands, one per line.  End with CNTL/Z.
C2950-24-Server(config)#snmp-server community public ?
  <1-99>       Std IP accesslist allowing access with this community string
  <1300-1999>  Expanded IP accesslist allowing access with this community string
  WORD         Access-list name
  ro           Read-only access with this community string
  rw           Read-write access with this community string
  view         Restrict this community to a named MIB view
  <cr>
C2960-24-Server(config)#snmp-server community public ro
2.在Zabbix监控机器测试SNMP是否开启访问,测试命令:snmpwalk
[root@localhost home]# snmpwalk -v 2c -c public 192.168.3.34 SNMPv2-MIB::sysDescr.0
SNMPv2-MIB::sysDescr.0 = STRING: Cisco IOS Software, C2950 Software (C2950-LANBASEK9-M), Version 12.2(55)SE5, RELEASE SOFTWARE (fc1)
Technical Support: http://www.cisco.com/techsupport
Copyright (c) 1986-2012 by Cisco Systems, Inc.
Compiled Thu 09-Feb-12 19:11 by prod_rel_team
snmpwalk -v 2c -c public 192.168.3.34 SNMPv2-MIB::sysDescr.0
-v 指定使用的SNMP版本
-c SNMP团体名称:public 也可以自定义名称
IP 开启SNMP的设备IP地址
SNMPv2-MIB::sysDescr.0 相应的SNMP参数。(如果对SNMP详细键值不了解,直接输入到IP,然后直接按enter键就会显示这个设备所支持的SNMP键值)
3.根据SNMP值,指定需监控项目,先添加流量监控
 [root@localhost home]# snmpwalk -v 2c -c public 192.168.6.34 ifinOctets
IF-MIB::ifInOctets.1 = Counter32: 4027323170
IF-MIB::ifInOctets.10 = Counter32: 2473582926
IF-MIB::ifInOctets.10001 = Counter32: 3193563790
IF-MIB::ifInOctets.10002 = Counter32: 0
IF-MIB::ifInOctets.10003 = Counter32: 246560353
IF-MIB::ifInOctets.10004 = Counter32: 3476635468
IF-MIB::ifInOctets.10005 = Counter32: 2989553401
IF-MIB::ifInOctets.10006 = Counter32: 3704449236
IF-MIB::ifInOctets.10007 = Counter32: 3969503501
IF-MIB::ifInOctets.10008 = Counter32: 1725650995
IF-MIB::ifInOctets.10009 = Counter32: 52641771
到zabbix web上操作,流程:增加监控设备-定义监控项目-生成流量图
依次选择:Configuration-Hosts-Create host
打开Createhost界面
Host name,Visible name 主机名称,你定义可以快速识别设备的名称就好。
Groups:选择此设备属于那一个管理组.例:switch
监控设备的四种方式:Agent SNMP JMX IPMI 本次使用SNMP
SNMP interface 此处填写:被监控设备的IP地址与端口号 例:192.168.6.34 UDP:161Description(设备描述),可以简单写一些设备的基本信息与设备位置等
点击:Add 创建设备完成
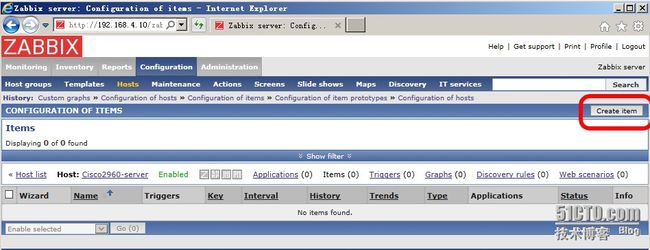
创建主机完成,现在准备开始添加监控项目,添加监控界面如下:
选择我们刚刚增加的监控设备,然后选择Items,打开界面发下:
选择:CreateItem 开始创建一个监控项目
一般流量分为IN与OUT,所以在创建监控项目时,要创建2个,一个是流入的流量,一个是流出的流量
它们二个的SNMP值如下:
IF-MIB::ifOutOctets.10005
IF-MIB::ifInOctets.10005
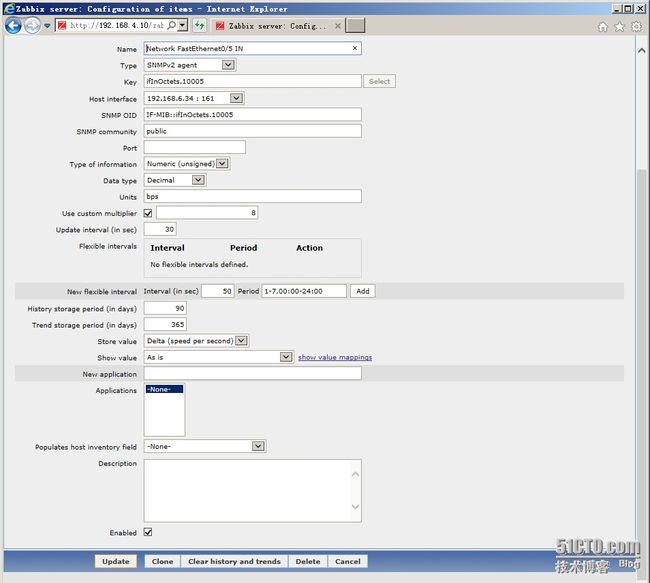
填写详细参数说明
name #Item 名字
Type #监控item的方式共计17种,在这里我们选择SNMP v2 agend方式
key #SNMP的值,网络流入key:ifInOctets
Host interface #当我们选择SNMP V2 agend方式时,它会自动找到监控主机地址
SNMP OID #需填写完整的SNMP值,填写:IF-MIB::ifInOctets.10005
SNMP communtiy # SNMP团体名称,会自动填写 public
units #网络流量单位:bps zabbix默认流量统计为bytes 转换成为bps.在此引出下一个选项填写*8
Use custom multiplier # 勾选打对号,然后填写乘8倍
Stoe value #选择:Delta (speed per second) 差量比较
其它的参数,请查看官方文档。
监控项目创建完毕,现在开始创建流量图
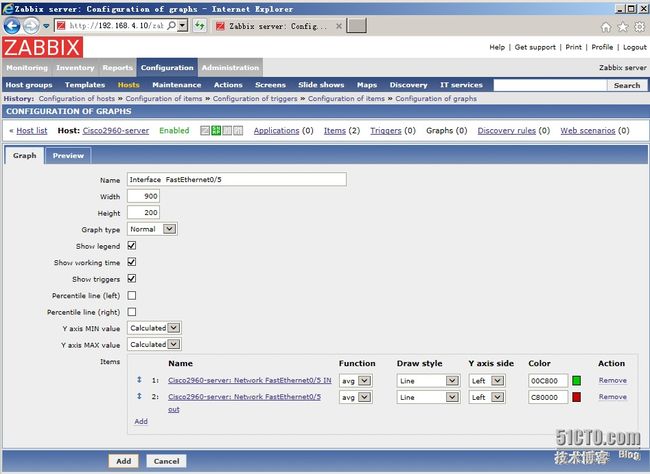
选择:Create graphs,进入创建界面如下图
Name 填写监控设备端口的名称,然后选择添加Items,找到我们刚刚创建的那个监控项目,全部选择。然后点击 Add。流量图创建完毕。
在流量图中已经能看到了网络流量的。


