Android Fragment应用及原理
什么是Fragment?
大多数人以前写项目的时候都是直接用Activity来构建每个页面,到了Android3.0之后,推出了Fragment,翻译成中文就是碎片,正好符合它的特质,Fragment其实就相当于Activity的“碎片”,它可以内嵌于Activity中,一个Activity可以由多个Fragment组合构建而成,Fragment可以有自己的控件、生命周期,可以接收和处理自己的事件,就如同一个小型的Activity。所以正好也就理解了为什么Fragment能够很好地利用于平板开发中。我们都知道平板的屏幕尺寸比手机大很多,那么如果针对普通手机所开发出来的布局运用到平板上时,会发现被拉伸了很多,同时浪费了很多空间,所以才需要对其进行“碎片化”,即将Activity分为多个Fragment,根据不同的场合来决定由哪些Fragment来组合呈现给用户。
先介绍Fragment的基本使用方式,Fragment使用方式分为两种:静态使用和动态使用
静态使用Fragment
在静态方式下,直接将Fragment当成Activity的一个组件来使用,直接在xml布局文件中定义这个Fragment,这里以定义标题栏为例,主要分为几下几步:1.创建Fragment自己的布局文件
<LinearLayout xmlns:android="http://schemas.android.com/apk/res/android"
    xmlns:tools="http://schemas.android.com/tools"
    android:layout_width="match_parent"
    android:layout_height="match_parent"
    android:orientation="horizontal" >

    <Button
        android:id="@+id/left_btn"
        android:layout_width="0dp"
        android:layout_height="wrap_content"
        android:layout_weight="1"/>

    <TextView
        android:layout_width="0dp"
        android:layout_height="wrap_content"
        android:layout_weight="4"
        android:gravity="center"
        android:text="Title"
        android:textSize="20sp"
        />
    <Button
        android:id="@+id/right_btn"
        android:layout_width="0dp"
        android:layout_height="wrap_content"
        android:layout_weight="1"/>

</LinearLayout>
2.创建Fragment类继承于Fragment,重写Fragment的onCreateView()方法,在onCreateView方法中加载Fragment的布局文件,并返回
public class TitleFragment extends Fragment implements OnClickListener{

	@Override
	public View onCreateView(LayoutInflater inflater, ViewGroup container,
			Bundle savedInstanceState) {
		// TODO Auto-generated method stub
		//加载Fragment的布局文件
		View view = inflater.inflate(R.layout.mytitle, container, false);
		//这里能够加载Fragment自己的一些控件
		Button left = (Button)view.findViewById(R.id.left_btn);
		Button right = (Button)view.findViewById(R.id.right_btn);
		//Fragment的控件的事件
		left.setOnClickListener(this);
		right.setOnClickListener(this);
		返回Fragment视图
		return view;
	}

	@Override
	public void onClick(View arg0) {
		// TODO Auto-generated method stub
		switch (arg0.getId()) {
		case R.id.left_btn:
			Toast.makeText(getActivity(),"左边按钮",1000).show();
			break;

		case R.id.right_btn:
			Toast.makeText(getActivity(),"右边按钮",1000).show();
			break;
		}
	}


}
3.在Activity的布局文件中定义该Fragment,其name属性指向-->Fragment所在的包名.Fragment的类名
<LinearLayout xmlns:android="http://schemas.android.com/apk/res/android"
    xmlns:tools="http://schemas.android.com/tools"
    android:layout_width="match_parent"
    android:layout_height="match_parent"
    android:orientation="vertical"
    >

    <fragment
        android:id="@+id/titlefragment"
        android:layout_width="fill_parent"
        android:layout_height="wrap_content"
        android:name="fragment.TitleFragment"/>

</LinearLayout>
运行结果:
动态使用Fragment
上面介绍了静态的使用Fragment,但是其实真实开发中更多情况下还是使用动态管理Fragment,在动态使用Fragment中,我们可以动态地加载、删除和更新多个Fragment。
下面以上面的例子为基础进行改动,实现在点击标题栏的左右两个按钮时,标题栏以下区域会切换不同的界面
1.由于要切换不同的子界面,所以我们可以通过另外创建两个Fragment,并为他们创建各自的布局文件,这里分别给它们设置不同的背景色
first_content.xml:
<LinearLayout xmlns:android="http://schemas.android.com/apk/res/android"
    xmlns:tools="http://schemas.android.com/tools"
    android:layout_width="match_parent"
    android:layout_height="match_parent"
    android:background="#5BC0DE"
    android:orientation="vertical" >

</LinearLayout>
第一个Fragment代码:
public class FirstFragment extends Fragment{

	@Override
	public View onCreateView(LayoutInflater inflater, ViewGroup container,
			Bundle savedInstanceState) {
		// TODO Auto-generated method stub
		return inflater.inflate(R.layout.first_content, container, false);
	}

}
second_content.xml:
<LinearLayout xmlns:android="http://schemas.android.com/apk/res/android"
    xmlns:tools="http://schemas.android.com/tools"
    android:layout_width="match_parent"
    android:layout_height="match_parent"
    android:background="#F2AD50"
    android:orientation="vertical" >

</LinearLayout>
第二个Fragment代码:
public class SecondFragment extends Fragment{

	@Override
	public View onCreateView(LayoutInflater inflater, ViewGroup container,
			Bundle savedInstanceState) {
		// TODO Auto-generated method stub
		return inflater.inflate(R.layout.second_content, container, false);
	}

}
2.由于是在同个区域进行刷新,所以我们可以使用FrameLayout来作为Activity中存放fragment的父布局
activity_main.xml:
<LinearLayout xmlns:android="http://schemas.android.com/apk/res/android"
    xmlns:tools="http://schemas.android.com/tools"
    android:layout_width="match_parent"
    android:layout_height="match_parent"
    android:orientation="vertical"
    >

    <!-- 标题区域   -->
    <fragment
        android:id="@+id/titlefragment"
        android:layout_width="fill_parent"
        android:layout_height="wrap_content"
        android:name="fragment.TitleFragment"/>

    <!-- 内容区域   -->
    <FrameLayout
        android:id="@+id/content"
        android:layout_width="fill_parent"
        android:layout_height="fill_parent">

    </FrameLayout>

</LinearLayout>
3.由于我们的标题栏也是由Fragment定义的,如果我们要实现点击它里面的两个按钮来操作FirstFragment和SecondFragment的跳转,可以直接在里TitleFragment中进行操纵,但不建议Fragment直接操作Fragment,因为毕竟Fragment是由Activity来管理的,我们可以通过对其按钮进行回调监听(如果对回调监听不熟悉的朋友可以见我另外一篇博文:Android中的监听事件回调机制),来把操作权给回我们的Activity,修改我们的TitleFragment类如下:
public class TitleFragment extends Fragment implements OnClickListener{

	//监听接口成员变量
	public static TitleOnClickListener listener;

	//回调接口,留给Activity中去实现回调
	public interface TitleOnClickListener{
		//whichbtn是判断点击的是哪个按钮
		public void titleOnClick(int whichbtn);
	}

	//留给Activity中注册监听接口
	public void setTitleOnClickListener(TitleOnClickListener listener){
		this.listener = listener;
	}

	@Override
	public View onCreateView(LayoutInflater inflater, ViewGroup container,
			Bundle savedInstanceState) {
		// TODO Auto-generated method stub
		View view = inflater.inflate(R.layout.mytitle, container,false);
		Button left = (Button)view.findViewById(R.id.left_btn);
		Button right = (Button)view.findViewById(R.id.right_btn);
		left.setOnClickListener(this);
		right.setOnClickListener(this);
		return view;
	}

	@Override
	public void onClick(View arg0) {
		// TODO Auto-generated method stub
		switch (arg0.getId()) {
		case R.id.left_btn:
			Toast.makeText(getActivity(), "左边按钮", 1000).show();
			//当点击标题栏左边按钮时,回调Activity中的titleOnClick函数
			this.listener.titleOnClick(R.id.left_btn);
			break;

		case R.id.right_btn:
			Toast.makeText(getActivity(), "右边按钮", 1000).show();
			//当点击标题栏右边按钮时,回调Activity中的titleOnClick函数
			this.listener.titleOnClick(R.id.right_btn);
			break;
		}
	}

}
4.上面这些准备工作完成之后,最后在Activity中来管理和实现Fragment的监听:
public class MainActivity extends Activity implements TitleOnClickListener{

	//标题Fragment
	TitleFragment title;

	//第一个Fragment
	FirstFragment first;

	//第二个Fragment
	SecondFragment second;

	@Override
	protected void onCreate(Bundle savedInstanceState) {
		super.onCreate(savedInstanceState);
		requestWindowFeature(Window.FEATURE_NO_TITLE);
		setContentView(R.layout.activity_main);

		title = new TitleFragment();
		//为标题栏Fragment注册监听
		title.setTitleOnClickListener(this);

		//初始化时默认加载第一个Fragment
		FragmentManager fm = getFragmentManager();
		FragmentTransaction transaction = fm.beginTransaction();
		first = new FirstFragment();
		/**
		 * add表示加载当前布局的fragment,
			第一个参数表示这些fragment的父布局,即我们的FrameLayout的id
			第二个参数表示当前加载哪一个fragment
		**/
		transaction.add(R.id.content, first);
		//处理完毕后记得提交,才能生效
		transaction.commit();
	}


	@Override
	public void titleOnClick(int whichbtn) {
		// TODO Auto-generated method stub
		switch (whichbtn) {
		case R.id.left_btn:
			if(first==null){
				first = new FirstFragment();
			}
			FragmentTransaction transaction = getFragmentManager().beginTransaction();
			transaction.replace(R.id.content, first);
			transaction.commit();
			break;

		case R.id.right_btn:
			if(second==null){
				second = new SecondFragment();
			}
			FragmentTransaction transaction1 = getFragmentManager().beginTransaction();
			transaction1.replace(R.id.content, second);
			transaction1.commit();
			break;
		}
	}
}
运行结果:
Fragment的生命周期
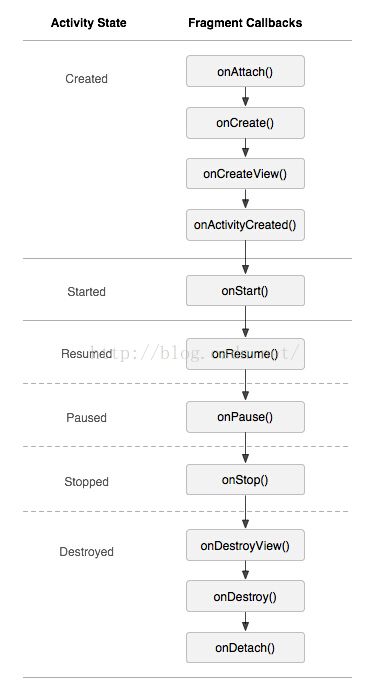
上面我们只是学会了如何使用Fragment,在onCreateView加载Fragment的视图,但实际上Fragment还有很多其他的生命周期函数,如下:
可以看到Fragment比Activity多了几个额外的生命周期回调函数:
onAttach(Activity); //当Activity与Fragment发生关联时调用
onCreateView(LayoutInflater,ViewGroup,Bundle); //创建该Fragment的视图
onActivityCreate(bundle); //当Activity的onCreate();方法返回时调用
onDestoryView(); //与onCreateView相对应,当改Fragment被移除时调用
onDetach(); //与onAttach()相对应,当Fragment与Activity的关联被取消时调用
Fragment回退栈
在上面的demo中,我们演示了类似tab的左右切换效果,想象这样一个场景,当你从第一个Fragment切换到第二个Fragment时,再按手机上的back键,会不会回到第一个Fragment?
答案是不会,它会直接退出整个Activity。那么如何才能做到按back键时返回到第一个Fragment呢,前面说过了,Fragment有很多跟Activity相似的属性,Android中为Activity提供了回退栈的机制,同样Fragment中也有这样的机制,不过是由Activity来管理。
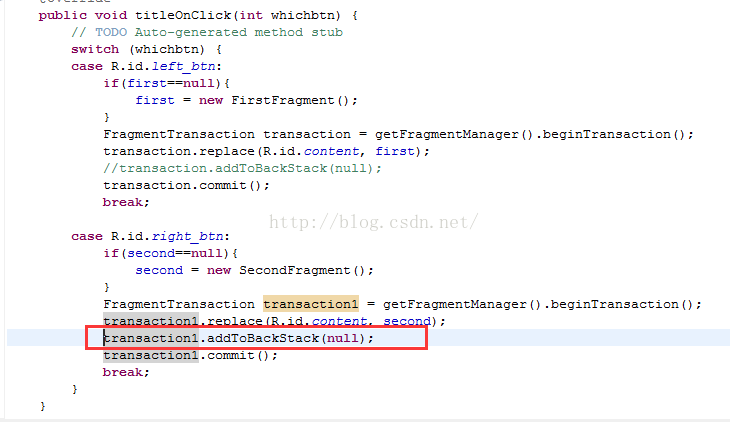
Fragment中FragmentTransaction提供了addToBackStack(String)方法,传入null表示将该事务加入到栈里面去。
在上面的例子中,我们在right_btn的点击事件中将Fragment添加到回退栈中:
加入这一句之后,就会在启动第二个Fragment时将transaction1添加到回退栈,而transaction1里的记录是“由第一个fragment更新到第二个fragment”,将该事务添加到回退栈之后,前一个Fragment实例就不会被销毁。
如果在上面回退栈的例子中,第一个Fragment带有输入框,假设你输入一些内容,点击跳转到第二个Fragment,当我们点击back键返回时,刚才输入的那些内容是否还在输入框上?
答案是没有,因为我们使用的是replace更新视图,replace其实是由remove和add方法组合而成的,而Fragment回退栈虽然不会销毁实例,但是会销毁Fragment的视图,那么问题来了,有什么办法能够使前一个Fragment的视图不被系统销毁掉?
可以通过使用hide方法,先隐藏当前的fragment,然后再进行添加,再将事务压入回退栈:


