iOS_31_cocos2d_Progress进度条
最终效果图:
进度条节点【CCProgressNode】,
构造时依赖一个Sprite
为【CCProgressNode】添加一个
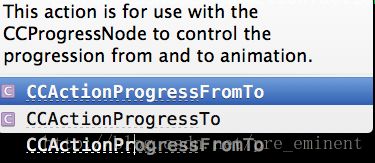
CCActionProgressFromTo动作
也可以在update方法中,更改【CCProgressNode】的percentage属性,实现进度条效果
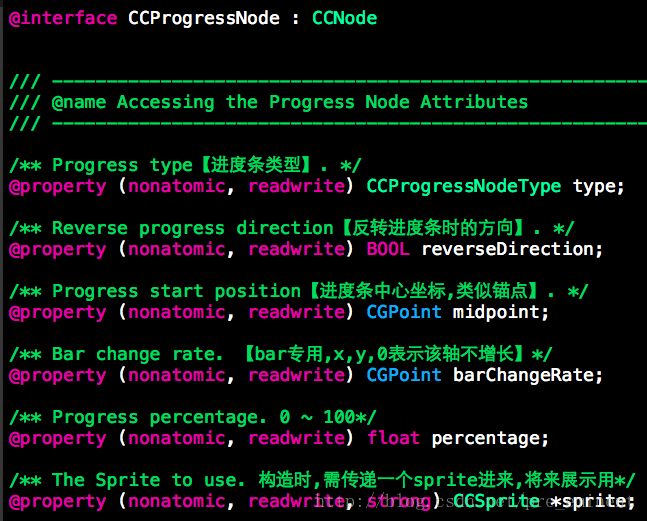
【CCProgressNode】基本属性:
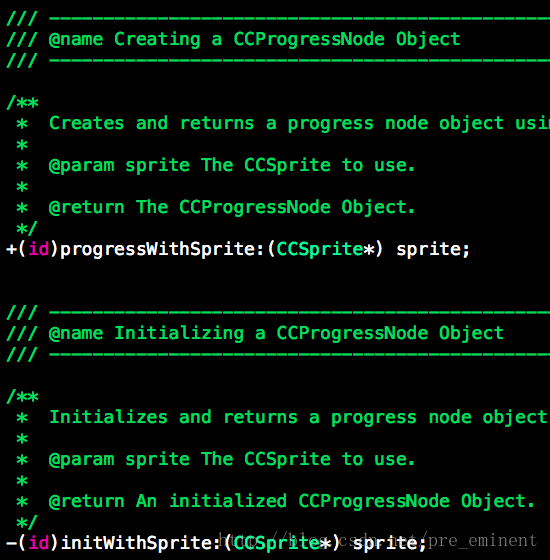
【CCProgressNode】构造方法:
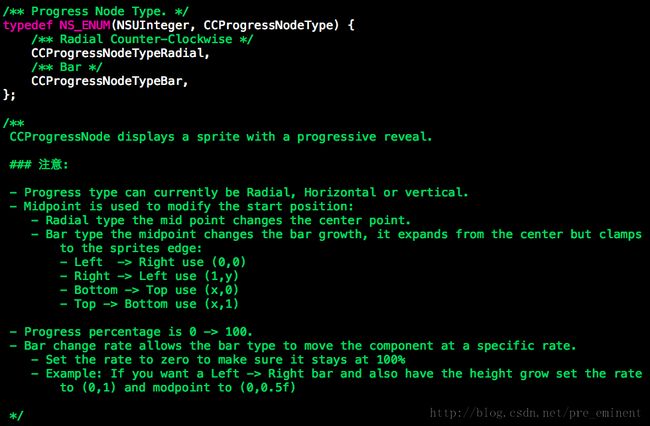
它的类型只有两种:
雷达和条形
进度条场景代码
//
//  ProgressScene.h
//  31_cocos2D入门
//
//  Created by beyond on 14-9-22.
//  Copyright (c) 2014年 com.beyond. All rights reserved.
//

#import "CCScene.h"
#import "cocos2d.h"
#import "cocos2d-ui.h"
@interface ProgressScene : CCScene

+ (instancetype)scene;
- (id)init;
@end
//
//  ProgressScene.m
//  31_cocos2D入门
//
//  Created by beyond on 14-9-22.
//  Copyright (c) 2014年 com.beyond. All rights reserved.
//  演示进度条:雷达或者bar条形

#import "ProgressScene.h"


@interface ProgressScene ()
{
    // 精灵
    CCSprite *_sprite;

    // 相当于一个ProgressView,通过进度的形式,展示一个Sprite,(根据说明可知,其构造方法,需要Sprite)
    CCProgressNode *_progressNode;
}
@end

@implementation ProgressScene

#pragma mark - 生命周期
+ (instancetype)scene
{
	return [[self alloc] init];
}
- (id)init
{

    self = [super init];
    if (!self) return(nil);

    // 1.创建背景颜色为深灰色
    [self setupBgColor];

    // 2.添加一个返回到主场景的按钮,位于右上方
    [self addBackToMainBtnOnRightTop];


    // 3.添加演示按钮,点击后,展示不同的进度效果
    [self addShowBtns];

    // 返回创建好的场景对象
	return self;
}


// 3.添加演示按钮,点击后,展示不同的进度效果
- (void)addShowBtns
{
    // 1.创建一个精灵,并不添加到self
    _sprite = [CCSprite spriteWithImageNamed:@"nanaLogo.jpg"];
    _sprite.name = @"nana";
    // 2.相当于一个ProgressView,通过进度的形式,展示一个Sprite,(根据说明可知,其构造方法,需要Sprite)
    _progressNode = [CCProgressNode progressWithSprite:_sprite];
    // 也要设置位置
    _progressNode.position = ccp(self.contentSize.width*0.5,self.contentSize.height/2);


    // 3.雷达
    [self addBtn:@"【雷达】" position:ccp(0, 0) target:self sel:@selector(radarBtnClick)];
    // 4.bar
    [self addBtn:@"【bar】" position:ccp(0, 0.2) target:self sel:@selector(barBtnClick)];
    // 5.label
    [self addBtn:@"【Label】" position:ccp(0, 0.4) target:self sel:@selector(labelBtnClick)];
}

#pragma mark - 按钮点击
// 1.点击按钮,演示 【雷达进度条】
- (void)radarBtnClick
{
    [_progressNode removeFromParent];

    // 设置类型为:雷达进度条
    _progressNode.type = CCProgressNodeTypeRadial;
    // 范围:0 ~ 100  0表示什么也不显示
    _progressNode.percentage = 0;

    // 雷达的中心点,类似锚点
    _progressNode.midpoint = ccp(0.5,0.5);

    // 2.添加到self
    [self addChild:_progressNode];

    // 3.可以通过执行动作,实现进度条的增加,也可以通过消息调度update方法中
//    CCActionProgressFromTo *action = [CCActionProgressFromTo actionWithDuration:1 from:0 to:100];
//    [_progressNode runAction:action];
}
// 2.点击按钮,演示 【bar进度条】
- (void)barBtnClick
{
    [_progressNode removeFromParent];

    // 设置类型为:bar进度条
    _progressNode.type = CCProgressNodeTypeBar;
    // 范围:0 ~ 100  0表示什么也不显示
    _progressNode.percentage = 0;

    // bar的中心点,类似锚点,设置从左下角开始
    _progressNode.midpoint = ccp(0.0,0.0);

    // barChangeRate,是一个point,仅在bar条件下有效,只让X方向增加,Y方向不增加
    _progressNode.barChangeRate = ccp(1.0,0.0);

    // 注意:当barChangeRate中y为0时,表示Y方向不会增加,因此,midpoint的y可以随便写

    // 2.添加到self
    [self addChild:_progressNode];

    // 3.可以通过执行动作,实现进度条的增加,也可以通过消息调度update方法中
    //    CCActionProgressFromTo *action = [CCActionProgressFromTo actionWithDuration:1 from:0 to:100];
    //    [_progressNode runAction:action];
}
// 2.点击按钮,演示 【Label进度条】
- (void)labelBtnClick
{
    [_progressNode removeFromParent];
    // cocos2d默认字体:Marker Felt
    // 1.先展示一个白色的
    CCLabelTTF *bgWhiteLabel = [CCLabelTTF labelWithString:@"Loading..." fontName:@"Marker Felt" fontSize:60];
    bgWhiteLabel.position = ccp(self.contentSize.width*0.5,self.contentSize.height/2);
    [self addChild:bgWhiteLabel];

    // 2.创建一个红色的,但是一开始不显示,进度为0
    CCLabelTTF *redLabel = [CCLabelTTF labelWithString:@"Loading..." fontName:@"Marker Felt" fontSize:60];
    redLabel.color = [CCColor colorWithCcColor3b:ccc3(255, 0, 0)];

    _progressNode = [CCProgressNode progressWithSprite:redLabel];
    _progressNode.position = bgWhiteLabel.position;


    // 设置类型为:bar进度条
    _progressNode.type = CCProgressNodeTypeBar;
    // 范围:0 ~ 100  0表示什么也不显示
    _progressNode.percentage = 0;

    // bar的中心点,类似锚点,设置从左下角开始
    _progressNode.midpoint = ccp(0.0,0.0);

    // barChangeRate,是一个point,仅在bar条件下有效,只让X方向增加,Y方向不增加
    _progressNode.barChangeRate = ccp(1.0,0.0);

    // 注意:当barChangeRate中y为0时,表示Y方向不会增加,因此,midpoint的y可以随便写

    // 2.添加到self
    [self addChild:_progressNode];


}
#pragma mark - 消息调度
// cocos2d V3中, 只要实现update方法,就会自动调用
// 因此,也可以通过消息调度来实现 进度条的增加
- (void)update:(CCTime)delta
{
    _progressNode.percentage++;
}
#pragma mark - 抽取
// 添加一个按钮
- (void)addBtn:(NSString *)title position:(CGPoint)position target:(id)target sel:(SEL)sel
{
    // 创建一个按钮,点击后进入下一个场景
    CCButton *btn = [CCButton buttonWithTitle:title fontName:@"Verdana-Bold" fontSize:18.0f];
    btn.positionType = CCPositionTypeNormalized;
    // 例如:ccp(0.5f, 0.35f) 是位于屏幕的中间靠下方
    // 注意这里是笛卡尔坐标系,原点在左下方
    btn.position = position;
    btn.anchorPoint = ccp(0, 0);
    // 监听点击事件
    [btn setTarget:target selector:sel];
    [self addChild:btn];
}

#pragma mark - 固定写法
// 固定写法:右上方,创建一个返回按钮,点击后,返回至主场景
- (void)addBackToMainBtnOnRightTop
{
    // 5、右上方,创建一个返回按钮,点击后,返回至主场景
    CCButton *backButton = [CCButton buttonWithTitle:@"[ 回到Main ]" fontName:@"Verdana-Bold" fontSize:18.0f];
    backButton.positionType = CCPositionTypeNormalized;
    // 屏幕的右上方 注意这里是笛卡尔坐标系,原点在左下方
    backButton.position = ccp(0.85f, 0.95f);
    // 监听点击事件
    [backButton setTarget:self selector:@selector(backToMainBtnClicked)];
    [self addChild:backButton];
}

// 固定写法: 回到主场景
- (void)backToMainBtnClicked
{
    // 使用转场动画,切换场景至 主场景,动画:从左向右
    [[CCDirector sharedDirector] replaceScene:[NSClassFromString(@"MainScene") scene]
                               withTransition:[CCTransition transitionPushWithDirection:CCTransitionDirectionRight duration:1.0f]];
}

// 固定定法:创建背景颜色为深灰色
- (void)setupBgColor
{

    CCNodeColor *background = [CCNodeColor nodeWithColor:[CCColor colorWithRed:0.2f green:0.2f blue:0.2f alpha:1.0f]];
    [self addChild:background];
}

@end


