jQuery学习笔记2——温故+知新
开始之前:http://docs.jquery.com/ 是jQuery文档的网站, https://jsfiddle.net/是js的在线验证工具。
如果你没有html,CSS,js,jQuery基础,请学习它们先。
Introduction
Web pages made withHTML andCSS display static content. They don't respond to user actions like clicking a mouse or typing a key.
JavaScript andjQuery are used to make web pages interactive.
-
JavaScript is a programming language used to create web pages that change in response to user actions.
-
jQuery is a collection of prewritten JavaScript code that lets us easily create interactive effects on our site.
1. 介绍一个实际的例子,可以在https://jsfiddle.net/上得到验证。
这个例子是侧面菜单的点击滑入效果:
<html>
  <head>
    <link href="//maxcdn.bootstrapcdn.com/font-awesome/4.1.0/css/font-awesome.min.css" rel="stylesheet">
    <link href='http://fonts.googleapis.com/css?family=Open+Sans:400;300' rel='stylesheet' type='text/css'>
    <link href='style.css' rel='stylesheet'>


  </head>
  <body>

    <div class="menu">

      <!-- Menu icon -->
      <div class="icon-close">
        <img src="http://s3.amazonaws.com/codecademy-content/courses/ltp2/img/uber/close.png">
      </div>

      <!-- Menu -->
      <ul>
        <li><a href="#">About</a></li>
        <li><a href="#">Blog</a></li>
        <li><a href="#">Help</a></li>
        <li><a href="#">Contact</a></li>
      </ul>
    </div>

    <!-- Main body -->
    <div class="jumbotron">

      <div class="icon-menu">
        <i class="fa fa-bars"></i>
        Menu
      </div>

    <script src="//ajax.googleapis.com/ajax/libs/jquery/1.11.1/jquery.min.js"></script>
    <script src="app.js"></script>
  </body>
</html>
CSS:
/* Initial body */
body {
  left: 0;
  margin: 0;
  overflow: hidden;
  position: relative;
}

/* Initial menu */
.menu {
  background: #202024 url('http://s3.amazonaws.com/codecademy-content/courses/ltp2/img/uber/black-thread.png') repeat left top;
  left: -285px;  /* start off behind the scenes */
  height: 100%;
  position: fixed;
  width: 285px;
}

/* Basic styling */

.jumbotron {
  background-image: url('http://s3.amazonaws.com/codecademy-content/courses/ltp2/img/uber/bg.png');
  height: 100%;
  -webkit-background-size: cover;
     -moz-background-size: cover;
       -o-background-size: cover;
          background-size: cover;
}

.menu ul {
  border-top: 1px solid #636366;
  list-style: none;
  margin: 0;
  padding: 0;
}

.menu li {
  border-bottom: 1px solid #636366;
  font-family: 'Open Sans', sans-serif;
  line-height: 45px;
  padding-bottom: 3px;
  padding-left: 20px;
  padding-top: 3px;
}

.menu a {
  color: #fff;
  font-size: 15px;
  text-decoration: none;
  text-transform: uppercase;
}

.icon-close {
  cursor: pointer;
  padding-left: 10px;
  padding-top: 10px;
}

.icon-menu {
  color: #fff;
  cursor: pointer;
  font-family: 'Open Sans', sans-serif;
  font-size: 16px;
  padding-bottom: 25px;
  padding-left: 25px;
  padding-top: 25px;
  text-decoration: none;
  text-transform: uppercase;
}

.icon-menu i {
  margin-right: 5px;
}
js:
var main = function(){
    $('.icon-menu').click(function(){
        $('.menu').animate({left: '0px'},200);
        $('body').animate({left: '285px'},200);
    });
    $('.icon-close').click(function(){
        $('.menu').animate({left: '-285px'},200);
        $('body').animate({left: '0px'},200);
    });
};

$(document).ready(main);
2. 一个点击显示隐藏的下拉菜单的实例,用到.children().show();
本例中有纵向排列的4个顶级菜单,每个顶级菜单在单击时可以显示它对应的下拉详情。
html总体结构:
html代码:
    <div class="articles container">

      <div class="article current">
        <div class="item row">
          <div class="col-xs-3">
            <p class="source">FLIGHT</p>
          </div>
          <div class="col-xs-6">
            <p class="title">Embraer adds third Legacy 500 prototype to flight test campaign</p>
          </div>
          <div class="col-xs-3">
            <p class="pubdate">Mar 23</p>
          </div>
        </div>
        <div class="description row">
          <div class="col-xs-3"> </div>
          <div class="col-xs-6">
            <h1>Embraer adds third Legacy 500 prototype to flight test campaign</h1>
            <p>The third Legacy 500 has joined Embraer's flight test programme aimed at delivering the midsize business jet in 2014. The airtcraft, serial number 003...</p>
          </div>
          <div class="col-xs-3"> </div>
        </div>
      </div>

      <div class="article">
        <div class="item row">
          <div class="col-xs-3">
            <p class="source">AW Commercial Aviation</p>
          </div>
          <div class="col-xs-6">
            <p class="title">CSeries Supplier Scramble</p>
          </div>
          <div class="col-xs-3">
            <p class="pubdate">Mar 22</p>
          </div>
        </div>
        <div class="description row">
          <div class="col-xs-3"> </div>
          <div class="col-xs-6">
            <h1>CSeries Supplier Scramble</h1>
            <p>Three months before the planned first flight of its CSeries, Bombardier is grappling with supplier issues crucial to meeting its production cost...</p>
          </div>
          <div class="col-xs-3"> </div>
        </div>
      </div>

      <div class="article">
        <div class="item row">
          <div class="col-xs-3">
            <p class="source">AW business aviation</p>
          </div>
          <div class="col-xs-6">
            <p class="title">Flying the Gulfstream G650</p>
          </div>
          <div class="col-xs-3">
            <p class="pubdate">Mar 22</p>
          </div>
        </div>
        <div class="description row">
          <div class="col-xs-3"> </div>
          <div class="col-xs-6">
            <h1>Flying the Gulfstream G650</h1>
            <p>Gulfstream is turning up the heat in the large-cabin business aircraft competition with its new G650 flagship, the largest, fastest, farthest-ranging...</p>
          </div>
          <div class="col-xs-3"> </div>
        </div>
      </div>
        <div class="item row">
          <div class="col-xs-3">
            <p class="source">FLIGHT</p>
          </div>
          <div class="col-xs-6">
            <p class="title">New retirements cut RAF VC10 fleet to four</p>
          </div>
          <div class="col-xs-3">
            <p class="pubdate">Mar 22</p>
          </div>
        </div>
        <div class="description row">
          <div class="col-xs-3"> </div>
          <div class="col-xs-6">
            <h1>New retirements cut RAF VC10 fleet to four</h1>
            <p>The UK Royal Air Force has retired another two of its Vickers VC10 tankers, with the pair's departure reducing its inventory of the Rolls-Royce...</p>
          </div>
          <div class="col-xs-3"> </div>
        </div>
      </di

    </div>
点击.article可以显示它下面的第一个 .description 的内容,使用了.children(). js code:
var main = function(){
    $('.article').click(function(){
         $(this).children('.description').show();
         //children() : nested directly under the current element.
    });
};
$(document).ready(main);
后面再升级的js:
var main = function(){
    $('.article').click(function(){
            $('.article').removeClass('current');//remove the current from all
            $('.description').hide();//Hide the descriptions of all
            $(this).addClass('current');//hilight the current article
            $(this).children('.description').show();//show the description of the clicked one
            //children() : nested directly under the current element.
    });
    /*Nice! Now when you click an article, it's shaded gray and its description opens up.*/
    /*Next let's see how to add two keyboard shortcuts. Here's what we want:press o, open the article; press n, open the next article*/
    //create a keypress event handler
    //The event handler should take event as a parameter.
    $(document).keypress(function(event){
        if (event.which === 111){//pressed 'o' key
<span style="white-space:pre">			</span>$('.description').hide();/*Hide the descriptions of all articles*/
            $('.current').children('.description').toggle();//open the on we clicked.
<span style="white-space:pre">		</span>}
        else if (event.which === 110){
            /*1.Select the current article using the '.current' selector. Save this in a new variable named currentArticle*/
            var currentArticle = $('.current');
            /*2.Select the next article using currentArticle.next(). Save this in a new variable named nextArticle*/
            var nextArticle = currentArticle.next();
            /*3.Remove the 'current' class from currentArticle using .removeClass()*/
            currentArticle.removeClass('current');
            /*4.Add the 'current' class to nextArticle using .addClass()*/
            nextArticle.addClass('current');
        }
    });
};
$(document).ready(main);
上面这个代码作几点总结:
- 要搞你selected的title, 先close all,再show你的那个current
- 对current的使用,相当于一个标签,非常重要!
- .next() 的使用方法,可参考:https://api.jquery.com/next/
- .children() 的使用方法,非常重要
- 最后使用了两个变量 currentArticle & nextArticle来装Object, 同时用到.next()来平移,后面的操作都是针对这两个容器来进行。
- removeClass('active-slide'); //注意这里没有"."
最后贴出CSS代码:
body {
  background-image: url('http://s3.amazonaws.com/codecademy-content/courses/ltp2/img/reader/bg.png');
  -webkit-background-size: cover;
     -moz-background-size: cover;
       -o-background-size: cover;
          background-size: cover;
}

p {
  margin: 0;
}

.row {
  margin: 0;
}

.articles {
  margin-top: 30px;
  margin-bottom: 30px;
}

.article {
  color: #222;
  background: rgba(255,255,255,.9);
  border-spacing: 2px;
  border-color: gray;
  font-family: arial,sans-serif;
  border-bottom: 1px #e5e5e5 solid;
}

.current .item {
  background: rgba(206,220,206,.9);
}

.item {
  cursor: pointer;
  padding-top: 7px;
  padding-bottom: 7px;

}

.item .source {
  margin-left: 20px;
}

.item .title {
  font-weight: bold;
}

.item .pubdate {
  margin-right: 20px;
}

.item .pubdate {
  text-align: right;
}

.description {
  display: none;
  padding-top: 10px;
  padding-bottom: 10px;
}

.description h1 {
  margin-top: 0px;
  font-size: 23px;
}
3. 关于$( )
$( )
In jQuery, we often see $( ). It has two main uses:
-
To select existing HTML elements on the page.
$('p')selects all p elements on the page. -
To create new HTML elements to add to the page.
$('<h1>')creates a new h1 element. The< >indicates that we want to create a new HTML element.
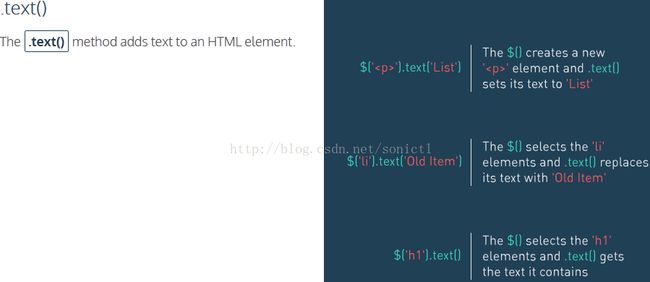
.text()
The .text() method adds text to an HTML element.
The .appendTo() method adds HTML elements to the end of the selected element.
$('.btn').click(function() {
  $('<li>').text('New item').appendTo('.items');
});
/**************************************/
$('.btn').click(function() {
  $('<li>').text('New item').prependTo('.items');
});
Click the New button in the web page to the right.
The .prependTo() method adds HTML elements to the beginning of the selected element.
.remove( )
Click the Delete button in the web page to the right.
The .remove() method removes the selected HTML element from the web page.
$('.btn').click(function() {
  $('.selected').remove();
});
.text( )
These six jQuery methods let you control more aspects of HTML elements:
-
.hide()hides the selected HTML element -
.show()displays an element -
.toggle()alternates hiding and showing an element -
.addClass()adds a CSS class to an element -
.removeClass()removes a class from an element -
.toggleClass()alternates adding and removing a class from an element
4. -理解DOM Document Object Model

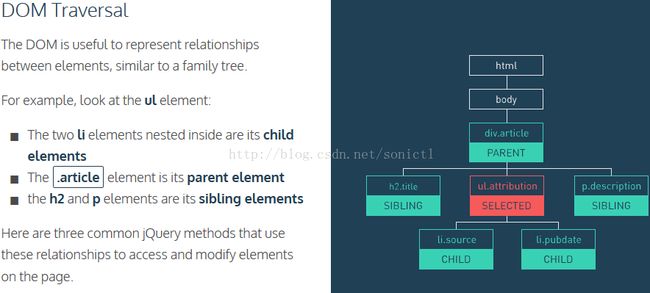
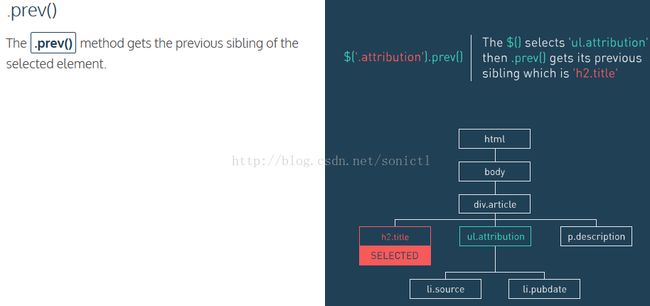
- .next( )
- .prev( )
- .children( )
5. 操作elements in html
有很多操作html中elements的方法,详见:http://learn.jquery.com/using-jquery-core/manipulating-elements/
这里我们要说的是.appendTo(), 和 .prependTo()
以下代码实现的是响应 class= "btn" 的按钮的click动作,生成一个<li> element,然后用prependTo()操纵它放在 ul class = "posts"的列表里。
var main = function(){
    $('.btn').click(function(){   //a click event handler
        var post;
        post = $('.status-box').val();//.val() is like .text() but to Get or set the value of form elements.
        //1. use $('<li>') to create a new li element;
        //2. use .text(post) to add text to the element
        //3. use .prependTo() to prepend it to the <ul class="posts">...</ul> element.
        $('<li>').text(post).prependTo('.posts');
        //create element -> inject text -> manipulate element
    });

    //这里要更新剩余字数Count characters left
    $('.status-box').keyup(function(){ //a keyup event handler
        var postLength = $(this).val().length; //store the length of the massage typed in the status box.
        var charactersLeft = 140 - postLength;
        //update the '.counter' to show the left value
        $('.counter').text(charactersLeft);
    });
}
$(document).ready(main);