转码项目小结
最近在忙新华社转码项目,中间出现了一些问题,通过耐心地探索,都一步步地解决了。现梳理和总结一下,供自己日后查阅:
1.根据XML字符串创建XML文件(需要jar包:dom4j)
			XMLWriter writer = null;
			// 设置XML文件的编码格式
			OutputFormat format = OutputFormat.createPrettyPrint();
			format.setEncoding("UTF-8");
			//要创建的XML文件的绝对路径
			File file = new File(completeXmlFilePath);
			//创建writer
			writer = new XMLWriter(new FileOutputStream(file), format);

			Document document = DocumentHelper.parseText(sb.toString());
			writer.write(document);
			writer.close();
对XML文件中某个节点值的解析
			Node node = vedioDataDoc.getRootElement();
			Node audioSampleRate = node.selectSingleNode("AudioSampleRate");
			String audioSamplingFrequencyStr = audioSampleRate.getText();
2.对json字符串的建和解析
所需jar包:
commons-beanutils-1.8.3.jar
commons-collections-3.2.1.jar
commons-httpclient.jar
commons-lang-2.6.jar
commons-logging.jar
ezmorph-1.0.6.jar
json-lib-2.4-jdk15.jar
创建代码示例:
	/**
	 * 根据要转码的视频标识文件名和相应用的系统配置信息,获取转码任务json对象
	 * @param completePath 要转码的视频标识文件的绝对路径
	 * @param flagVideoFileName 要转码的视频标识文件的文件名(含格式)
	 * @param tmpConfigId 该视频所对应的配置项Id
	 * @param tmpPriority 该视频所对应的配置项所采用的优先级
	 * @param tmpTcTemplateId 该视频所对应的配置项所采用的转码模版Id
	 * @param tmpImgTemplateId 该视频所对应的配置项所采用的截图模版Id
	 * @return 转码任务json对象
	 */
	private JSONObject getTaskJsonObjByConfigAndFileName(String completePath,
			String flagVideoFileName, int tmpConfigId, int tmpPriority,
			String tmpTcTemplateId, String tmpImgTemplateId) {
		/**
		  * 要拼成的json字符串格式
		  * {

			'callback': 'http://192.168.2.30/back.php',
			'key': 426918,
			'type': 'transcode',
			'priority':100,
			"QualityDetect": "1",
			'ShotDetect': "1",
			'AudioDetect': '1',
			'outputs': [
				{'profileId': '3', 'type': 'video'},
				{'profileId': '3', 'type': 'image'}
				],
			'inputs': [
				{'type': 'video', 'file': 'aa90d80a8a376237ee75986a2018aaea.flv'}
				]
			}
		  * 在此基础上增加以下3项,供调度使用
		  * title----任务名称
		  * configId----任务所采用的配置项Id
		  * completePath----源视频标识文件的绝对路径
		  */
		 JSONObject json =null;//最终要发送的json字符串
		 JSONArray inputJsonArray = null;//用于存放inputs属性值,即视频文件数据的数组(转码只支持一个视频文件)
		 JSONArray outputJsonArray = null;//用于存放outputs属性值,即视频模版和截图模版的数据组成的数组

		 json = new JSONObject();
		 //提供的回调地址
		 String callBackUrl = ReadConfig.CallBackUrl;
		 json.put("callback", callBackUrl);

		 //任务Id采用UUID
		 UUID uid = UUID.randomUUID();
		 String key = uid.toString();
		 json.put("key", key);


		 //任务类型
		 json.put("type",ReadConfig.Type);
		 //任务优先级采用它所在的输入标识目录对应的优先级
		 json.put("priority",tmpPriority);

		 //对源视频进行视频质量检测
		 json.put("QualityDetect", 1);//视频质量检测
		 json.put("ShotDetect", 1);//转场检测
		 json.put("AudioDetect", 1);//静音/削顶检测

		 //对outputs属性值进行填写
		 outputJsonArray = new JSONArray();
		 //输出视频项
		 if(tmpTcTemplateId != null && !"".equals(tmpTcTemplateId)){
			 JSONObject outputVideoItem = new JSONObject();
			 outputVideoItem.put("profileId", tmpTcTemplateId);
			 outputVideoItem.put("type", "video");
			 outputJsonArray.add(outputVideoItem);
		 }
		 //输出图片项
		 if(tmpImgTemplateId != null && !"".equals(tmpImgTemplateId)){
			 JSONObject outputImgItem = new JSONObject();
			 outputImgItem.put("profileId", tmpImgTemplateId);
			 outputImgItem.put("type", "image");
			 outputJsonArray.add(outputImgItem);
		 }
		 json.put("outputs", outputJsonArray);


		 //对inputs属性值进行填写
		 inputJsonArray = new JSONArray();
		 JSONObject inputVideoItem = new JSONObject();
		 inputVideoItem.put("type", "video");
		 inputVideoItem.put("file", flagVideoFileName);
		 inputJsonArray.add(inputVideoItem);

		 json.put("inputs", inputJsonArray);


		 //在此基础上增加以下3项,供转码的调度系统使用
		 json.put("title", DataTool.getFileNameWithoutFormat(flagVideoFileName));
		 json.put("configId", tmpConfigId);
		 json.put("completePath", completePath);

		 return json;
	}
解析代码示例:
			//1.将转码后回调的json字符串解析为json对象
    			JSONObject callBackJsonObj = JSONObject.fromObject(callBackText);
    			String status = callBackJsonObj.getString("status");
			String taskId = callBackJsonObj.getString("key");

			//从json对象中解析出输出文件的格式和名称
			JSONArray fileArray = callBackJsonObj.getJSONArray("files");
    			Map<String,String> outputFileMap = getOutputFileMapFromFiles(fileArray);
/**
	 * 转码完成后回调时发送的json字符串中的file数组
	 * @param fileArray
	 * @return 文件类型与文件名称的键值对(文件名称不含"/")
	 */
	private Map<String, String> getOutputFileMapFromFiles(JSONArray fileArray) {
		Map<String, String> fileMap = new HashMap<String, String>();

		JSONObject tmpObj = null;
		String fileType = "";
		String fileName = "";
		for(int i=0; i<fileArray.size(); i++){
			tmpObj = fileArray.getJSONObject(i);
			fileType = tmpObj.getString("type");
			fileName = tmpObj.getString("name").substring(1);//去掉"/"

			fileMap.put(fileType, fileName);

		}
		return fileMap;
	}
3.对http client的使用
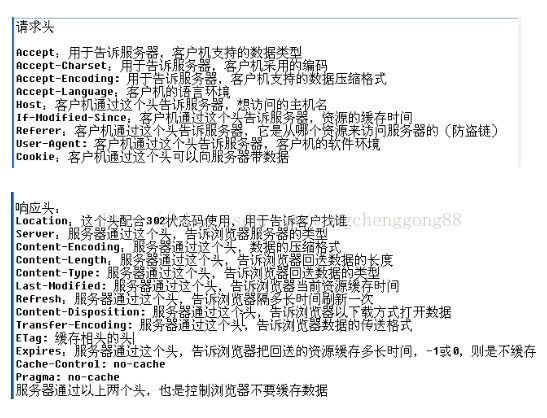
首先需要请求头和响应头进行了解:
http client代码示例:
	/**
	 * 向转码服务器发送http请求时的通用方法
	 * @param interfaceUrl http请求的接口地址
	 * @param requestType http请求方式 get/post
	 * @param obj 请求时要附加的参数,json对象,如果不需要参数,该项可为null
	 * @param hasResponseText 是否需要返回字符串
	 * @return 请求接口时返回的json字符串,如果不需要,则返回null
	 */
	public String getResponseTextByHttpRequest(String interfaceUrl, String requestType, JSONObject obj, boolean hasResponseText){
		String text = null;//响应的字符串
		String useIp = null;

		if(tmpIpList.isEmpty()){
			text = "[]";
			System.out.println("http请求超时,反复切换ip,对接口"+interfaceUrl+"均不能访问,请检查转码服务器的工作状态");
			log.error("http请求超时,反复切换ip,对接口"+interfaceUrl+"均不能访问,请检查转码服务器的工作状态");
		}else{
			//采用ipList中存放的第一个ip地址
			useIp = tmpIpList.get(0);
			interfaceUrl = replaceIpForInterfaceUrl(interfaceUrl,useIp);


			try{
				HttpResponse response = null;

				// 1.在创建httpclient时设置编码为UTF-8,并设置超时时间为5秒钟
				HttpParams httpParams = new BasicHttpParams();
				httpParams.setParameter("charset", "UTF-8");
				HttpConnectionParams.setConnectionTimeout(httpParams,5000);
				HttpClient  httpclient = new DefaultHttpClient(httpParams);


				//2.创建请求时需要的参数,一个json对象
				StringEntity reqEntity = null;
				if(obj != null){
					reqEntity = new StringEntity(obj.toString(),"UTF-8");
					reqEntity.setContentType("application/json");

					System.out.println("请求"+interfaceUrl+"时的附加参数----------------"+obj.toString()+"----------------");
					log.info("请求"+interfaceUrl+"时的附加参数-----------------"+obj.toString()+"----------------");
				}

				//3.根据请求方式创建get请求或post请求对象,如果有参数的话就附加上参数,然后发送http请求

				log.info("准备进行http "+requestType+"请求:"+interfaceUrl);
				if("get".equals(requestType)){
					HttpGet httpget = new HttpGet(interfaceUrl);
					response = httpclient.execute(httpget);
				}else{
					HttpPost httppost = new HttpPost(interfaceUrl);
					if(reqEntity != null){
						httppost.setEntity(reqEntity);
					}
					response = httpclient.execute(httppost);
				}

				log.info("向"+interfaceUrl+"发送http请求的结果:"+response.getStatusLine());


				int state = response.getStatusLine().getStatusCode();
				if(state==200){
					//根据请求是否需要返回字符串,进行不同的处理:如果需要,则返回字符串,如果不需要,则返回null
					if(hasResponseText){
						HttpEntity entity = response.getEntity();
						text = readInputStreamToText(entity.getContent());

						log.info("向"+interfaceUrl+"发送http请求的响应结束,返回的字符串为"+text);

					}else{

						text = null;
						log.info("向"+interfaceUrl+"发送http请求的响应结束,没有返回字符串");
					}


				}else{
					throw new Exception();
				}
			}catch(Exception ex){

				System.out.println("转码"+useIp+"发生异常,请求时不能正常响应"+ex.getMessage());
				log.error("转码"+useIp+"发生异常,请求时不能正常响应", ex);

				//表示ipList中存放的第一个ip地址无效,因此将其移除
				tmpIpList.remove(0);
				text = getResponseTextByHttpRequest(interfaceUrl,requestType, obj, hasResponseText);

			}


		}

		return text;
	}
4. 对文件的相关操作:
从项目的src下加载properties的例子:
		 InputStream is = ReadConfig.class.getResourceAsStream("/config.properties");
		 Properties prop = new Properties();
		 try {
			prop.load(is);
			//将转码服务器的ip依次读到内存中
			TranscodeIps=prop.getProperty("TranscodeIps");
对文件的复制操作:
//复制文件
	public void copyFile(String sourceFile, String targetFile) throws IOException{
		log.info("[文件复制]准备复制文件:"+sourceFile+"----->"+targetFile);

		BufferedInputStream inBuff = null;
        BufferedOutputStream outBuff = null;
        try {
            // 新建文件输入流并对它进行缓冲
            inBuff = new BufferedInputStream(new FileInputStream(sourceFile));

            // 新建文件输出流并对它进行缓冲
            outBuff = new BufferedOutputStream(new FileOutputStream(targetFile));

            // 缓冲数组
            byte[] b = new byte[1024*1024*20];
            int len;
            while ((len = inBuff.read(b)) != -1) {
                outBuff.write(b, 0, len);
            }
            // 刷新此缓冲的输出流
            outBuff.flush();
            b = null;

            log.info("文件复制成功"+sourceFile+"----->"+targetFile);

        }catch(IOException e){
        	log.error("文件复制报错"+sourceFile+"----->"+targetFile, e);
        } finally {
            // 关闭流
            if (inBuff != null){
            	inBuff.close();
            }
            if (outBuff != null){
            	outBuff.close();
            }


        }
	}
对文本文件的读取:
//读取文件,返回字符串
	public String readFileToText(String sourceFile) throws IOException{
		log.info("读取文件"+sourceFile);
		String data = "";

		FileReader fileReader = new FileReader(new File(sourceFile));
		BufferedReader reader = new BufferedReader(fileReader);

		String line = null;
		while ((line = reader.readLine()) != null) {
			// System.out.println(line);
			line = new String(line.getBytes(),"UTF-8");
			data += (line+"\r\n");
		}

		reader.close();
		fileReader.close();
		return data;
	}
5.对log4j的使用
已总结过:http://blog.csdn.net/wangchenggong88/article/details/9626949
# File output by days...
log4j.appender.file=org.apache.log4j.DailyRollingFileAppender
log4j.appender.file.Threshold=ERROR
log4j.appender.file.file=${catalina.base}/logs/psp_error.log
log4j.appender.file.MaxFileSize=2000KB
log4j.appender.file.DatePattern="."yyyy-MM-dd
log4j.appender.file.layout=org.apache.log4j.PatternLayout
log4j.appender.file.layout.ConversionPattern=%d %p [%c] - %m%n
6.对jqGrid的使用
在使用过程中,出现的主要问题就是复选框,参考了jqGrid的API之后找到了问题所在。其实复选框的值在展示时与其value是一致的,这与一般的表单有所不同。
个人感觉主要就是使用index.html和WebRoot\js\user\function.js两个文件。其中js文件中设定了从后台加载数据时的地址,是通过Ajax的方式。
//查询“新建任务”
function searchTransCoderTaskForNew(){
	document.getElementById('control').style.display="none";
	jQuery("#gridTable").GridUnload();
	jQuery("#gridTable").jqGrid({
		url:"SearchTransCoderTask",
		mtype:'post',
        datatype: "json",
        postData:{state:'New'},
        height: '100%',
        width: document.body.clientWidth-80,
        colNames:['序号','任务ID','任务名称','输入文件','优先级', '创建时间','剩余时间','任务进度'],
        colModel:[
                {name:'NO',index:'NO', align:'center',sorttype:"int"},
                {name:'Id',index:'Id', align:'center',sorttype:"int"},
                {name:'TaskName',index:'NO',align:'center', sorttype:"string"},
                {name:'InputFile',index:'NO',align:'center', sorttype:"string"},
                {name:'Priority',index:'Priority',align:'center'},
                {name:'CreateTime',align:'center',index:'CreateTime'},
                {name:'RemainTime',align:'center',sorttype:"string"},
                {name:'State',index:'State',align:'center', sorttype:"string"}
        ],
        sortable:true,
        sortname:'CreateTime',
        sortorder:'asc',
        viewrecords:true,
        rowNum:50,
        rowList:[50,200,500],
        pager:"#gridPager",
        caption: '转码新建任务列表'
	});
	jQuery("#gridTable").jqGrid('navGrid','#gridPager',{edit:false,add:false,del:false});

}