CSS3 渐变(Gradients)
1、CSS3 渐变(Gradients)
CSS3 渐变(gradients)可以让你在两个或多个指定的颜色之间显示平稳的过渡。以前,你必须使用图像来实现这些效果。但是,通过使用 CSS3 渐变(gradients),你可以减少下载的事件和宽带的使用。此外,渐变效果的元素在放大时看起来效果更好,因为渐变(gradient)是由浏览器生成的。
CSS3 定义了两种类型的渐变(gradients):
线性渐变(Linear Gradients)- 向下/向上/向左/向右/对角方向
径向渐变(Radial Gradients)- 由它们的中心定义
2、CSS3 线性渐变
为了创建一个线性渐变,你必须至少定义两种颜色结点。颜色结点即你想要呈现平稳过渡的颜色。同时,你也可以设置一个起点和一个方向(或一个角度)。
语法:background: linear-gradient(direction, color-stop1, color-stop2, ...);
(1)、线性渐变 - 从上到下(默认情况下)
下面的实例演示了从顶部开始的线性渐变。起点是红色,慢慢过渡到蓝色:
<!DOCTYPE html>
<html>
<head>
<style>
#grad1 {
    height: 200px;
    background: -webkit-linear-gradient(red, blue); /* Safari 5.1 - 6.0 */
    background: -o-linear-gradient(red, blue); /* Opera 11.1 - 12.0 */
    background: -moz-linear-gradient(red, blue); /* Firefox 3.6 - 15 */
    background: linear-gradient(red, blue); /* 标准的语法(必须放在最后) */
}
</style>
</head>
<body>
<h3>线性渐变 - 从上到下</h3>
<p>从顶部开始的线性渐变。起点是红色,慢慢过渡到蓝色:</p>
<div id="grad1"></div>
<p><strong>注意:</strong> Internet Explorer 9 及之前的版本不支持渐变。</p>
</body>
</html>
(2)、线性渐变 - 从左到右
下面的实例演示了从左边开始的线性渐变。起点是红色,慢慢过渡到蓝色:
<!DOCTYPE html>
<html>
<head>
<style>
#grad1 {
    height: 200px;
    background: -webkit-linear-gradient(left, red , blue); /* Safari 5.1 - 6.0 */
    background: -o-linear-gradient(right, red, blue); /* Opera 11.1 - 12.0 */
    background: -moz-linear-gradient(right, red, blue); /* Firefox 3.6 - 15 */
    background: linear-gradient(to right, red , blue); /* 标准的语法(必须放在最后) */
}
</style>
</head>
<body>
<h3>线性渐变 - 从左到右</h3>
<p>从左边开始的线性渐变。起点是红色,慢慢过渡到蓝色:</p>
<div id="grad1"></div>
<p><strong>注意:</strong> Internet Explorer 9 及之前的版本不支持渐变。</p>
</body>
</html>
(3)、线性渐变 - 对角
你可以通过指定水平和垂直的起始位置来制作一个对角渐变。下面的实例演示了从左上角开始(到右下角)的线性渐变。起点是红色,慢慢过渡到蓝色:
<!DOCTYPE html>
<html>
<head>
<style>
#grad1 {
width:500px;
    height: 200px;
    background: -webkit-linear-gradient(left top, red , blue); /* Safari 5.1 - 6.0 */
    background: -o-linear-gradient(bottom right, red, blue); /* Opera 11.1 - 12.0 */
    background: -moz-linear-gradient(bottom right, red, blue); /* Firefox 3.6 - 15 */
    background: linear-gradient(to bottom right, red , blue); /* 标准的语法(必须放在最后) */
}
</style>
</head>
<body>
<h3>线性渐变 - 对角</h3>
<p>从左上角开始(到右下角)的线性渐变。起点是红色,慢慢过渡到蓝色:</p>
<div id="grad1"></div>
<p><strong>注意:</strong> Internet Explorer 9 及之前的版本不支持渐变。</p>
</body>
</html>

(3)、使用角度
如果你想要在渐变的方向上做更多的控制,你可以定义一个角度,而不用预定义方向(to bottom、to top、to right、to left、to bottom right,等等)。
语法background: linear-gradient(angle, color-stop1, color-stop2);
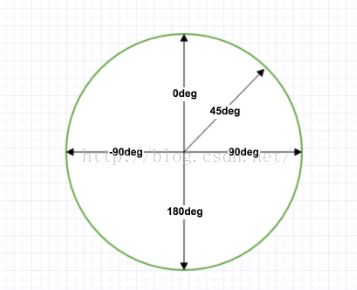
角度是指水平线和渐变线之间的角度,逆时针方向计算。换句话说,0deg 将创建一个从下到上的渐变,90deg 将创建一个从左到右的渐变。
但是,请注意很多浏览器(Chrome,Safari,fiefox等)的使用了旧的标准,即 0deg 将创建一个从左到右的渐变,90deg 将创建一个从下到上的渐变。换算公式 90 - x = y 其中 x 为标准角度,y为非标准角度。
下面的实例演示了如何在线性渐变上使用角度:
<!DOCTYPE html>
<html>
<head>
<style>
#grad1 {
width:300px;
    height: 50px;
    background: -webkit-linear-gradient(0deg, red, blue); /* Safari 5.1 - 6.0 */
    background: -o-linear-gradient(0deg, red, blue); /* Opera 11.1 - 12.0 */
    background: -moz-linear-gradient(0deg, red, blue); /* Firefox 3.6 - 15 */
    background: linear-gradient(0deg, red, blue); /* 标准的语法(必须放在最后) */
}
#grad2 {
width:300px;
    height: 50px;
    background: -webkit-linear-gradient(90deg, red, blue); /* Safari 5.1 - 6.0 */
    background: -o-linear-gradient(90deg, red, blue); /* Opera 11.1 - 12.0 */
    background: -moz-linear-gradient(90deg, red, blue); /* Firefox 3.6 - 15 */
    background: linear-gradient(90deg, red, blue); /* 标准的语法(必须放在最后) */
}
#grad3 {
width:300px;
    height: 50px;
    background: -webkit-linear-gradient(180deg, red, blue); /* Safari 5.1 - 6.0 */
    background: -o-linear-gradient(180deg, red, blue); /* Opera 11.1 - 12.0 */
    background: -moz-linear-gradient(180deg, red, blue); /* Firefox 3.6 - 15 */
    background: linear-gradient(180deg, red, blue); /* 标准的语法(必须放在最后) */
}
#grad4 {
width:300px;
    height: 50px;
    background: -webkit-linear-gradient(-90deg, red, blue); /* Safari 5.1 - 6.0 */
    background: -o-linear-gradient(-90deg, red, blue); /* Opera 11.1 - 12.0 */
    background: -moz-linear-gradient(-90deg, red, blue); /* Firefox 3.6 - 15 */
    background: linear-gradient(-90deg, red, blue); /* 标准的语法(必须放在最后) */
}
</style>
</head>
<body>
<h3>线性渐变 - 使用不同的角度</h3>
<div id="grad1" style="color:white;text-align:center;">0deg</div><br>
<div id="grad2" style="color:white;text-align:center;">90deg</div><br>
<div id="grad3" style="color:white;text-align:center;">180deg</div><br>
<div id="grad4" style="color:white;text-align:center;">-90deg</div>
<p><strong>注意:</strong> Internet Explorer 9 及之前的版本不支持渐变。</p>
</body>
</html>
(4)、使用多个颜色结点
下面的实例演示了如何设置多个颜色结点:
<!DOCTYPE html>
<html>
<head>
<style>
#grad1 {
width:300px;
    height:80px;
    background: -webkit-linear-gradient(red, green, blue); /* Safari 5.1 - 6.0 */
    background: -o-linear-gradient(red, green, blue); /* Opera 11.1 - 12.0 */
    background: -moz-linear-gradient(red, green, blue); /* Firefox 3.6 - 15 */
    background: linear-gradient(red, green, blue); /* 标准的语法(必须放在最后) */
}
#grad2 {
width:300px;
    height:80px;
    background: -webkit-linear-gradient(red, orange, yellow, green, blue, indigo, violet); /* Safari 5.1 - 6.0 */
    background: -o-linear-gradient(red, orange, yellow, green, blue, indigo, violet); /* Opera 11.1 - 12.0 */
    background: -moz-linear-gradient(red, orange, yellow, green, blue, indigo, violet); /* Firefox 3.6 - 15 */
    background: linear-gradient(red, orange, yellow, green, blue, indigo, violet); /* 标准的语法(必须放在最后) */
}
#grad3 {
width:300px;
    height:80px;
    background: -webkit-linear-gradient(red 10%, green 85%, blue 90%); /* Safari 5.1 - 6.0 */
    background: -o-linear-gradient(red 10%, green 85%, blue 90%); /* Opera 11.1 - 12.0 */
    background: -moz-linear-gradient(red 10%, green 85%, blue 90%); /* Firefox 3.6 - 15 */
    background: linear-gradient(red 10%, green 85%, blue 90%); /* 标准的语法(必须放在最后) */
}
</style>
</head>
<body>
<h4>3 个颜色结点(均匀分布)</h4>
<div id="grad1"></div>
<h4>7 个颜色结点(均匀分布)</h4>
<div id="grad2"></div>
<h4>3 个颜色结点(不均匀分布)</h4>
<div id="grad3"></div>
<p><strong>注意:</strong> 当未指定百分比时,颜色结点不会自动均匀分布。</p>
<p><strong>注意:</strong> Internet Explorer 9 及之前的版本不支持渐变。</p>

</body>
</html>

(5)、使用透明度(Transparency)
CSS3 渐变也支持透明度(transparency),可用于创建减弱变淡的效果。为了添加透明度,我们使用 rgba() 函数来定义颜色结点。rgba() 函数中的最后一个参数可以是从 0 到 1 的值,它定义了颜色的透明度:0 表示完全透明,1 表示完全不透明。
下面的实例演示了从左边开始的线性渐变。起点是完全透明,慢慢过渡到完全不透明的红色:
<!DOCTYPE html>
<html>
<head>
<style>
#grad1 {
width:500px;
    height: 200px;
    background: -webkit-linear-gradient(left, rgba(255,0,0,0), rgba(255,0,0,1)); /* Safari 5.1 - 6.0 */
    background: -o-linear-gradient(right, rgba(255,0,0,0), rgba(255,0,0,1)); /* Opera 11.1 - 12.0 */
    background: -moz-linear-gradient(right, rgba(255,0,0,0), rgba(255,0,0,1)); /* Firefox 3.6 - 15 */
    background: linear-gradient(to right, rgba(255,0,0,0), rgba(255,0,0,1)); /* 标准的语法(必须放在最后) */
}
</style>
</head>
<body>
<h3>线性渐变 - 透明度</h3>
<p>为了添加透明度,我们使用 rgba() 函数来定义颜色结点。rgba() 函数中的最后<br>一个参数可以是从 0 到 1 的值,它定义了颜色的透明度:0 表示完全透明,<br>1 表示完全不透明。</p>
<div id="grad1"></div>
<p><strong>注意:</strong> Internet Explorer 9 及之前的版本不支持渐变。</p>
</body>
</html>

(6)、重复的线性渐变
repeating-linear-gradient() 函数用于重复线性渐变:
<!DOCTYPE html>
<html>
<head>
<style>
#grad1 {
width:400px;
    height: 200px;
    background: -webkit-repeating-linear-gradient(red, yellow 10%, green 20%); /* Safari 5.1 - 6.0 */
    background: -o-repeating-linear-gradient(red, yellow 10%, green 20%); /* Opera 11.1 - 12.0 */
    background: -moz-repeating-linear-gradient(red, yellow 10%, green 20%); /* Firefox 3.6 - 15 */
    background: repeating-linear-gradient(red, yellow 10%, green 20%); /* 标准的语法(必须放在最后) */
}
</style>
</head>
<body>
<h3>重复的线性渐变</h3>
<div id="grad1"></div>
<p><strong>注意:</strong> Internet Explorer 9 及之前的版本不支持渐变。</p>
</body>
</html>

2、CSS3 径向渐变
径向渐变由它的中心定义。为了创建一个径向渐变,你也必须至少定义两种颜色结点。颜色结点即你想要呈现平稳过渡的颜色。同时,你也可以指定渐变的中心、形状(原型或椭圆形)、大小。默认情况下,渐变的中心是 center(表示在中心点),渐变的形状是 ellipse(表示椭圆形),渐变的大小是 farthest-corner(表示到最远的角落)。
语法background: radial-gradient(center, shape size, start-color, ..., last-color);
(1)、径向渐变 - 颜色结点均匀分布(默认情况下)
<!DOCTYPE html>
<html>
<head>
<style>
#grad1 {
    height: 150px;
    width: 200px;
    background: -webkit-radial-gradient(red, green, blue); /* Safari 5.1 - 6.0 */
    background: -o-radial-gradient(red, green, blue); /* Opera 11.6 - 12.0 */
    background: -moz-radial-gradient(red, green, blue); /* Firefox 3.6 - 15 */
    background: radial-gradient(red, green, blue); /* 标准的语法(必须放在最后) */
}
</style>
</head>
<body>
<h3>径向渐变 - 颜色结点均匀分布</h3>
<div id="grad1"></div>
<p><strong>注意:</strong> Internet Explorer 9 及之前的版本不支持渐变。</p>
</body>
</html>

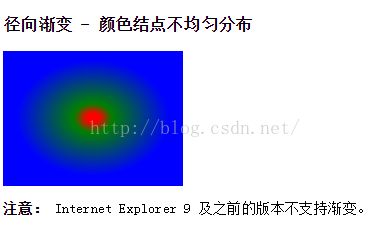
(2)、径向渐变 - 颜色结点不均匀分布
<!DOCTYPE html>
<html>
<head>
<style>
#grad1 {
    height: 150px;
    width: 200px;
    background: -webkit-radial-gradient(red 5%, green 15%, blue 60%); /* Safari 5.1 - 6.0 */
    background: -o-radial-gradient(red 5%, green 15%, blue 60%); /* Opera 11.6 - 12.0 */
    background: -moz-radial-gradient(red 5%, green 15%, blue 60%); /* Firefox 3.6 - 15 */
    background: radial-gradient(red 5%, green 15%, blue 60%); /* 标准的语法(必须放在最后) */
}
</style>
</head>
<body>
<h3>径向渐变 - 颜色结点不均匀分布</h3>
<div id="grad1"></div>
<p><strong>注意:</strong> Internet Explorer 9 及之前的版本不支持渐变。</p>
</body>
</html>

(3)、设置形状
shape 参数定义了形状。它可以是值 circle 或 ellipse。其中,circle 表示圆形,ellipse 表示椭圆形。默认值是 ellipse。
<!DOCTYPE html>
<html>
<head>
<style>
#grad1 {
    height: 100px;
    width: 200px;
    background: -webkit-radial-gradient(red, yellow, green); /* Safari 5.1 - 6.0 */
    background: -o-radial-gradient(red, yellow, green); /* Opera 11.6 - 12.0 */
    background: -moz-radial-gradient(red, yellow, green); /* Firefox 3.6 - 15 */
    background: radial-gradient(red, yellow, green); /* 标准的语法(必须放在最后) */
}
#grad2 {
    height: 100px;
    width: 200px;
    background: -webkit-radial-gradient(circle, red, yellow, green); /* Safari 5.1 - 6.0 */
    background: -o-radial-gradient(circle, red, yellow, green); /* Opera 11.6 - 12.0 */
    background: -moz-radial-gradient(circle, red, yellow, green); /* Firefox 3.6 - 15 */
    background: radial-gradient(circle, red, yellow, green); /* 标准的语法(必须放在最后) */
}
</style>
</head>
<body>

<h3>径向渐变 - 形状</h3>
<p><strong>椭圆形 Ellipse(默认):</strong></p>
<div id="grad1"></div>
<p><strong>圆形 Circle:</strong></p>
<div id="grad2"></div>
<p><strong>注意:</strong> Internet Explorer 9 及之前的版本不支持渐变。</p>
</body>
</html>
(4)、不同尺寸大小关键字的使用
size 参数定义了渐变的大小。它可以是以下四个值:closest-side、farthest-side、closest-corner、farthest-corner
(5)、重复的径向渐变
repeating-radial-gradient() 函数用于重复径向渐变
<!DOCTYPE html>
<html>
<head>
<style>
#grad1 {
    height: 150px;
    width: 200px;
    background: -webkit-repeating-radial-gradient(red, yellow 10%, green 15%); /* Safari 5.1 - 6.0 */
    background: -o-repeating-radial-gradient(red, yellow 10%, green 15%); /* Opera 11.6 - 12.0 */
    background: -moz-repeating-radial-gradient(red, yellow 10%, green 15%); /* Firefox 3.6 - 15 */
    background: repeating-radial-gradient(red, yellow 10%, green 15%); /* 标准的语法(必须放在最后) */
}
</style>
</head>
<body>
<h3>重复的径向渐变</h3>
<div id="grad1"></div>
<p><strong>注意:</strong> Internet Explorer 9 及之前的版本不支持渐变。</p>
</body>
</html>

