友盟消息推送
博主也是第一次使用友盟消息推送,其中的配置我也不需要多讲,在这里附上iOS客户端友盟消息推送的集成文档,并讲讲个人使用心得
iOS友盟消息推送集成文档
这里既有集成文档的讲解步骤,还有证书配置的指南,只需要按照步骤集成即可。
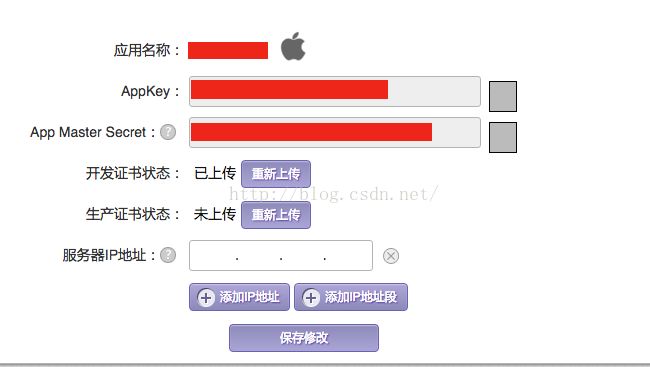
1、配置服务器地址
友盟消息推送后台:适配iOS9,在info.plist文件中按截图配置

以iOS9 SDK编译的工程会默认以SSL安全协议进行网络传输,即HTTPS,如果依然使用HTTP协议请求网络会报系统异常并中断请求。目前可用如下两种方式保持用HTTP进行网络连接:
A、在info.plist中加入安全域名白名单(右键info.plist用source code打开)
<key>NSAppTransportSecurity</key> <dict> <key>NSExceptionDomains</key> <dict> <key>msg.umengcloud.com</key> <dict> <key>NSIncludesSubdomains</key> <true/> <key>NSTemporaryExceptionAllowsInsecureHTTPLoads</key> <true/> <key>NSTemporaryExceptionMinimumTLSVersion</key> <string>TLSv1.1</string> </dict> </dict> </dict>
注:msg.umengcloud.com是友盟服务器的地址。
B、在info.plist的NSAppTransportSecurity下新增NSAllowsArbitraryLoads并设置为YES,指定所有HTTP连接都可正常请求
<key>NSAppTransportSecurity</key> <dict> <key>NSAllowsArbitraryLoads</key> <true/> </dict>公司API接口后台消息推送:
在博主标记之处天上请求后台的URL地址即可
2、创建应用,在这里,上传证书时一定要按照文档上的步骤来执行,一般在iOS客户端的开发环境下进行消息推送测试,如果能够获取 Device Token 了,而是用友盟消息后台发送消息失败那就只有证书原因了。
3、推送使用(具体参考友盟官方文档)
请先在友盟的消息推送管理后台中创建App,获得AppKey和AppSecret
-
导入SDK
- 下载 UMessage_Sdk_All_x.x.x.zip并解压缩
- 导入插件
所需SDK文件夹:
UMessage_Sdk_x.x.x
请在你的工程目录结构中,右键选择Add->Existing Files…,选择这个文件夹。或者将这个文件夹拖入XCode工程目录结构中,在弹出的界面中勾选Copy items into destination group's folder(if needed), 并确保Add To Targets勾选相应的target。 -
配置(可选)
- SDK采用ARC管理内存,非ARC项目也是默认支持,如遇问题,请联系我们
- 如果您使用了
-all_load,可能需要添加libz的库:
TARGETS-->Build Phases-->Link Binary With Libraries-->+-->libz.dylib
说明
SDK支持iOS 4.3+ -
添加代码
打开*AppDelegate.m,依次按照以下步骤集成:didFinishLaunchingWithOptions中的设置:
- (BOOL)application:(UIApplication *)application didFinishLaunchingWithOptions:(NSDictionary *)launchOptions { //set AppKey and AppSecret [UMessage startWithAppkey:@"your appkey" launchOptions:launchOptions]; #if __IPHONE_OS_VERSION_MAX_ALLOWED >= _IPHONE80_
 if(UMSYSTEM_VERSION_GREATER_THAN_OR_EQUAL_TO(@"8.0"))
 {
 //register remoteNotification types (iOS 8.0及其以上版本)
 UIMutableUserNotificationAction *action1 = [[UIMutableUserNotificationAction alloc] init];
 action1.identifier = @"action1_identifier";
 action1.title=@"Accept";
 action1.activationMode = UIUserNotificationActivationModeForeground;//当点击的时候启动程序

 UIMutableUserNotificationAction *action2 = [[UIMutableUserNotificationAction alloc] init]; //第二按钮
 action2.identifier = @"action2_identifier";
 action2.title=@"Reject";
 action2.activationMode = UIUserNotificationActivationModeBackground;//当点击的时候不启动程序,在后台处理
 action2.authenticationRequired = YES;//需要解锁才能处理,如果action.activationMode = UIUserNotificationActivationModeForeground;则这个属性被忽略;
 action2.destructive = YES;

 UIMutableUserNotificationCategory *categorys = [[UIMutableUserNotificationCategory alloc] init];
 categorys.identifier = @"category1";//这组动作的唯一标示
 [categorys setActions:@[action1,action2] forContext:(UIUserNotificationActionContextDefault)];

 UIUserNotificationSettings *userSettings = [UIUserNotificationSettings settingsForTypes:UIUserNotificationTypeBadge|UIUserNotificationTypeSound|UIUserNotificationTypeAlert
 categories:[NSSet setWithObject:categorys]];
 [UMessage registerRemoteNotificationAndUserNotificationSettings:userSettings];

 } else{
 //register remoteNotification types (iOS 8.0以下)
 [UMessage registerForRemoteNotificationTypes:UIRemoteNotificationTypeBadge
 |UIRemoteNotificationTypeSound
 |UIRemoteNotificationTypeAlert];
 }
#else

 //register remoteNotification types (iOS 8.0以下)
 [UMessage registerForRemoteNotificationTypes:UIRemoteNotificationTypeBadge
 |UIRemoteNotificationTypeSound
 |UIRemoteNotificationTypeAlert];

#endif
 //for log
 [UMessage setLogEnabled:YES];

 return YES;
}
didRegisterForRemoteNotificationsWithDeviceToken中设置
- (void)application:(UIApplication *)application didRegisterForRemoteNotificationsWithDeviceToken:(NSData *)deviceToken { [UMessage registerDeviceToken:deviceToken]; }
didReceiveRemoteNotification中设置
- (void)application:(UIApplication *)application didReceiveRemoteNotification:(NSDictionary *)userInfo { [UMessage didReceiveRemoteNotification:userInfo]; }
说明
如需关闭推送,请使用[UMessage unregisterForRemoteNotifications]
#pragma mark - APP接收到远程推送

- (void)application:(UIApplication *)application didReceiveRemoteNotification:(NSDictionary *)userInfo
{
    XNLog(@"收到新消息");
    //[UMessage didReceiveRemoteNotification:userInfo];
    //发送推送
    [[NSNotificationCenterdefaultCenter]postNotificationName:noti_refreshMsgByDidReceiveRemoteNotiobject:niluserInfo:nil];
}

// 在 iOS8系统中,还需要添加这个方法。通过新的 API注册推送服务
- (void)application:(UIApplication *)application didRegisterUserNotificationSettings:(UIUserNotificationSettings *)notificationSettings
{
    [application registerForRemoteNotifications];
}

//获取deviceToken
- (void)application:(UIApplication *)application didRegisterForRemoteNotificationsWithDeviceToken:(NSData *)deviceToken
{
    [UMessageregisterDeviceToken:deviceToken];
}

// 当 DeviceToken获取失败时,系统会回调此方法
- (void)application:(UIApplication *)application didFailToRegisterForRemoteNotificationsWithError:(NSError *)error
{
    NSLog(@"DeviceToken获取失败,原因:%@",error);
}
4、添加测试设备,进入友盟消息后台,友盟消息后台
通过获取deviceToken
- (void)application:(UIApplication *)application didRegisterForRemoteNotificationsWithDeviceToken:(NSData *)deviceToken
{
    [UMessage registerDeviceToken:deviceToken];
}

5、发送测试消息
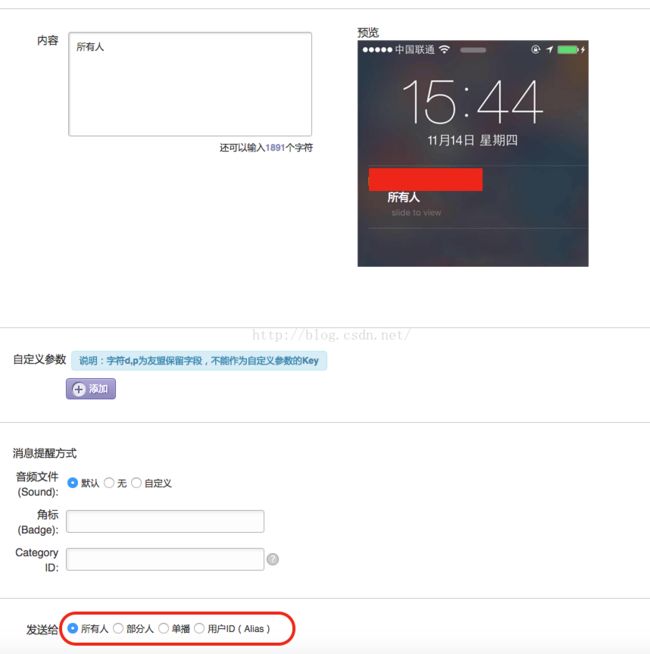
在开发环境之下,发送给所有人就是给添加过Device Token的测试设备进行发送消息;单播就是给特定的Device Token 发送消息
6、手机配置设置
通知—需要推送的APP— (按照自己的喜好设置,之前博主是因为开启了 “在锁定屏幕上显示“ ,所以发送消息之后一直接收不到,在锁屏上才能看到,去设置关闭之后,就能收到,要特别注意啊!)
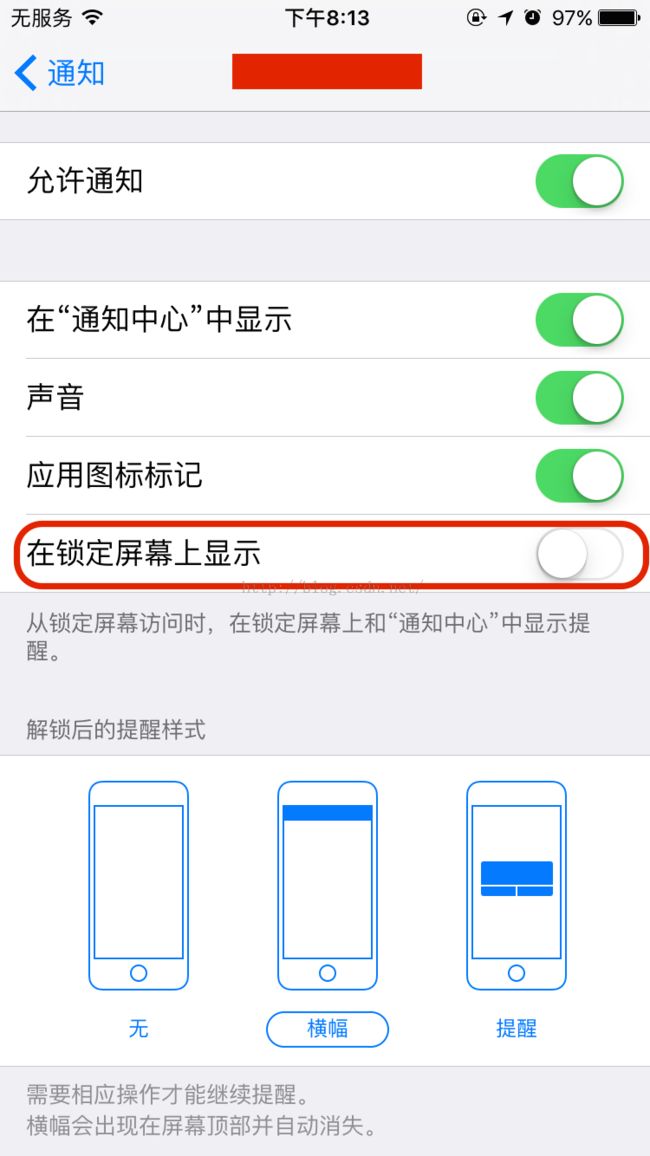
在手机上查看,还可设置角标,点击通知就可进入发送通知消息的APP中
博主在这里附上两篇文章参考
http://bbs.umeng.com/thread-6191-1-1.html
http://bbs.umeng.com/thread-9355-1-1.html