ubuntu 16.04 搭建lamp的苦逼经历
大致流程:
apache安装:
edemon@linux:~$ sudo apt install apache2
php安装:
edemon@linux:~$ sudo apt install php7.0-cli
……
Creating config file /etc/php/7.0/cli/php.ini with new version
mysql安装:
edemon@linux:~$ sudo apt install mysql-server
update-alternatives: using /etc/mysql/mysql.cnf to provide /etc/mysql/my.cnf (my.cnf) in auto mode
Checking if update is needed.
This installation of MySQL is already upgraded to 5.7.12, use –force if you still need to run mysql_upgrade
Setting up mysql-server (5.7.12-0ubuntu1) …
其他模块:
edemon@linux:~$ sudo apt-get install libapache2-mod-php7.0
检测php:
edemon@linux:~$ cat /etc/apache2/mods-enabled/php7.0.load
# Conflicts: php5
LoadModule php7_module /usr/lib/apache2/modules/libphp7.0.so
测试并开启服务:
edemon@linux:~ sudoservicemysqlrestartedemon@linux: sudo service apache2 restart
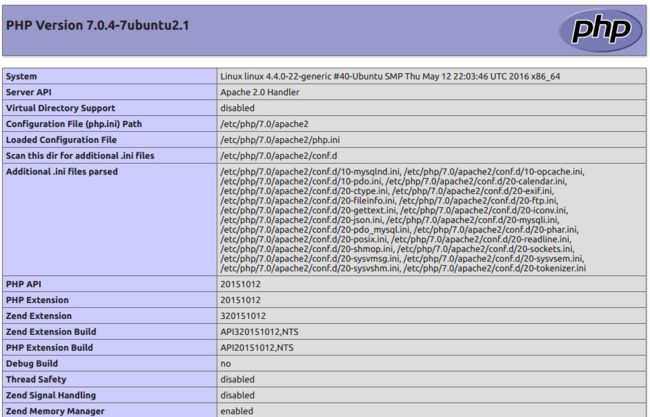
edemon@linux:~$ sudo vim /var/www/html/phpinfo.php
<?php echo phpinfo(); ?>

URL:
http://localhost/phpinfo.php
查看mysql服务:
edemon@linux:~$ service mysql status
● mysql.service - MySQL Community Server
Loaded: loaded (/lib/systemd/system/mysql.service; enabled; vendor preset: enabled)
Active: active (running) since 二 2016-06-07 09:37:40 CST; 8min ago
Process: 29705 ExecStartPost=/usr/share/mysql/mysql-systemd-start post (code=exited, status=0/SUCCESS)
Process: 29701 ExecStartPre=/usr/share/mysql/mysql-systemd-start pre (code=exited, status=0/SUCCESS)
Main PID: 29704 (mysqld)
CGroup: /system.slice/mysql.service
└─29704 /usr/sbin/mysqld
6月 07 09:37:39 linux systemd[1]: Starting MySQL Community Server…
6月 07 09:37:40 linux systemd[1]: Started MySQL Community Server.
安装phpmyadmin:
edemon@linux:~ sudochmod777/var/www[sudo]passwordforedemon:edemon@linux: sudo apt install phpmyadmin
sudo apt install php-mbstring
sudo apt install php-gettext
建立var/www/html/phpmyadmin软链接:
sudo ln -s /usr/share/phpmyadmin /var/www/html/phpmyadmin
php配置文件php.ini:
edemon@linux:/etc/php/7.0/apache2$ ls
conf.d php.ini
display_errors = On(显示错误日志)
extension=php_mbstring.dll (开启mbstring)
重启apache:
sudo /etc/init.d/apache2 restart
因为默认安装phpmyadmin时会安装apahce和php等依赖包,由于是16.04系统,会默认安装php7.0,php7.0又没有默认自带php-mbstring,php-gettext这两个包,所以会报错。
重要的查找和命令:
phpmyadmin相关文件:
/var/lib/dpkg/info/phpmyadmin.postinst
mysql相关文件:
edemon@linux:~$ whereis mysql
mysql: /usr/lib/mysql /etc/mysql /usr/share/mysql
edemon@linux:/etc/mysql$ ls
conf.d debian-start my.cnf.fallback mysql.conf.d
debian.cnf my.cnf mysql.cnf
edemon@linux:/usr/lib/mysql$ ls
lz4_decompress plugin resolve_stack_dump zlib_decompress
edemon@linux:/usr/share/mysql$ ls
bulgarian magic
charsets my-default.cnf
czech mysqld_multi.server
danish mysql-log-rotate
debian_create_root_user.sql mysql_security_commands.sql
debian-start.inc.sh mysql_sys_schema.sql
dictionary.txt mysql-systemd-start
docs mysql_system_tables_data.sql
dutch mysql_system_tables.sql
echo_stderr mysql_test_data_timezone.sql
english norwegian
errmsg-utf8.txt norwegian-ny
estonian polish
fill_help_tables.sql portuguese
french romanian
german russian
greek serbian
hungarian slovak
innodb_memcached_config.sql spanish
install_rewriter.sql swedish
italian ukrainian
japanese uninstall_rewriter.sql
korean
查找文件:
edemon@linux:~$ sudo find / -name filename
关于apparmor:
http://manpages.ubuntu.com/manpages/xenial/en/man7/apparmor.7.html
后来发现这样命令安装的后果是mysql根本不能正常使用,可能是自己的系统升级后,原来的mysql没啦,但是残余软件还在,导致安装出现了问题。所以最后还是老老实实的用安装包安装吧
换用安装包安装
安装顺序:
mysql-common_5.7.13-1ubuntu16.04_amd64.deb
mysql-community-client_5.7.13-1ubuntu16.04_amd64.deb
mysql-client_5.7.13-1ubuntu16.04_amd64.deb
mysql-community-server_5.7.13-1ubuntu16.04_amd64.deb
安装mysql server时产生软件依赖问题:
mysql-community-server depends on apparmor; however:
Package apparmor is not installed.
mysql-community-server depends on libmecab2 (>= 0.996-1.2ubuntu1); however:
Package libmecab2 is not installed.
那就先安装上:
sudo apt -f install apparmor libmecab2
然后mysql-community-server,mysql-server就能正常使用了。
mysql -u root -p

mysql> select now(); +---------------------+
| now() | +---------------------+
| 2016-06-08 11:42:47 | +---------------------+
1 row in set (0.00 sec)
mysql> exit;
Bye解决原则
安装软件和之前的产生冲突——删除所有的残余文件!
什么文件不能正常使用——删除!
软件依赖——缺啥装啥!
—————————————————————————————————————————————————————————————————————————-
幕后:
后期mysql安装出现各种错误,所以尝试过使用官网安装源:http://dev.mysql.com/downloads/repo/apt/
使用方法:http://dev.mysql.com/doc/mysql-apt-repo-quick-guide/en/
为了保证顺利安装,删除所有的mysql残余文件。
sudo find / -name mysql
sudo rm -r filename
使用安装源的注意事项:
Note
Once the MySQL APT repository is enabled on your system, you will no longer be able to install any MySQL packages from your platform’s native software repositories until the MySQL APT repository is disabled.
输入密码的注意事项:
Important
Make sure you remember the root password you set. Users who want to set a password later can leave the passwordfield blank in the dialogue box and just press OK; in that case, root access to the server will be authenticated by The Socket Peer-Credential Authentication Plugin for connections using a Unix socket file. You can set the root password later using the program mysql_secure_installation.
edemon@linux:~$ sudo service mysql status
● mysql.service - MySQL Community Server
Loaded: loaded (/lib/systemd/system/mysql.service; enabled; vendor preset: en
Active: inactive (dead)
# MySQL systemd service file
我发现这并没有什么×用
/lib/systemd/system/mysql.service的内容:
[Unit]
Description=MySQL Community Server
After=network.target
[Install]
WantedBy=multi-user.target
[Service]
User=mysql
Group=mysql
PermissionsStartOnly=true
ExecStartPre=/usr/share/mysql/mysql-systemd-start pre
ExecStart=/usr/sbin/mysqld
ExecStartPost=/usr/share/mysql/mysql-systemd-start post
TimeoutSec=600
Restart=on-failure
RuntimeDirectory=mysqld
RuntimeDirectoryMode=755
——————————————————————————————————————————————————————————————————————————–
其他参考
删除mysql:
删除mysql
1.sudo apt-get autoremove –purge mysql-server-5.5
2.sudo apt-get remove mysql-common
清理残留数据
dpkg -l |grep ^rc|awk ‘{print $2}’ |sudo xargs dpkg -P
重新安装mysql
1.sudo apt-get install mysql-server
2.sudo apt-get install mysql-client
3.sudo apt-get install php5-mysql
ubuntu16.04 LAMP环境搭建URL:
http://www.tuicool.com/articles/2Evyq2V
常见依赖问题
正在设置 mysql-server-5.5 (5.5.27-0ubuntu2) …start: Job failed to startinvoke-rc.d: initscript mysql,
action “start” failed.dpkg: error processing mysql-server-5.5 (–configure): 子进程 已安装 post-installation 脚本 返回了错误号 1dpkg: dependency problems prevent configuration of mysql-server: mysql-server 依赖于 mysql-server-5.5;然而: 软件包 mysql-server-5.5 尚未配置。dpkg: error processing mysql-server (–configure): 依赖关系问题 - 仍未被配置因为错误消息指示这是由于上一个问题导致的错误,没有写入 apport 报告。
在处理时有错误发生: mysql-server-5.5 mysql-serverE: Sub-process /usr/bin/dpkg returned an error code (1)
这个问题刚好之前我遇到过,一段时间一直困扰着我,但是经过我的研究,慢慢摸索,也查阅了相关的资料,终于把这个问题顺利解决了,现在我就把这个问题的解决办法分享给大家,让更多的人知道。
在删除mysql前 需要先删除一下 /var/lib/mysql 还有 /etc/mysql
需要输入以下几条命令:
sudo rm /var/lib/mysql/ -Rsudo rm /etc/mysql/ -R
sudo apt-get autoremove mysql* –purge
sudo apt-get remove apparmor
sudo apt-get install mysql-server mysql-common
从上到下依次输入命令敲回车,等这些命令都执行完之后,会重新装Mysql数据库,到重新安装出现输入密码的操作的时候说明你的问题已经解决了!
配置 MySQL 的管理员密码:
sudo mysqladmin -u root password newpassword


