Dubbo教程持续集成篇--SonarQube代码质量管理平台的配置与使用
一、SonarQube的配置(前提,先用admin用户登录)
1、 安装中文汉化包:
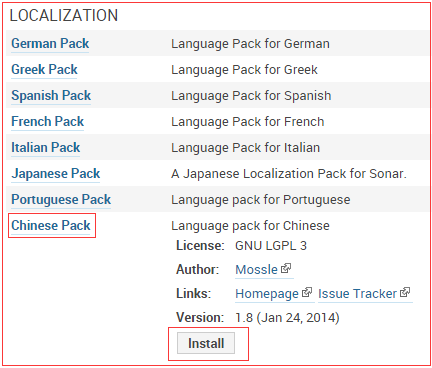
Setting >> Update Center >> AvailablePlugins >> LOCALIZATION >> Chinese Pack
>> Install
安装完汉化包之后需要重启SonarQube才能生效(重启前可顺便把CheckStyle、PMD等插件安装一下)
# /root/sonarqube/bin/linux-x86-64/sonar.shrestart
Stopping SonarQube...
Stopped SonarQube.
Starting SonarQube...
Started SonarQube.
重启完之后刷新SonarQube:http://192.168.4.221:9090/sonarqube/
汉化成功(注意,汉化包并没有完全汉化),重新登录
2、 MyEclipse/Eclipse中安装SonarQube插件的安装、配置、使用:
http://docs.sonarqube.org/display/SONAR/SonarQube+in+Eclipse
http://docs.sonarqube.org/display/SONAR/Installing+SonarQube+in+Eclipse
http://docs.sonarqube.org/display/SONAR/Configuring+SonarQube+in+Eclipse
http://docs.sonarqube.org/display/SONAR/Working+with+SonarQube+in+Eclipse
(请参考官方文档操作,在此不作讲解,我们重点讲SonarQube结合Maven插件的使用)
3、 Maven分析器插件的配置与使用
http://docs.sonarqube.org/display/SONAR/Installing+and+Configuring+Maven
在Maven本地库中的settings.xml(我这里是settings_edu.xml)配置文件中的
<profiles></profiles>节点中添加如下配置:
<profile>
<id>sonar</id>
<activation>
<activeByDefault>true</activeByDefault>
</activation>
<properties>
<!-- Example forMySQL-->
<sonar.jdbc.url>
jdbc:mysql://192.168.4.221:3306/sonarqube?useUnicode=true&characterEncoding=utf8
</sonar.jdbc.url>
<sonar.jdbc.username>root</sonar.jdbc.username>
<sonar.jdbc.password>wusc.321</sonar.jdbc.password>
<!-- OptionalURL to server. Default value is http://localhost:9000 -->
<sonar.host.url>http://192.168.4.221:9090/sonarqube</sonar.host.url>
</properties>
</profile>
使用Maven分析器进行分析,命令:
纯Maven命令:mvn clean install sonar:sonar
MyEclipse中执行:clean install sonar:sonar
(如果你是第一次运行此命令,看执行日志你会发现它会先下载sonar-runner等插件)
成功执行完分析命令后便可到Web Server中查看代码质量分析结果数据。
4、 配置:
(1) 配置
(2) 权限
(3) 系统
5、 质量配置介绍(切换默认配置)
6、 代码规则介绍(自定义规则)
7、 问题处理介绍(质量管理的体现)
8、 指表
9、 仪表盘(自定义)
参考内容教程
