S5PV210(TQ210)学习笔记——触摸屏驱动编写
转载:http://blog.csdn.net/girlkoo/article/details/8756731
电阻式触摸屏的驱动比较简单,可以采用输入子系统驱动框架来编写,而电容式触摸屏的驱动程序相对比较复杂,因为电容触控一般采用I2C接口控制,我在自己编写电容触控驱动的时候郁闷了好几天,当然,并不是因为I2C电容触控驱动繁琐,主要是天嵌TQ210的触摸屏驱动程序是以模块方式提供的,并不开放源代码,也没有提供触控的芯片手册,我曾通过技术咨询群和电话咨询的方式咨询过天嵌相关人士,想跟他们索取触控协议而不要所谓的触控驱动程序源码,但是,天嵌相关人员以保密协议为由(尽管我完全不相信做LCD屏的商家会不告诉你怎么用屏)拒绝提供触控协议。我们不去追究这些无聊的问题,好在天嵌这样的公司(或者是与其合作开发的触摸屏驱动的公司)还没有实力自己做芯片,所以,只要找到触控芯片的型号并根据触控芯片型号找到对应的手册,然后就可以自己编写所谓的电容式触摸屏驱动了。
一 触控芯片分析
首先,卸下触摸屏的四个螺丝并翻过触摸屏来观察,可以在在触摸屏排线上看到触控芯片,仔细观察芯片型号(如果看不清可以用放大镜配合手电筒观看),我们可以看到,TQ210的触摸屏控制芯片是GT811,然后我找到了GT811的芯片手册(这些资料都上传到了我的CSDN资源里,请您支持一下),有了手册,编写驱动就不难了。
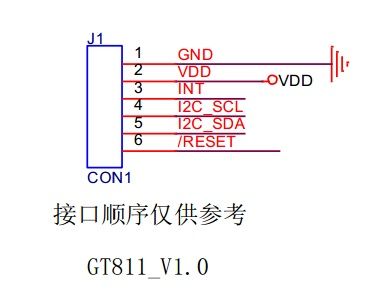
GT811引出了6根脚,分别是VCC、GND、I2CSDA、I2CSCL、INT和RESET,虽然INT脚不是必须的,但是开发高效省资源的触屏驱动程序往往都采用中断方式,下面是GT811的引脚图:
我用万能表实际测量了一下触控模块的各个引脚,实际线序是GND、SDA、SDL、INT、RESET和VDD。GT811的初始化顺序如下:
- (1) 初始化INT脚为悬浮输入态并初始化RESET脚为输出态,并输出低电平
- (2) 延时1ms
- (3) 初始化RESET脚为悬浮输入态,并使能上拉
- (4) 写入GT811寄存器配置表
- (5) 根据需要配置INT脚
二 I2C驱动编写
I2C驱动也是基于总线结构的,不过分为两种,一种是Legacy方式,另一种是New Style方式,其中,Legacy方式在新内核中已经不支持了,不过韦东山老师的视频中还是分析的Legacy方式,New Style方式你可以自己用Source Insight追踪分析一下,我这里就不多说了,具体的可以参考下面的代码。
- #include <linux/module.h>
- #include <linux/input.h>
- #include <linux/i2c.h>
- #include <linux/gpio.h>
- #include <linux/delay.h>
- #include <linux/input.h>
- #include <plat/gpio-cfg.h>
- #include <linux/interrupt.h>
- const static unsigned short normal_address[] = {0x5d, I2C_CLIENT_END};
- static unsigned gt811_rst;
- static unsigned gt811_int;
- static struct input_dev *ts_input;
- static struct workqueue_struct *wq;
- static struct work_struct work;
- static struct i2c_client * this_client = NULL;
- static unsigned int status = 0;
- static int i2c_read_bytes(struct i2c_client *client, uint8_t *buf, int len)
- {
- struct i2c_msg msgs[2];
- int ret=-1;
- msgs[0].flags=!I2C_M_RD;
- msgs[0].addr=client->addr;
- msgs[0].len=2;
- msgs[0].buf=&buf[0];
- msgs[1].flags=I2C_M_RD;
- msgs[1].addr=client->addr;
- msgs[1].len=len-2;
- msgs[1].buf=&buf[2];
- ret=i2c_transfer(client->adapter,msgs, 2);
- return ret;
- }
- static int i2c_write_bytes(struct i2c_client *client,uint8_t *data,int len)
- {
- struct i2c_msg msg;
- int ret=-1;
- msg.flags=!I2C_M_RD;
- msg.addr=client->addr;
- msg.len=len;
- msg.buf=data;
- ret=i2c_transfer(client->adapter,&msg, 1);
- return ret;
- }
- static const struct i2c_device_id ts_id[] = {
- { "tq210-ts", 0 },
- { }
- };
- static int ts_init_panel(struct i2c_client *client){
- short ret=-1;
- uint8_t config_info[] = {
- 0x06,0xA2,
- 0x12,0x10,0x0E,0x0C,0x0A,0x08,0x06,0x04,0x02,0x00,0xE2,0x53,0xD2,0x53,0xC2,0x53,
- 0xB2,0x53,0xA2,0x53,0x92,0x53,0x82,0x53,0x72,0x53,0x62,0x53,0x52,0x53,0x42,0x53,
- 0x32,0x53,0x22,0x53,0x12,0x53,0x02,0x53,0xF2,0x53,0x0F,0x13,0x40,0x40,0x40,0x10,
- 0x10,0x10,0x0F,0x0F,0x0A,0x35,0x25,0x0C,0x03,0x00,0x05,0x20,0x03,0xE0,0x01,0x00,
- 0x00,0x34,0x2C,0x36,0x2E,0x00,0x00,0x03,0x19,0x03,0x08,0x00,0x00,0x00,0x00,0x00,
- 0x14,0x10,0xEC,0x01,0x00,0x00,0x00,0x00,0x00,0x00,0x00,0x00,0x00,0x00,0x0D,0x40,
- 0x30,0x3C,0x28,0x00,0x00,0x00,0x00,0xC0,0x12,0x01
- };
- config_info[62] = 480 >> 8;
- config_info[61] = 480 & 0xff;
- config_info[64] = 800 >> 8;
- config_info[63] = 800 & 0xff;
- ret = i2c_write_bytes(client, config_info, sizeof(config_info)/sizeof(config_info[0]));
- if(ret < 0) {
- printk(KERN_ERR "GT811 Send config failed!\n");
- return ret;
- }
- return 0;
- }
- static irqreturn_t gt811_int_handler(int irq, void *devid){
- disable_irq_nosync(this_client->irq);
- queue_work(wq, &work);
- return IRQ_RETVAL(IRQ_HANDLED);
- }
- static void ts_work_func(struct work_struct* work){
- int ret;
- unsigned char point_data[19] = {0x07, 0x21, 0};
- unsigned short input_x = 0;
- unsigned short input_y = 0;
- unsigned short input_p = 0;
- ret=i2c_read_bytes(this_client, point_data, sizeof(point_data)/sizeof(point_data[0]));
- if(ret <= 0){
- printk("Failed\n");
- return;
- }
- if(point_data[2]&0x1){
- status = 1;
- input_y = 479-((point_data[4]<<8)|point_data[5]);
- input_x = 799-((point_data[6]<<8)|point_data[7]);
- input_p = point_data[8];
- printk("stat: %d, x: %d, y: %d, p: %d\n", point_data[2], input_x, input_y,
- input_p);
- }
- else if(status){
- status = 0;
- printk("up\n");
- }
- enable_irq(this_client->irq);
- }
- static int ts_probe(struct i2c_client *client, const struct i2c_device_id *id){
- int retry, ret;
- char test_data;
- printk("ts_probe\n");
- test_data = 0;
- gt811_rst = S5PV210_GPD0(3);
- gt811_int = S5PV210_GPH1(6);
- gpio_request(gt811_rst, "reset");
- gpio_request(gt811_rst, "tsint");
- if (!i2c_check_functionality(client->adapter, I2C_FUNC_I2C))
- {
- dev_err(&client->dev, "Must have I2C_FUNC_I2C.\n");
- return -ENODEV;
- }
- s3c_gpio_setpull(gt811_rst, S3C_GPIO_PULL_UP);
- for(retry=0;retry < 5; retry++)
- {
- gpio_direction_output(gt811_rst, 0);
- msleep(1);
- gpio_direction_input(gt811_rst);
- msleep(100);
- ret =i2c_write_bytes(client, &test_data, 1);
- if (ret > 0)
- break;
- dev_info(&client->dev, "GT811 I2C TEST FAILED!Please check the HARDWARE connect\n");
- }
- if(ret <= 0)
- {
- dev_err(&client->dev, "Warnning: I2C communication might be ERROR!\n");
- return -ENODEV;
- }
- for(retry = 0; retry != 5; ++ retry){
- ret = ts_init_panel(client);
- if(ret != 0){
- continue;
- }
- else{
- break;
- }
- }
- if(ret != 0){
- printk("GT811 Configue failed!\n");
- return -ENODEV;
- }
- this_client = client;
- ts_input = input_allocate_device();
- if(IS_ERR(ts_input)){
- printk("GT811 allocate ts input device failed!\n");
- return -ENOMEM;
- }
- ts_input->evbit[0] = BIT_MASK(EV_SYN) | BIT_MASK(EV_KEY) | BIT_MASK(EV_ABS) ;
- ts_input->keybit[BIT_WORD(BTN_TOUCH)] = BIT_MASK(BTN_TOUCH);
- ts_input->absbit[0] = BIT(ABS_X) | BIT(ABS_Y) | BIT(ABS_PRESSURE);
- input_set_abs_params(ts_input, ABS_Y, 0, 799, 0, 0);
- input_set_abs_params(ts_input, ABS_X, 0, 479, 0, 0);
- input_set_abs_params(ts_input, ABS_PRESSURE, 0, 255, 0, 0);
- ts_input->name = "tq210-ts";
- ts_input->phys = "input/ts";
- ts_input->id.bustype = BUS_I2C;
- ts_input->id.product = 0xBEEF;
- ts_input->id.vendor =0xDEAD;
- ret = input_register_device(ts_input);
- if(ret < 0){
- printk("Unable register %s input device!\n", ts_input->name);
- input_free_device(ts_input);
- return -ENOMEM;
- }
- client->irq = IRQ_EINT(14);
- s3c_gpio_setpull(gt811_int, S3C_GPIO_PULL_UP);
- if(request_irq(IRQ_EINT(14), gt811_int_handler, IRQF_TRIGGER_FALLING, "gt811-int", NULL) < 0){
- printk("Request irq for gt811 failed!\n");
- input_unregister_device(ts_input);
- input_free_device(ts_input);
- return -ENOMEM;
- }
- wq = create_workqueue("ts_handle_thread");
- if(wq == NULL){
- printk(KERN_ALERT "crete workqueue failed!\n");
- input_unregister_device(ts_input);
- input_free_device(ts_input);
- free_irq(IRQ_EINT(14), NULL);
- return -ENOMEM;
- }
- INIT_WORK(&work, ts_work_func);
- return 0;
- }
- static int ts_remove(struct i2c_client *client){
- free_irq(IRQ_EINT(14), NULL);
- enable_irq(client->irq);
- flush_workqueue(wq);
- destroy_workqueue(wq);
- input_unregister_device(ts_input);
- input_free_device(ts_input);
- gpio_free(gt811_rst);
- gpio_free(gt811_int);
- return 0;
- }
- static struct i2c_driver ts_driver = {
- .driver = {
- .name = "tq210-ts",
- .owner = THIS_MODULE,
- },
- .probe = ts_probe,
- .remove = ts_remove,
- .id_table = ts_id,
- .address_list = normal_address,
- };
- static int ts_init(void){
- printk("init\n");
- i2c_add_driver(&ts_driver);
- return 0;
- }
- static void ts_exit(void){
- i2c_del_driver(&ts_driver);
- printk("exit\n");
- }
- module_init(ts_init);
- module_exit(ts_exit);
- MODULE_LICENSE("GPL");
三 注册TS的I2C模块设备
- static struct i2c_board_info smdkv210_i2c_devs2[] __initdata = {
- /* To Be Updated */
- { I2C_BOARD_INFO("tq210-ts", 0x5d), },
- ;
四 tslib测试教程(ubuntu)
- sudo apt-get install git
2. 下载最新的tslib
- git clone https://github.com/kergoth/tslib
3. 安装auto
- sudo apt-get install autoconf automake libtool
4. 编译tslib
- ./autogen.sh
- mkdir tmp
- echo "ac_cv_func_malloc_0_nonnull=yes" >arm-linux.cache
- ./configure --host=arm-linux --cache-file=arm-linux.cache --prefix=$(pwd)/tmp
- make
- make install
5. 安装tslib
- cd tmp
- cp * /nfsroot/rootfs -rfd
6. 配置tslib
- 修改 /etc/ts.conf
- 将行
- # module_raw input
- 改为:
- module_raw input
- (实际上就是去掉高行的#号和第一个空格)
7. 配置tslib运行环境变量
- export TSLIB_TSDEVICE=/dev/input/event1 //这里需要根据自己的event位置进行修改,新内核在/dev/input/event*
- export TSLIB_CALIBFILE=/etc/pointercal
- export TSLIB_CONFFILE=/etc/ts.conf
- export TSLIB_PLUGINDIR=/lib/ts
- export TSLIB_CONSOLEDEVICE=none
- export TSLIB_FBDEVICE=/dev/fb0
8. 校正(电容屏实际上不需要校正,仅为了测试触屏驱动)
- 运行ts_calibrate,并根据提示进行校正
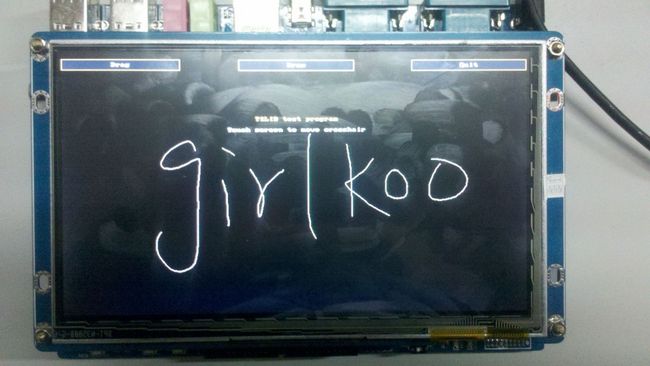
9. 自由画图
- 运行ts_test,点击draw按钮,可以自由画图,效果如下图。

